Creating Custom Actions for the new Entra Inbound Provisioning API for automatic user provisioning
- Introduction
- Extending Provisioning Job Schema
- Extending the AttributeMapping.psd file
- Add Attribute Mappings for New SCIM Attributes in the Entra ID Portal
- Preprocessing API Import and generate the CSV File
- Components of a Github Action
- Create the Workflow
- Creating secrets for a repository
- Conclusion
Introduction
Pablo Picasso once said, “Good artists copy, great artists steal.” In our realms of IT and Security, this is often a common practice. Sometimes you get to read one article from an IT Professional sitting some thousand miles across the sea in a different part of the world and you think wow, this is incredible! Let’s just try to implement and play around with it. Pim Jacobs is one of those great IT Professionals, who can write such detailed lucid long-form articles that you can’t help but admire. What I admire most about Pim, is his attention to detail, he does not take shortcuts, do not assume for his readers, and explains Entra Identity Governance articles with the meticulous details of a novelist. I must grudgingly admit I am not a great writer like Pim, I lack his originality of thoughts. If you are not following Pim’s work on Identity Man, you are missing out on a lot of great content on Entra ID and Modern Workplace Management.
Recently I came across this wonderful blog by Pim and as usual, I was blown away by the details and the amount of work he put into it. I was so impressed that I decided to try it out myself.

I am not going to repeat what Pim has already explained in his blog, but I will try to explain the steps I took to implement the same and where I have differed from him, I will also try to explain the steps I took to create the Custom Github Actions using the new Entra Inbound Provisioning API for automatic user provisioning.
What I am to cover in this blog is a stripped-down version of Pim’s blog, where I would configure a similar capability with less Azure Footprint and less Azure Cost. I have already wrote a blog on this topic, you can read it here.
Use Case
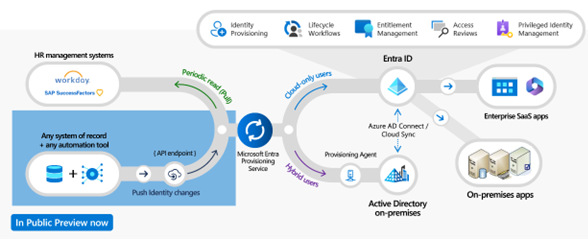
The use case is simple, our fictional organization SuryenduB uses HR Source (Bamboo HR) as our source of truth, We want to use this as the genesis of Identity Lifecycle Management. We also want to enrich the user’s profile information with information from Bamboo HR information like title, department, office location, etc. We want to do all this automatically without any manual intervention, periodically. Our Organization is a Cloud-First Organization, all our workloads, and developer workstations are Entra Joined. All the LOB Applications are hosted in Azure and use Entra ID for Single Sign On and SCIM-Based Provisioning. This is where we differ from Pim’s use case, he uses an on-premises AD for Target Application. Here are high-level steps we will follow to implement this use case.
Entra ID Configuration
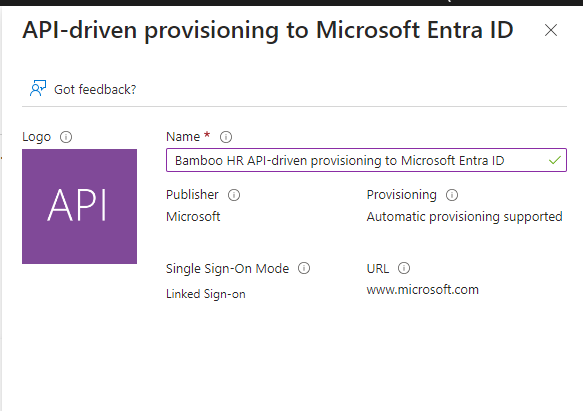
Pim has explained this in detail in his blog, In our use case we will follow the instructions, with a significant change. We will use the App, API-driven provisioning to Microsoft Entra ID instead of API-driven provisioning to Active Directory. This is because we do not have an on-premises AD, we will use the Entra ID to create Cloud Only User Object.
Please add a user-friendly name for the App, I have used Bamboo HR API-driven provisioning to Microsoft Entra ID. We will use the Client ID and Client Secret in our Powershell Script.
.
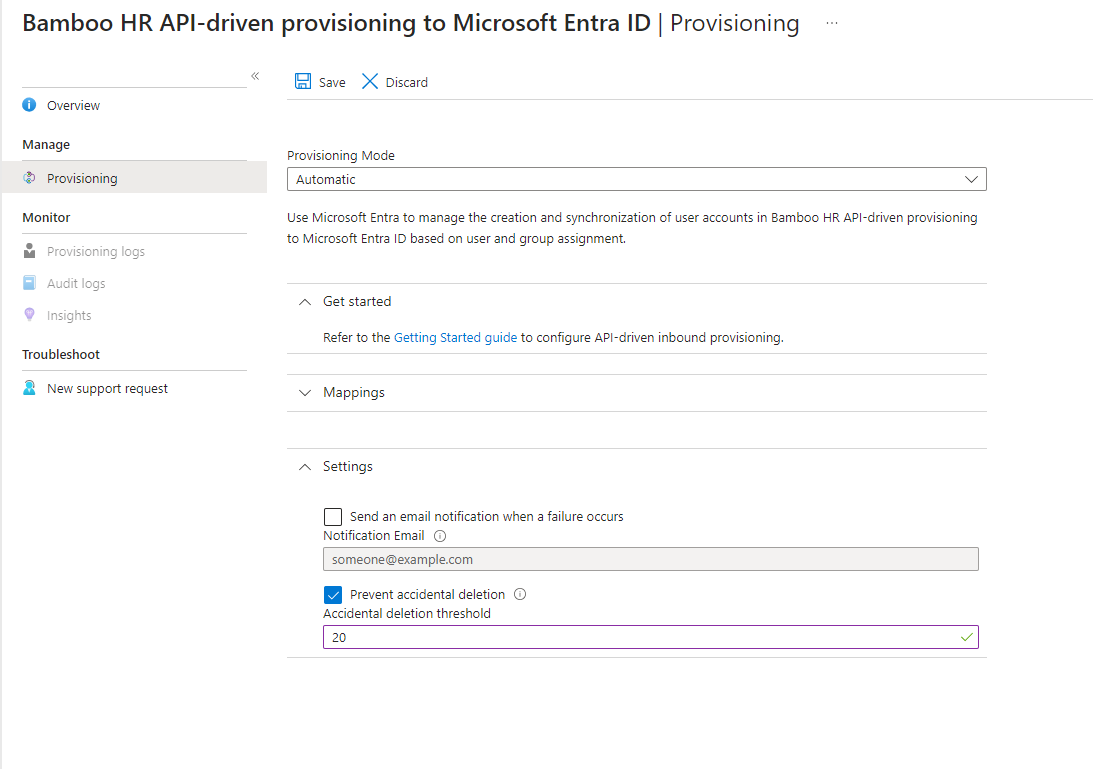
After creating the application we need to go to the Provisioning blade and click on Get Started.
After setting the Provisioning Mode to Automatic, we will add a valid notification email ID and Prevent accidental deletion threshold. Like PIM I have also set the threshold to 20, you can set it to a lower value if you want.
API Client Configuration
- Bamboo HR exposes API, which we will use to get the user information.
- We will use the
Invoke-RestMethodto get the user information from Bamboo HR. - We will implement our business use case in Powershell to iterate through the user information and create a SCIM payload.
- Our Powershell Script will send a Post Request to the Entra Bulk Upload endpoint.
- Entra will process the SCIM payload received attribute mapping rules and complete user provisioning
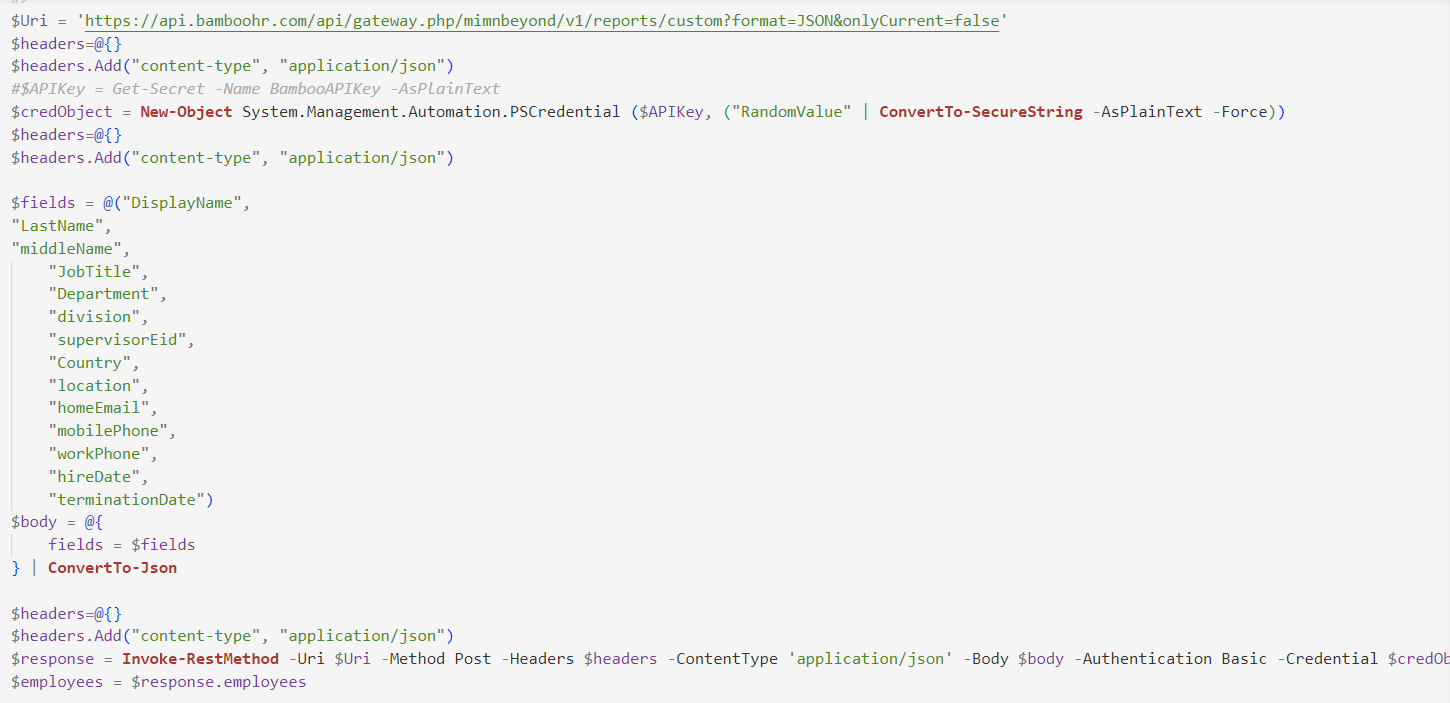
Follow the steps explained in Pim’s blog to create the API Key for Bamboo HR and save it in a secure location. We will use this API Key in our Powershell Script. You can find the Powershell Script here.
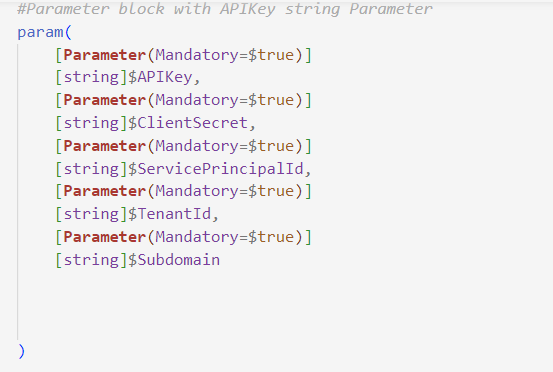
In Our Powershell API Client, we will consume the API Key as a parameter to be stored in GitHub Secrets. We will also consume the Entra ID Client ID and Client Secret as parameters to be stored in GitHub Secrets. We will also consume the Entra ID Tenant ID as a parameter to be stored in GitHub Variable.
’
I have followed the steps explained in Pim’s blog to create the Powershell Script. He has used the Azure logic app to trigger the APIs, whereas I have used the Powershell script to trigger the APIs. As the end goal of this blog is to create a Custom Github Action, to trigger the Powershell Script.
Create the APIKey in Bamboo HR using the steps explained in Pim’s blog.

Bamboo HR expects the API key to be sent as a username as Basic Authentication any random string can be sent as a password. We will use the APIKey as the username and RandomString as the password.


I have the following URI for calling Bamboo HR API. Replace the Value mimnBeyond for your Bamboo HR Subdomain.
 .
.
I have used the same fields from the Bamboo HR API response as Pim has used in his blog. You can add more fields if you want.
 .
.
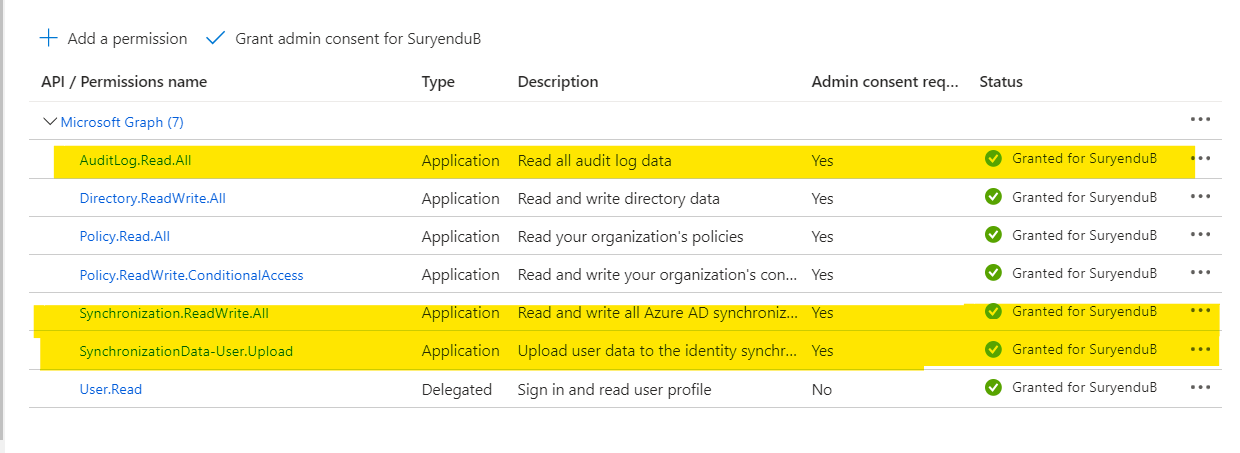
At this moment it is a good idea to add necessary permissions to the API Client in Entra ID. We will need the following permissions.
| Permisssion | Purpose |
|---|---|
| SynchronizationData-User.Upload | Perform a new bulk upload using the synchronization job. |
| AuditLog.Read.All | Allows the app to read and query your audit log activities, on behalf of the signed-in user. This is required to read the provisioning log status of the bulk upload job. |
| Synchronization.ReadWrite.All | Allows the app to configure the Azure AD synchronization service, on behalf of the signed-in user. This will be used in our powershell client to start and resume job, update the application schema based on our HR data input |
 .
.
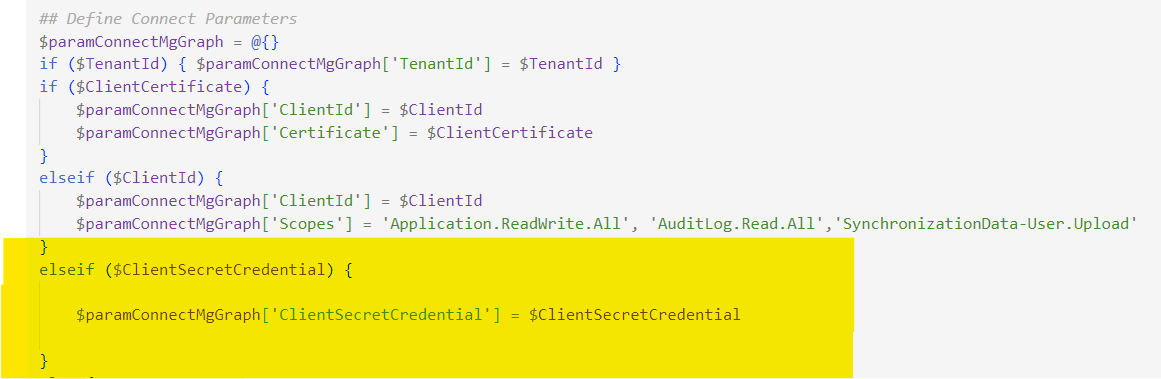
I have used the Standard Powershell Script from Microsoft in the next sections for the next actions in configuring our API Client. However, I have made some changes to the script to make it more usable as part of GitHub Actions.
-
Add Support for Client Secret Authentication.

-
Resolve a Bug in the Script for updating Synchronization Schema for User Objects in the Provisioning App. Bamboo HR API-driven provisioning to Microsoft Entra ID in the
Set-AzureADProvisioningAppSchemaFunction.
Extending provisioning job schema
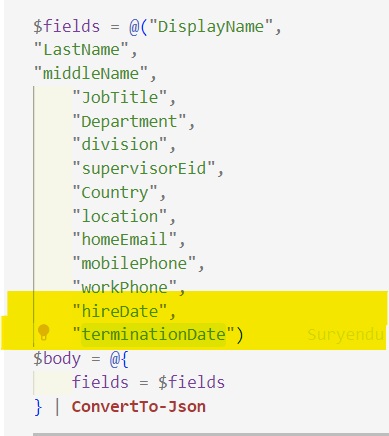
In our use case from the Bamboo HR API from All the fields we are generating after the preprocessing, we will need to add the following fields to the Provisioning Job Schema. Pim has explained using clickops process for extending the schema in his blog, I will explain the Powershell process for extending the schema. We will discuss the logic for preprocessing section later in the article.
| Field | Purpose |
|---|---|
| hiredate | Joining Date of the User. |
| terminationDate | This is added for terminated users and if it is in past, user will be deactivated. |
.
We need to run the following command in our pipeline to update the Provisioning Job Schema which reads all columns in the CSV file, adds them under an extension schema namespace, and updates the provisioning app schema.
.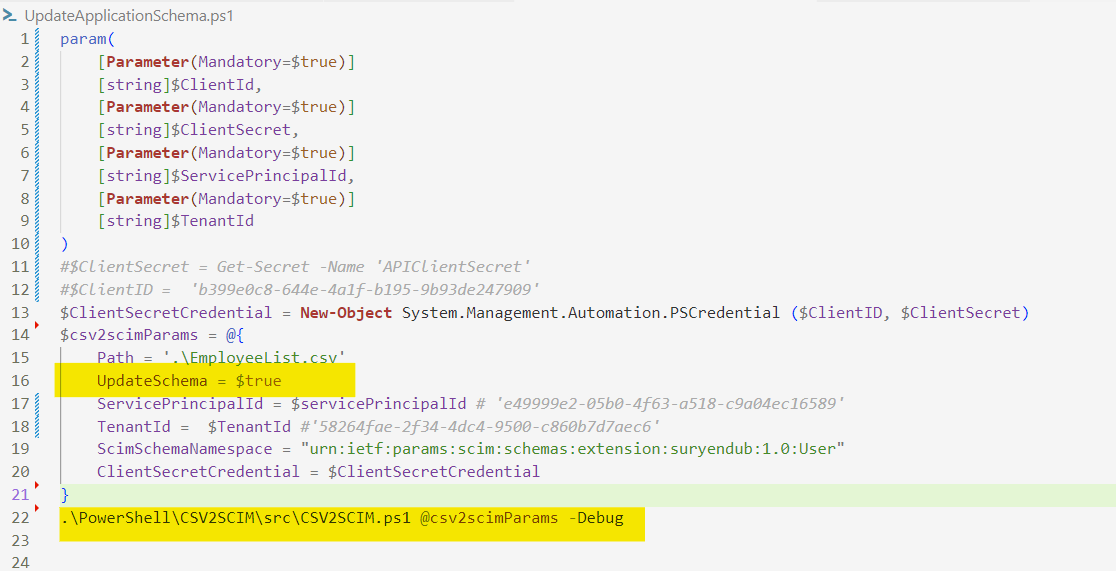
If the attribute extensions are already present in the provisioning app schema, then this mode only emits a warning that the attribute extension already exists.

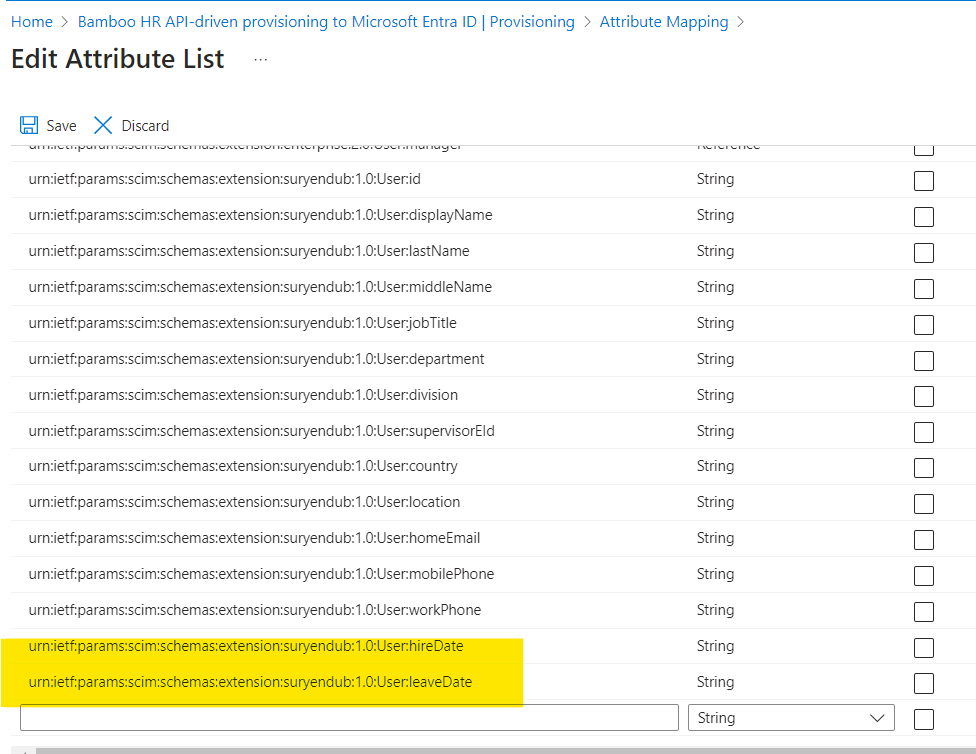
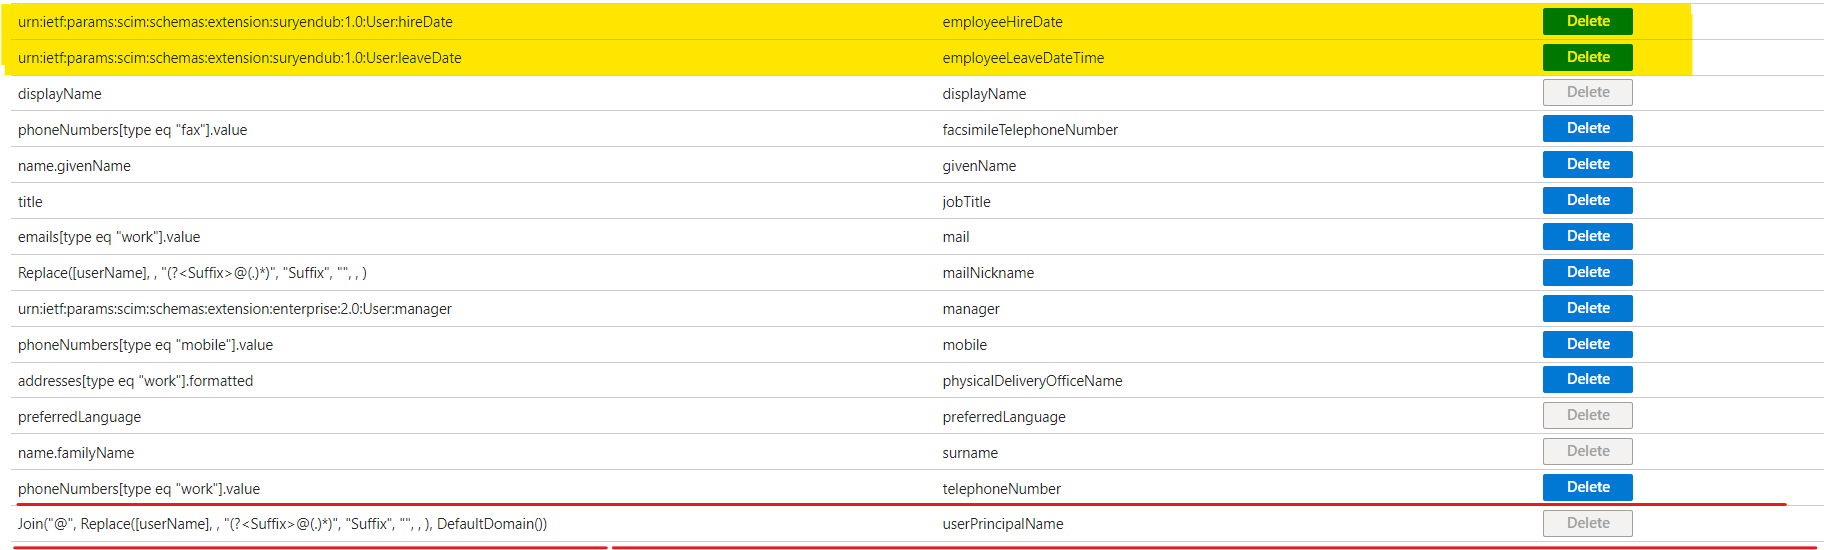
We can verify the schema update in the Entra ID Portal, for that again go to the ‘Provisioning’ tab, go to ‘Mappings’, and hit the **‘Users’ mapping. In here hit ‘Show advanced options’ and hit ‘Edit attribute list for API’.
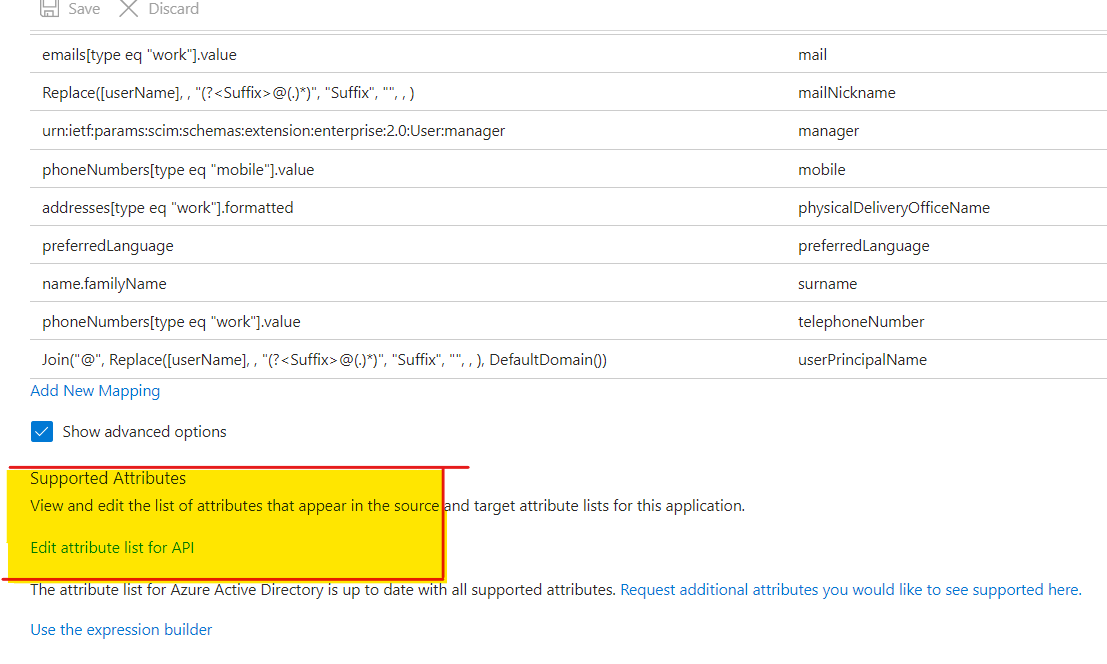
We can see the new attributes added to the schema.
 .
.
Extending the AttributeMapping.psd file
AttributeMapping.psd file is used to map the attributes from the CSV file to the SCIM payload. We will need to add the following fields to the sample AttributeMapping.psd file provided by Microsoft here.
 .
.
This is where I differed a little bit from Pim as I am only provisioning Cloud Only User Objects in Entra ID, I have not added the SamAccountName and ParentDistinguishedName attributes. I have only added the Hiredate and LeaveDate attributes.
Add Attribute Mappings for New SCIM Attributes in the Entra ID Portal
Once new Attributes are available we can use them in our Attribute Mappings. Go to the ‘Provisioning’ tab, go to ‘Mappings’ and hit the ‘Users’ mapping and select ‘Add New Mapping.
 .
.
For that select ‘Direct’ as the mapping type, select the ‘Source Attribute’ (from the API attribute list) and ‘Target attribute’ (from the Active Directory attribute list) and hit ‘OK’.
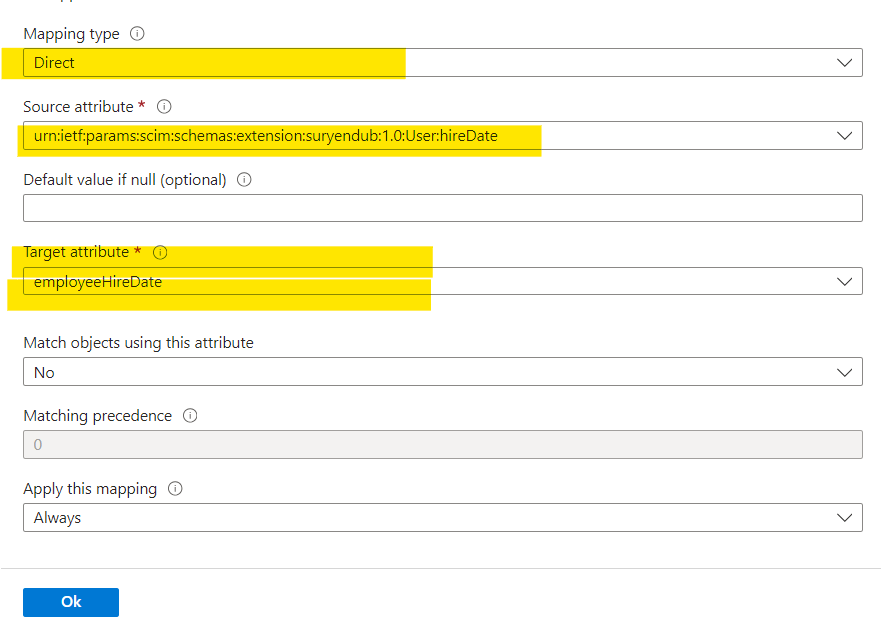 .
Repeat it for all the custom attributes you are adding to the schema.
.
Repeat it for all the custom attributes you are adding to the schema.
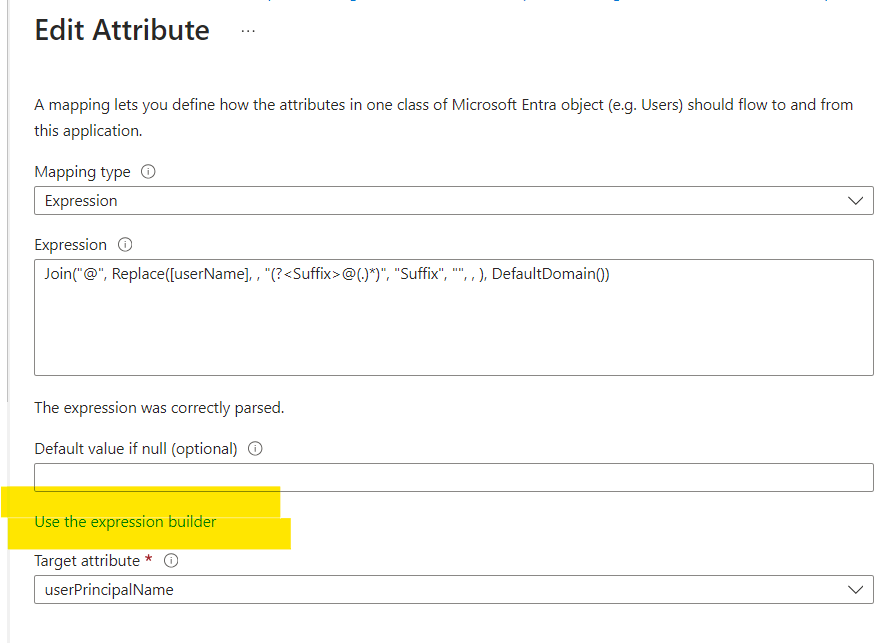
We will also modify the User Principal Name attribute that it gets only edited on ‘creation’. The provisioning service doesn’t provide the ability to check for duplicate userPrincipalName (UPN) and handle conflicts. If the default sync rule for the UPN attribute generates an existing UPN value, then the user create operation fails. To avoid this, we will modify the User Principal Name attribute mapping to add random string.
Click on the ‘User Principal Name’ attribute mapping.
Click on the Expression Builder and add the following expression in the Expression Input Box at the right side of the page.
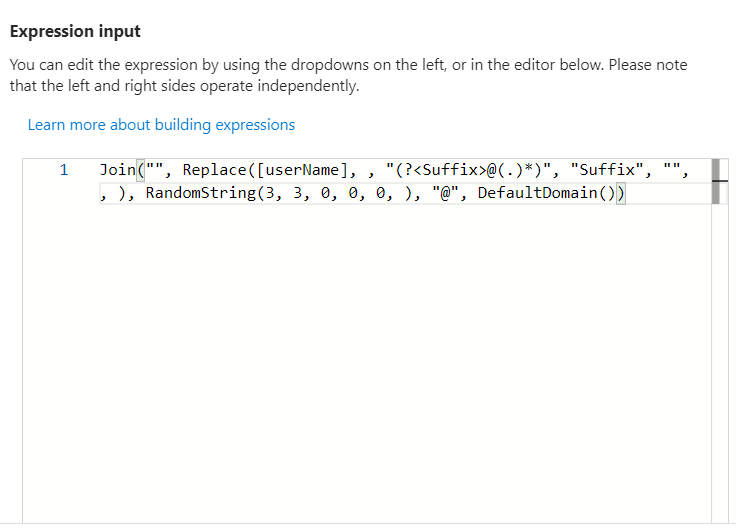
Join("", Replace([userName], , "(?<Suffix>@(.)*)", "Suffix", "", , ), RandomString(3, 3, 0, 0, 0, ), "@", DefaultDomain())
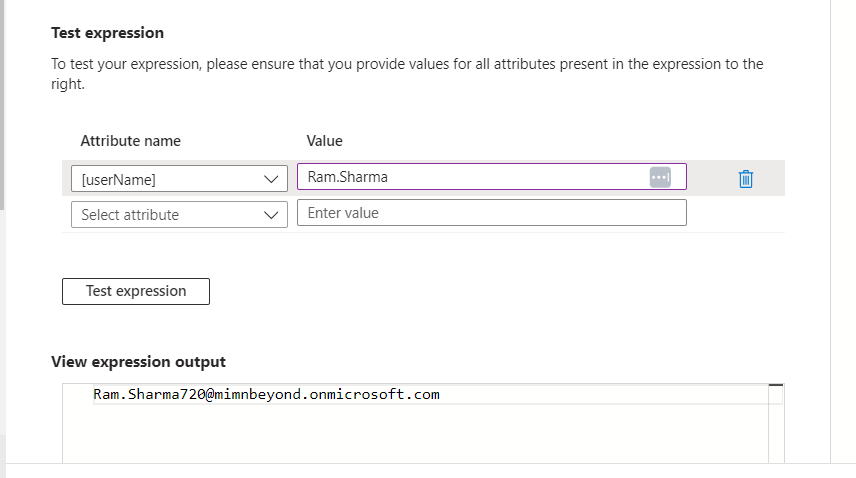
You can also test the Expression by providing a value for the [userName] attribute.
 .
.
When you are happy with the test result click on Apply Expression. Notice that the Apply this Mapping is set to ‘Only During Object Creation’. Click OK to save the changes.
 .
.
Once every thing is configured we can enable the provisioning service by clicking on the ‘Start provisioning’ button from the ‘Provisioning Overview’ page of the Provisioning Application.
Preprocessing API Import and generate the CSV File
We iterate through the user information from the Bamboo HR API and take the following actions.
-
The employee’s display name is used to generate a unique user ID by replacing spaces with dots and removing diacritics and special characters.
- The employee’s department is checked to determine their user type. If the department is not “Subcontractors”, the user type is set to “Employee”. Otherwise, it is set to “Subcontractor”.
- The hire date is formatted as a string in the ‘yyyy-MM-ddTHH:mm:ssZ’ format.
- The leave date and worker status are determined based on the termination date. If the termination date is not ‘0000-00-00’, the worker status is set to “Inactive” and the leave date is formatted as a string in the ‘yyyy-MM-ddTHH:mm:ssZ’ format. Otherwise, the worker status is set to “Active” and the leave date is not set.
After processing the employee data, a custom object is created using the [PSCustomObject] type accelerator. This object contains properties for the worker ID, worker status, worker type, first name, last name, full name, user ID, email, manager ID, hire date, leave date, department, job title, mobile phone, and office phone.
The custom object is added to the $ScimPayloadOutputResults array.
Once all employees have been processed, the $ScimPayloadOutputResults array is exported to a CSV file named ‘EmployeeList.csv’ using the Export-Csv cmdlet.
We will use this CSV file as the input for the Bulk Upload API.
 .
.
We could also generate the ‘User Principal Name’ in the Preprocessing Section, but I have decided to generate it in the Attribute Mapping as explained earlier.
Now we have finally managed to create all the artifacts required for the API Client. Now it is time to put everything together. We will now create a Custom Github Action to trigger the Powershell Script.
Components of a Github Action
In this step, we will look at how to create a Composite Custom Action that will call the Powershell Script APIDrivenProvisioningPowershell.ps1 and pass the parameters to the Powershell Script.
You need to know two salient facts about GitHub Actions.
- Github Actions are all in individual GitHub Repositories.
- They have an
action.ymlfile that defines the inputs, outputs, and configuration for the Action.
What we are going to create is a Composite Action that has a run property within action.yml that executes several steps. It has the following properties name, description, author.
This is followed by the inputs section. This is an optional property. When the action is run, an environment variable is created for each input. The value of the input is available to use in the action by using the syntax $.
| Item | required | Description |
|---|---|---|
| input_id | Yes | The name of the input. |
| description | Yes | A description of the input. |
| required | Yes | Whether the input is required. |
| default | No | The default value of the input. |
| deprecationMessage | No | Warning Message to let user know that this input is being deprecated. |
Some Github Actions return outputs. The outputs section defines the outputs for the action.
| Item | required | Description |
|---|---|---|
| output_id | Yes | The name of the output. |
| description | Yes | A description of the output. |
| value | No ( Yes for composite action). | The Value that output parameter will be mapped in to. |
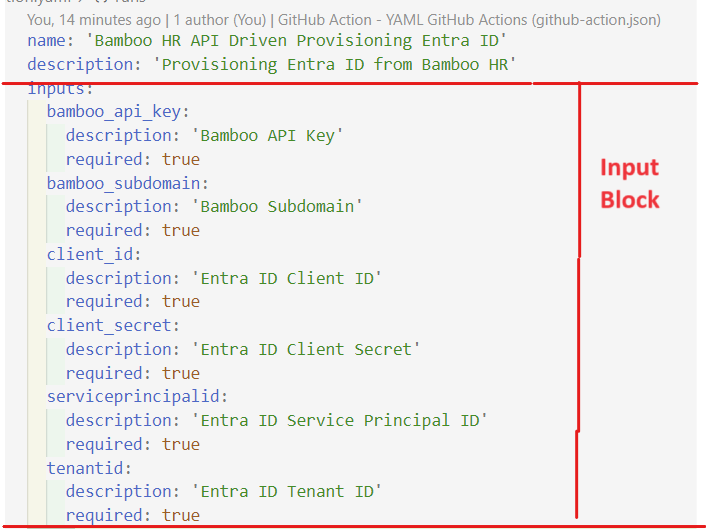
name: "APIDrivenProvisioning"
description: "This action triggers the APIDrivenProvisioningPowershell.ps1 script"
author: "Suryendu Bhattacharya"
inputs:
  APIKey:
    description: "API Key for Bamboo HR"
    required: true
  ClientID:
    description: "Client ID for Entra ID"
    required: true
  ClientSecret:
    description: "Client Secret for Entra ID"
    required: true
  TenantID:
    description: "Tenant ID for Entra ID"
    required: true
runs:
  using: "composite"
  steps:
    - name: Step 1
      run: |
        echo "Hello World"
      shell: bash
    - name: Step 2
      run: |
        echo "Hello World Again"
      shell: bash
branding:
  icon: "upload-cloud"
  color: "blue"
 .
.
We will use a Github action of Composite Type. This can run a set of actions in a sequence.
 .
.
We will use the following steps in our Composite Action to trigger the Powershell Script we have built in our previous section.
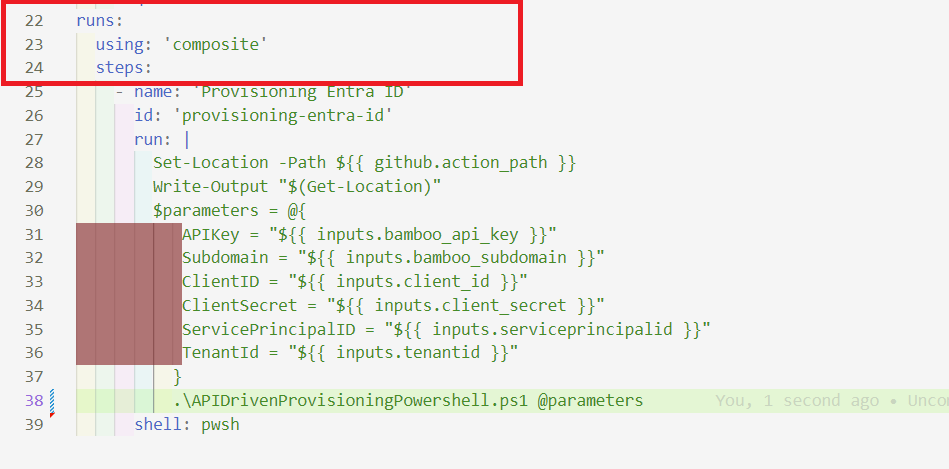
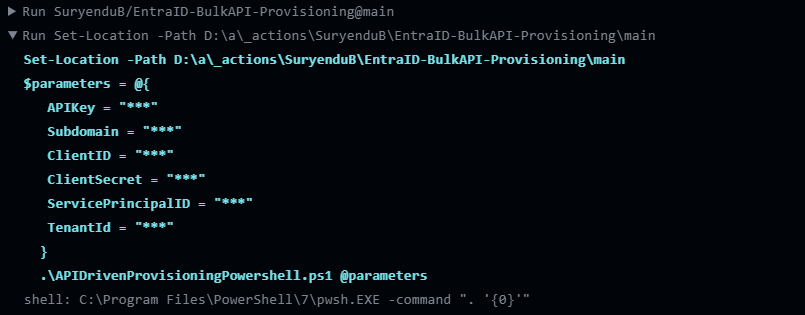
steps:
    - name: 'Provisioning Entra ID'
      id: 'provisioning-entra-id'
      run: |
        Set-Location -Path $
        $parameters = @{
           APIKey = "$"
           Subdomain = "$"
           ClientID = "$"
           ClientSecret = "$"
           ServicePrincipalID = "$"
           TenantId = "$"
          }
          .\APIDrivenProvisioningPowershell.ps1 @parameters
      shell: pwsh
We start by naming the step. “Provisioning Entra ID” and has an identifier of “provisioning-entra-id”. The ID is used to reference this step in subsequent steps or actions. We will not require it as we do not expect our script to return any output but for debugging purposes, it will be a good idea to have it. We are going to run the PowerShell script, enclosed within a multi-line string using the | symbol.
The first line within the script sets the current location to the path of the GitHub Actions workflow file.
Then we define the parameters hashtable for splatting. The values for the parameters are retrieved from the GitHub Actions workflow inputs using the $ syntax. These inputs are provided when the workflow is triggered when we create the workflow for using the workflow.
Finally, the .\APIDrivenProvisioningPowershell.ps1 @parameters line executes the APIDrivenProvisioningPowershell.ps1 script, passing the $parameters hashtable as arguments.
Create the Workflow
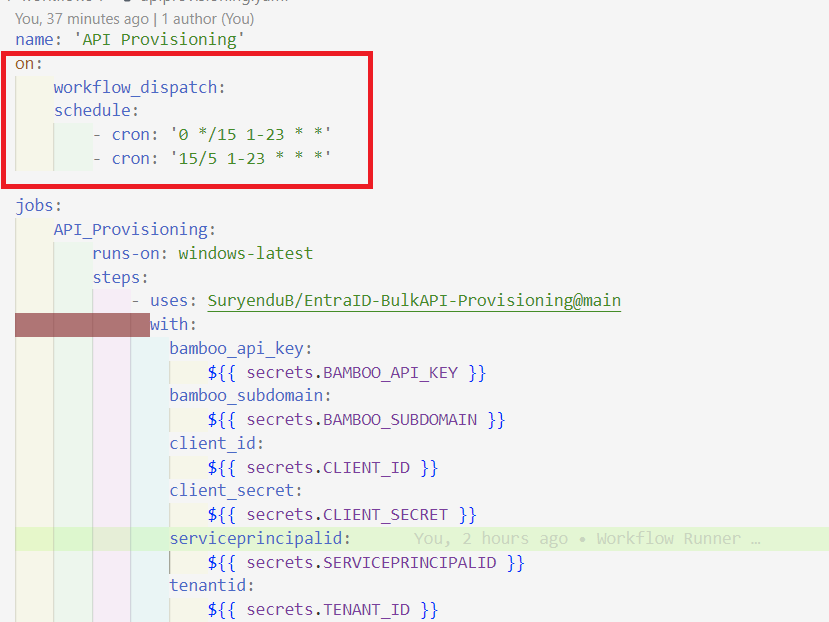
We can use this action in a standard workflow that runs on a schedule.
 .
.
The workflow is triggered by two events: “workflow_dispatch” allows manual triggering of the workflow, and “schedule” triggers the workflow based on a cron schedule.
The workflow has one job named “API_Provisioning” that runs on the latest version of Windows.
The job consists of a single step that uses the “SuryenduB/EntraID-BulkAPI-Provisioning” action which is the repository location of our Composite Action.
We have used the with statement to pass the parameters to the Composite Action. We have used the secrets statement to pass the sensitive parameters to the Composite Action. For the workflow to run, we need to create the following secrets in the repository.
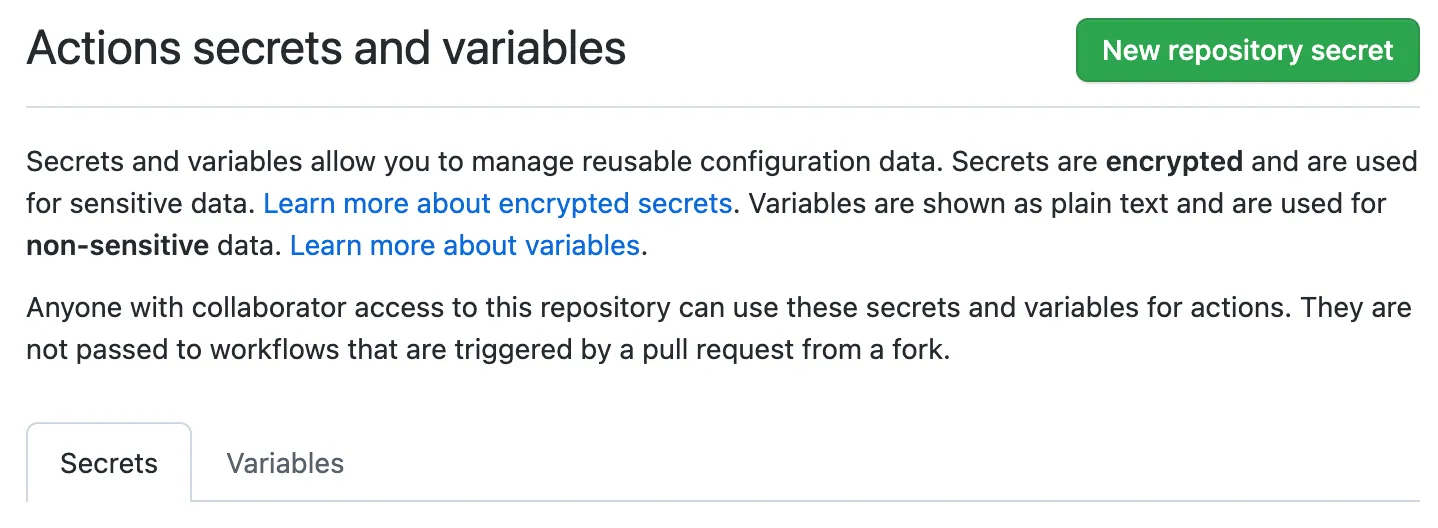
Creating secrets for a repository
-
Under your repository name, click Settings. If you cannot see the “Settings” tab, select the dropdown menu, then click Settings.

-
In the “Security” section of the sidebar, select Secrets and variables, then click Actions.
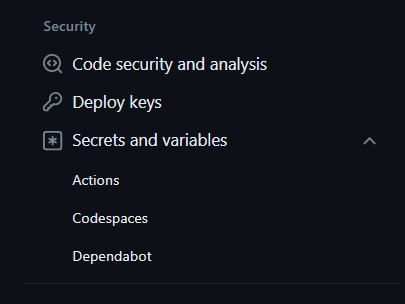
-
Click the Secrets tab.
-
Click New repository secret.
-
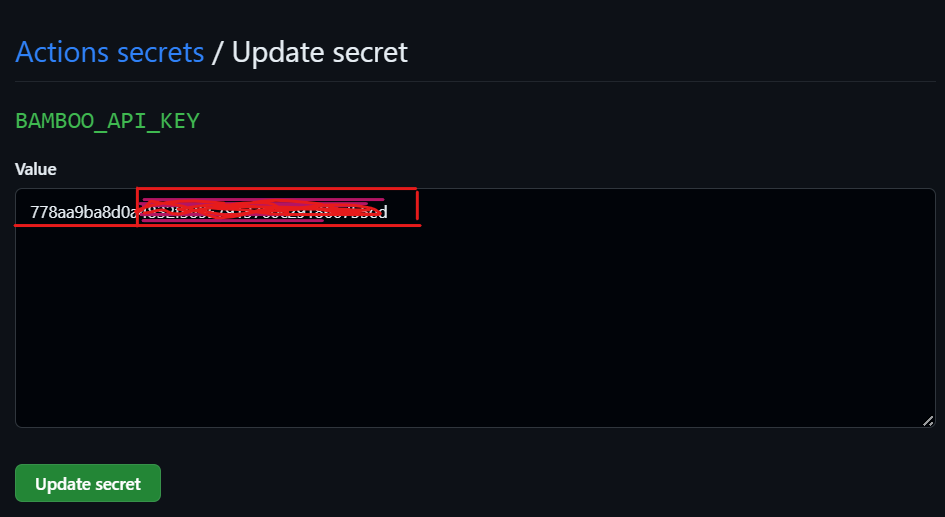
In the Name field, type
BAMBOO_API_KEYfor your secret. -
In the Secret field, enter the value for the secret.
-
Click Add secret.
-
Repeat the steps for the following secrets.
 .
.
Please remember Client ID is the Client ID of the API Client , we have previously added permission to. ServicePrincipalID is the Object ID of the Inbound API Provisioning app we have created.
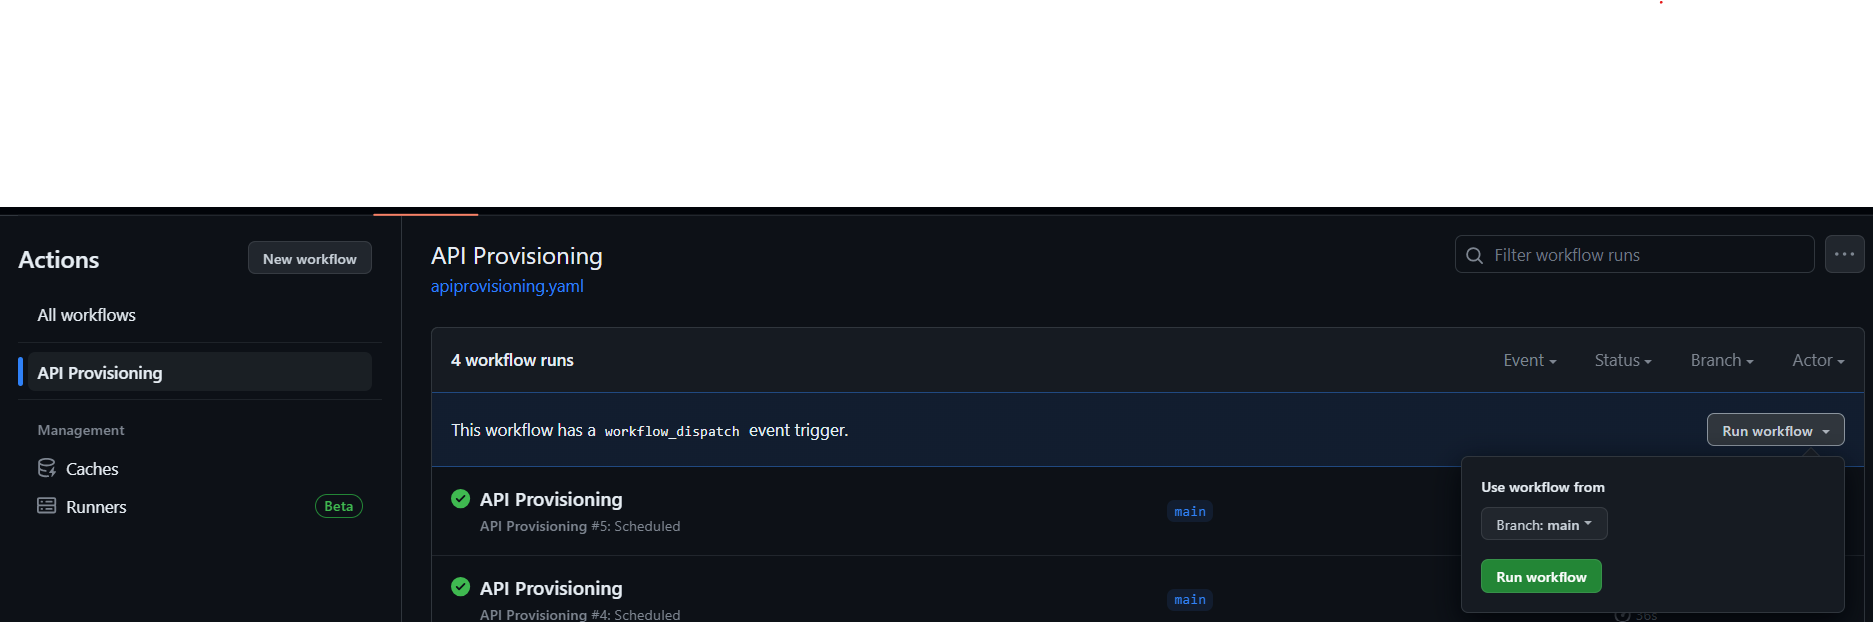
Now that we have created the secrets, created the composite action, and created the workflow, we can trigger the workflow manually.
We will navigate to the main page of the repository.
Under our repository, We will click the Actions tab.
In the left sidebar, click on the workflow API Provisioning.
Above the list of workflow runs, click the Run workflow button.
 .
.
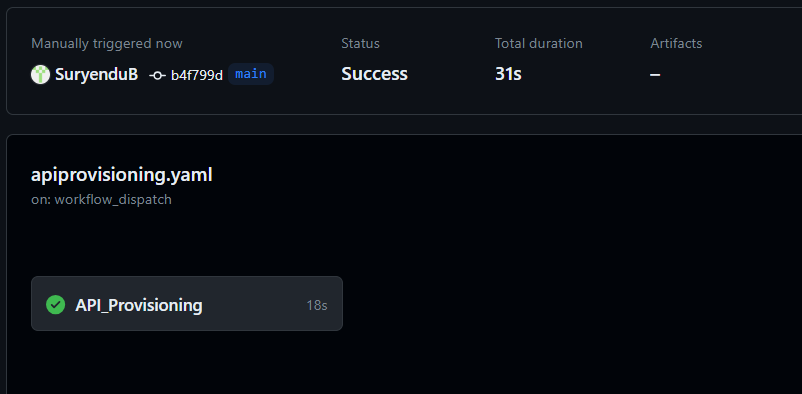
Once the Run workflow button is clicked, we will be presented with the following screen.
 .
.
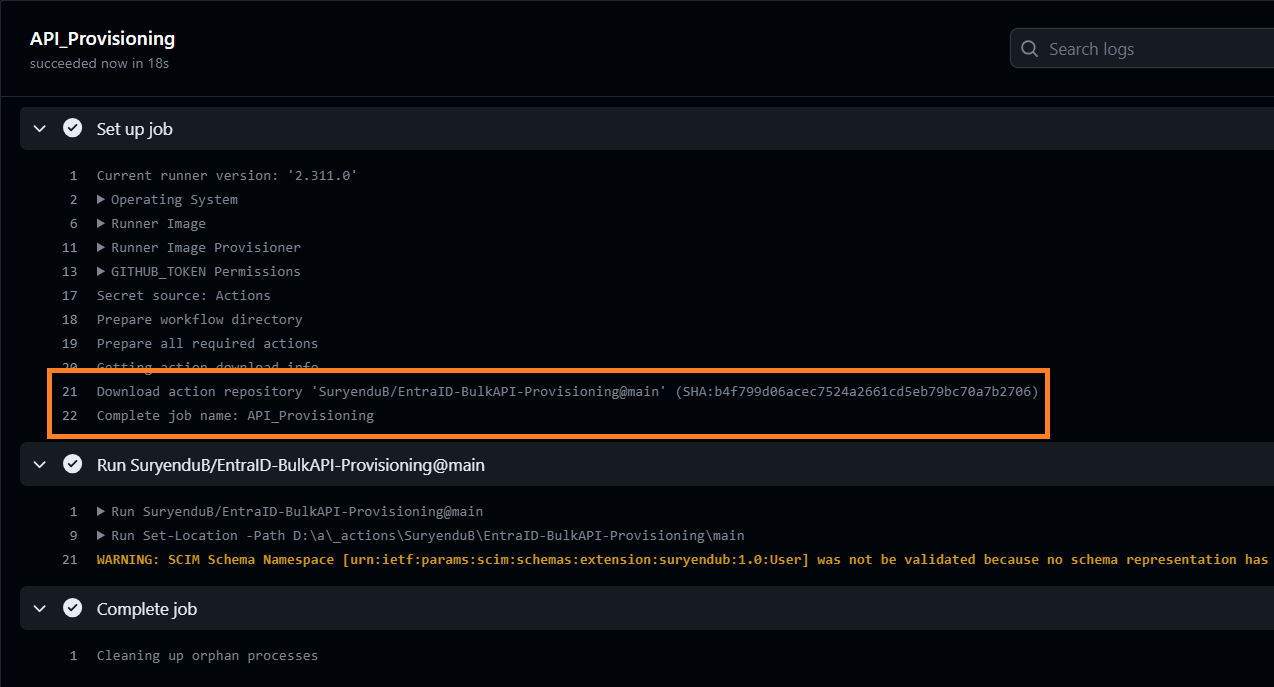
We will click on the API Provisioning job to expand the jobs run.
 .
.
Clicking on the steps API_Provisioning will expand the steps run. We can see in the screenshot composite action repository is downloaded.
In the next step, Composite Action is executed which triggers the Powershell Script with all the required parameters.
 .
.
 .
.
We can verify that the workflow run is completed in the Entra ID Portal.
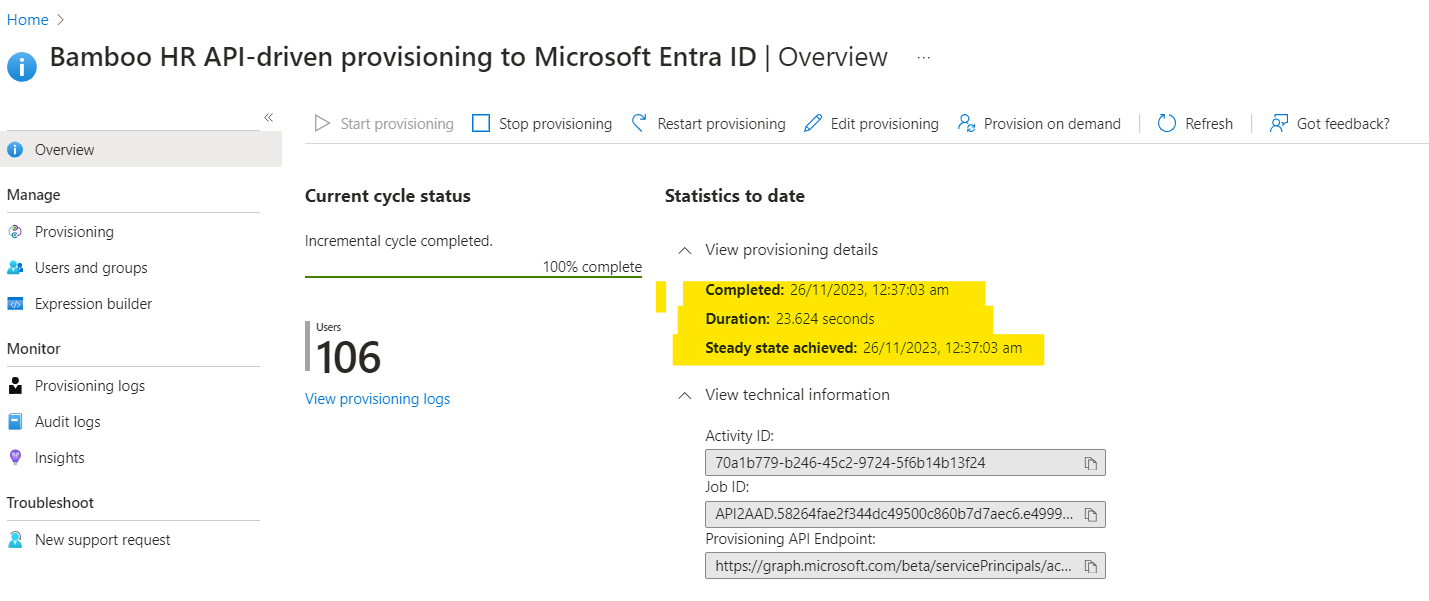 .
.
I will again refer back to Pim’s Blog to dig deeper into the synchronization job Run and the Provisioning Logs.
We will click on the ‘Provisioning Logs’ tab in the left pan.
We will try to briefly explain each step in the provisioning process. First We can verify users are imported from the API as per the attributeMapping.psd file.
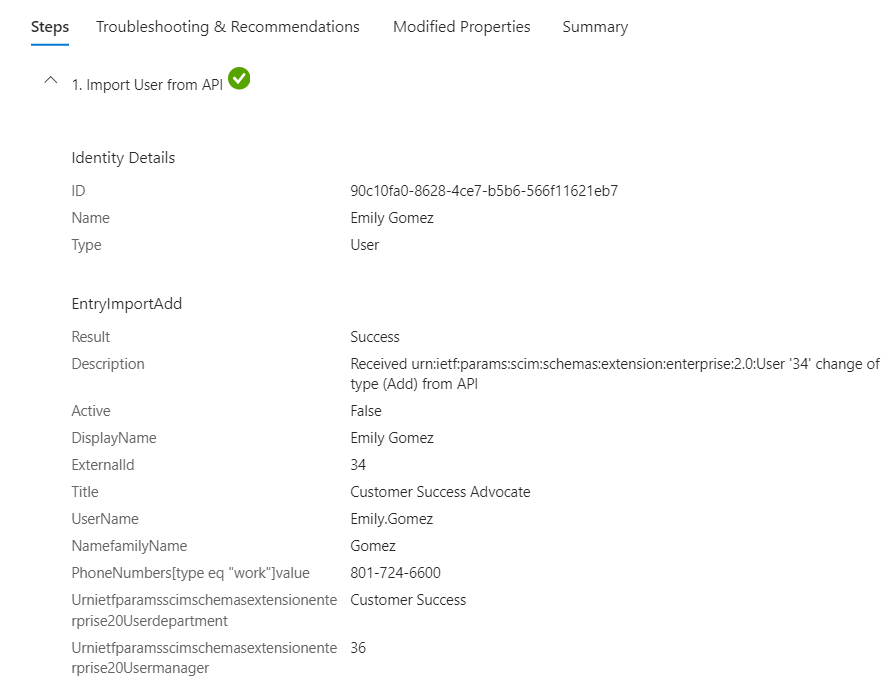 .\
.\
Then Provisioning Job determines if the user is in scope for provisioning.
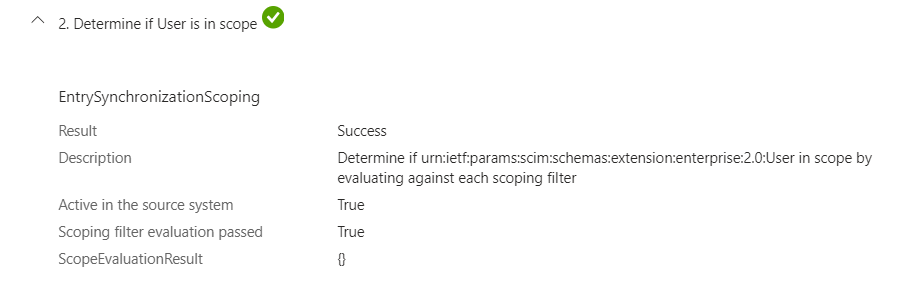 .
.
Then Provisioning Job tries to match the user with the existing user in the Entra ID based on the matching attribute in attribute mapping for the Inbound Provisioning App we have configured.
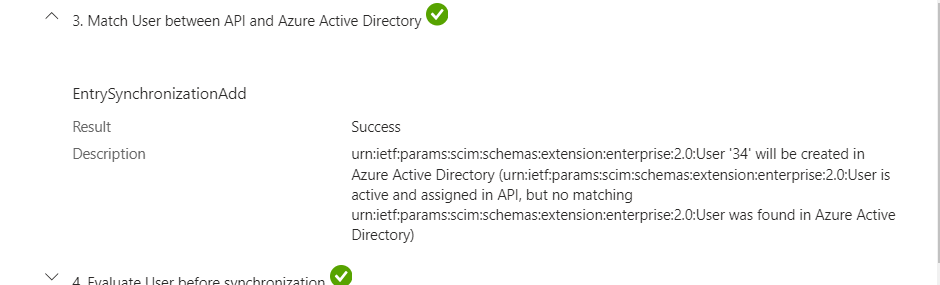 .
.
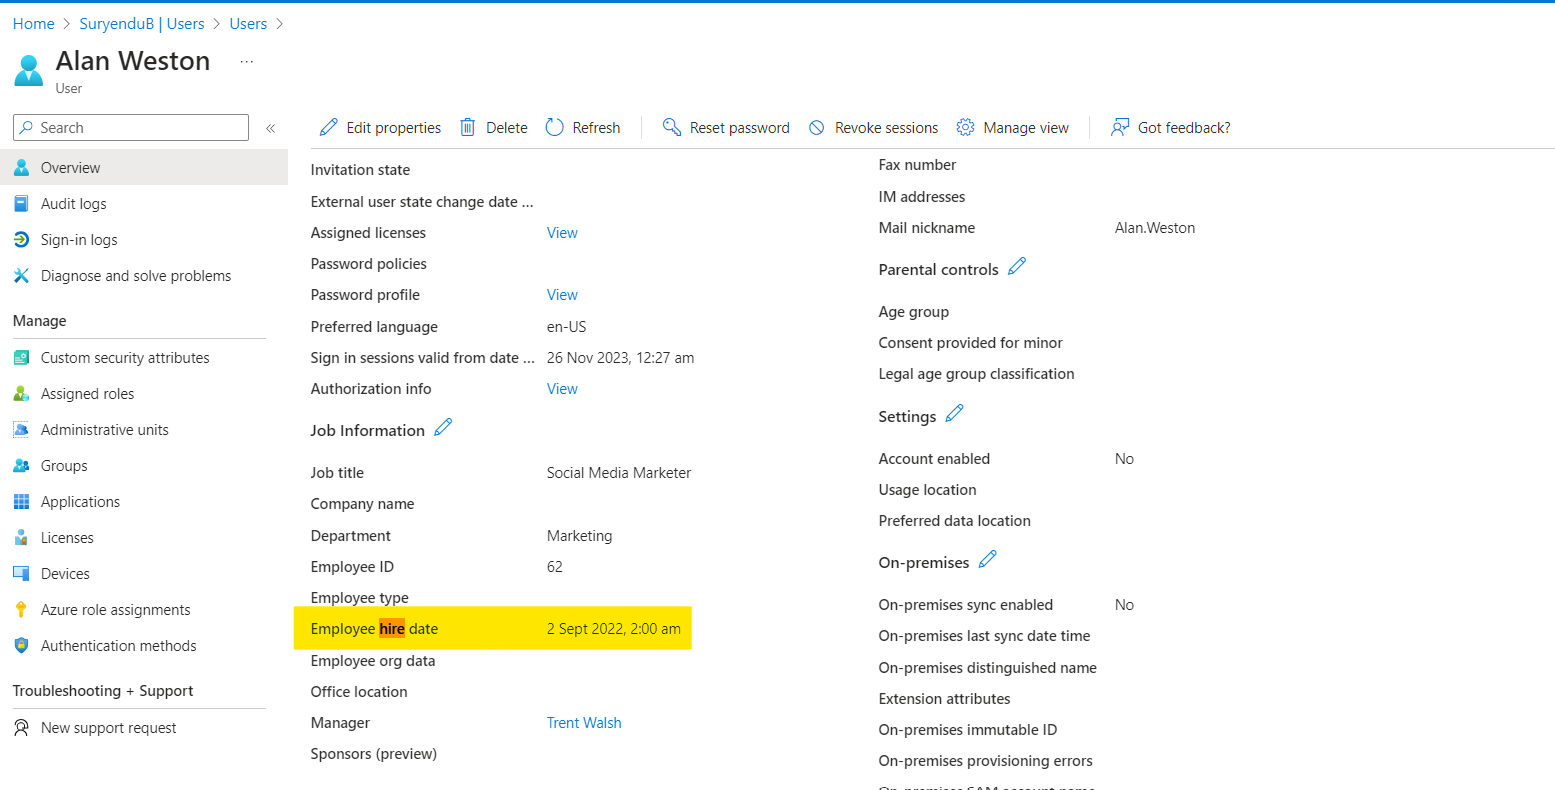
We can verify new user is created in the Entra ID Portal. Subsequently, any changes to the user information in the Bamboo HR will be reflected in the Entra ID Portal.
 .
.
Conclusion
In this blog post, I explain how to create custom actions for the new Entra Inbound Provisioning API for automatic user provisioning.
A small recap of the scenario, we have used Bamboo HR as the source of truth for user information for creating cloud-only user objects. I showed how to create an application in Entra ID with the API-driven provisioning mode,
API Client Configuration: : I showed how to use the Bamboo HR API to get the user information and how to use PowerShell to process the data and create a SCIM payload for the Entra Bulk Upload endpoint. We briefly touched on how to add custom attributes to the provisioning app schema using PowerShell and how to map them to the Entra ID attributes using the Entra ID portal.
A major focus of my blog was to show how to Create Custom GitHub Actions: for API-driven provisioning and how to use this in the GitHub Actions Workflow. I know we have barely scratched the surface of the immense possibility of CI/CD workflow and Provisioning API Driven lifecycle process. For Example, it would not be a bad idea to add a trigger for push action, so that whenever changes are made to our provisioning setup, the provisioning Job gets triggered.
We can add custom actions for other tasks, like onboarding users with Temporary Access Pass. Please share your feedback and shout out to Pim for all his content.