The Next Generation of Provisioning for Enterprise IAM - Part 2
Continuing the same discussion from my Previous article The Next Generation of Provisioning for Enterprise IAM, we did manage to break the link between on premise active directory and Entra ID , for our Pilot Users. We Managed to restore the user with same attributes as cloud only user.
Now we will move to the second phase of our task , that is to move towards establishing link between our HR Data Solution and Entra ID, bypassing the need for our legacy hybrid identity architecture components like , Microsoft Identity Manager , Azure AD Connect , Active Directory.
I did touch in brief about the new BulkUploadAPI from Microsoft. The rate limit for this API is 40 requests per second. Each request can contain a maximum of 50 user operations in the bulk request Operations array.
Steps for syncing in house HR Data with Entra ID
1. Configure API-driven inbound provisioning app (Public preview)
This feature is available only when you configure the following Enterprise Gallery apps:
-
API-driven inbound user provisioning to Azure AD
-
IT Admin configures an API-driven inbound user provisioning app from the Microsoft Entra Enterprise App gallery. I have written a small script to configure this application..
Connect-MgGraph
$AppName = "API-driven Inbound User Provisioning to Azure AD"
$AppliocationTemplate = Get-MgApplicationTemplate -Filter "displayName eq '$AppName'"
Invoke-MgInstantiateApplicationTemplate -ApplicationTemplateId $AppliocationTemplate.Id -DisplayName "Contoso $AppName"
Start-Sleep -Seconds 20
$AzureADProvApplication = Get-MgApplication -Filter "displayName eq 'Contoso $AppName'"
We can verify the configred application from Enterprise Application Blade.

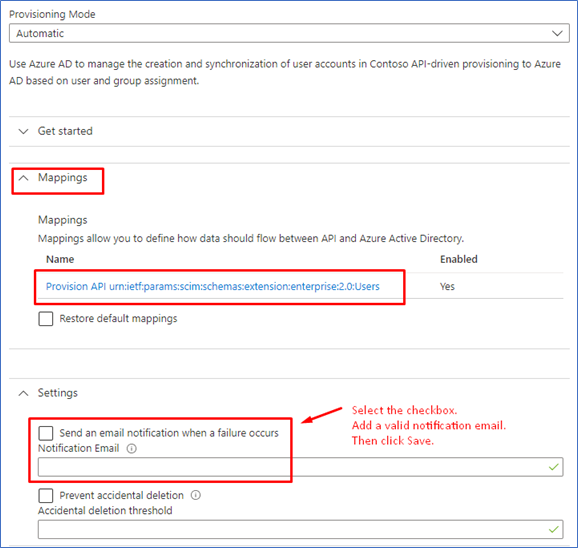
Once the application creation is successful, we need to go the Provisioning blade and click on Get started.

Switch the Provisioning Mode from Manual to Automatic.
Once the save operation is successful, we will see two more expansion panels – one for Mappings and one for Settings. Before proceeding to the next step, we need to provide a valid notification email id and Save the configuration once more.
Grant Permission for API Driven Provisioning
- We need to provide our client application (Azure AD , Logic App or Custom Connector ) necessary permission to connect to the Inbound API , read Provisioning Logs and permission to trigger provisioning jobs or stop running provisioning jobs
| Permisssion | Purpose |
|---|---|
| SynchronizationData-User.Upload | Perform a new bulk upload using the synchronization job. |
| AuditLog.Read.All | Allows the app to read and query your audit log activities, on behalf of the signed-in user. This is required to read the provisioning log status of the bulk upload job. |
| Synchronization.ReadWrite.All | Allows the app to configure the Azure AD synchronization service, on behalf of the signed-in user. This will be used in our powershell client to start and resume job, update the application schema based on our HR data input |
As the client is given permission to our Privilege Resource, for creating users in our Entra ID Tenant, we must take the necessary steps to secure this API access. I would recommend using a Managed Identity for accessing the inbound provisioning API. We assign our managed identity with following three permissions.
      Install-Module Microsoft.Graph -Scope CurrentUser

      Connect-MgGraph -Scopes "Application.Read.All","AppRoleAssignment.ReadWrite.All,RoleManagement.ReadWrite.Directory"
      Select-MgProfile Beta
      $graphApp = Get-MgServicePrincipal -Filter "AppId eq '00000003-0000-0000-c000-000000000000'"

      $PermissionName = "SynchronizationData-User.Upload"
      $AppRole = $graphApp.AppRoles | `
      Where-Object {$_.Value -eq $PermissionName -and $_.AllowedMemberTypes -contains "Application"}
      $managedID = Get-MgServicePrincipal -Filter "DisplayName eq 'PRD-Server"
      New-MgServicePrincipalAppRoleAssignment -PrincipalId $managedID.Id -ServicePrincipalId $managedID.Id -ResourceId $graphApp.Id -AppRoleId $AppRole.Id

      $PermissionName = "AuditLog.Read.All"
      $AppRole = $graphApp.AppRoles | `
      Where-Object {$_.Value -eq $PermissionName -and $_.AllowedMemberTypes -contains "Application"}
      $managedID = Get-MgServicePrincipal -Filter "DisplayName eq 'PRD-Server'"
      New-MgServicePrincipalAppRoleAssignment -PrincipalId $managedID.Id -ServicePrincipalId $managedID.Id -ResourceId $graphApp.Id -AppRoleId $AppRole.Id


      $PermissionName = "Synchronization.ReadWrite.All"
      $AppRole = $graphApp.AppRoles | `
      Where-Object {$_.Value -eq $PermissionName -and $_.AllowedMemberTypes -contains "Application"}
      $managedID = Get-MgServicePrincipal -Filter "DisplayName eq 'PRD-Server'"
      New-MgServicePrincipalAppRoleAssignment -PrincipalId $managedID.Id -ServicePrincipalId $managedID.Id -ResourceId $graphApp.Id -AppRoleId $AppRole.Id
Building API client to send authoritative identity data to Azure AD
For Our integration scenario, we will use the Powershell Client provided by Microsoft.
This connector will be used to Provision users who are transformed into cloud-only users in the first part of this blog series.
Microsoft Provides a Powershell Script CSV2SCIM to read CSV files that we fetch from our HR Data source using Rest API and automatically provisions user accounts in our Target Directory Entra ID. This PowerShell script also supports extending the schema of our provisioning app that we will use to map our HR Data Source custom attributes and it also supports management functions such as reading the provisioning logs and restarting the job.
-
The Powershell client CSV2SCIM sends a POST request to provisioning /bulkUpload API endpoint associated with the provisioning app.
- If successful, an Accepted 202 Status is returned.
- The Azure AD Provisioning Service processes the data received, applies the attribute mapping rules, and completes user provisioning.
- Depending on the provisioning app configured, the user is provisioned to Entra ID for cloud-only users. The API Client then queries the provisioning logs API endpoint for the status of each record sent.
Extending provisioning job schema
In our CSV file fetched from the HR data source, we have attributes that are not present in the standard SCIM schema. attributes, We need to include these attributes as part of our API-driven provisioning.
I will explain how to extend our API-driven provisioning app to process additional custom attributes using our Powershell Client.
To represent such attributes, we need to create a SCIM extension schema and add additional attributes under this namespace.
The CSV2SCIM script provides an execution mode called UpdateSchema which reads all columns in the CSV file, adds them under an extension schema namespace, and updates the provisioning app schema.
'UpdateScimSchema' {
        Import-Module Microsoft.Graph.Applications  -ErrorAction Stop
        Connect-MgGraph -Identity -ErrorAction Stop | Out-Null

        Get-Content -Path $Path -First 1 | Set-AzureADProvisioningAppSchema -ScimSchemaNamespace $ScimSchemaNamespace -ServicePrincipalId $ServicePrincipalId
    }
And we can run the script in this mode to update our Application Schema.
.\CSV2SCIM.ps1 -Path 'UserFile.CSV' -UpdateSchema -ServicePrincipalId 00000000-0000-0000-0000-000000000000 -TenantId 00000000-0000-0000-0000-000000000000 -ScimSchemaNamespace "urn:ietf:params:scim:schemas:extension:suryendub:1.0:User"

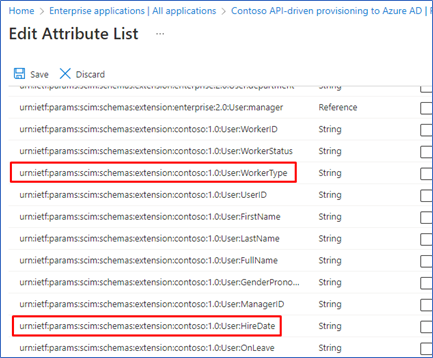
You can verify the update to your provisioning app schema by opening the Attribute Mapping page and accessing the Edit attribute list for API option under Advanced options.

The Attribute List shows attributes under the new namespace and attributes.
Extending provisioning app Mapping to use the custom Attribute
We need to customize the AttributeMapping.psd1 file to represent our enterprise use case. In this case, we have extended the mapping by adding attributes corresponding to our HR System.
    "urn:ietf:params:scim:schemas:extension:suryendub:1.0:User" = @{
        Career_Step = "Career_Step"
        Business_Unit = "Business_Unit"
        OrgUnitPath = "OrgUnitPath"
        employeeID = "ID"
        PrimaryEmail = "PrimaryEmail"

    }
Run the following command to validate if the AttributeMapping file has valid SCIM schema attributes. This command returns True if the validation is successful.
$AttributeMapping = Import-PowerShellDataFile '..\Samples\AttributeMapping.psd1'

.\CSV2SCIM.ps1  -Path 'UserFile.CSV' -AttributeMapping $AttributeMapping -ValidateAttributeMapping
Once I verified that the AttributeMapping file is valid, we can run the following command to generate a bulk request in the file BulkRequestPayload.json
.\CSV2SCIM.ps1 -Path 'UserFile.CSV' -AttributeMapping $AttributeMapping > BulkRequestPayloadHRUser.json
- In my test environment running the script results in the following BulkUpload json.
{
    "schemas":  [
                    "urn:ietf:params:scim:api:messages:2.0:BulkRequest"
                ],
    "Operations":  [
                       {
                           "method":  "POST",
                           "bulkId":  "bf56ef2c-d046-4bfb-84dd-4d904557444d",
                           "path":  "/Users",
                           "data":  {
                                        "schemas":  [
                                                        "urn:ietf:params:scim:schemas:core:2.0:User",
                                                        "urn:ietf:params:scim:schemas:extension:enterprise:2.0:User",
                                                        "urn:ietf:params:scim:schemas:extension:SuryenduB:1.0:User"
                                                    ],
                                        "userType":  null,
                                        "userName":  null,
                                        "urn:ietf:params:scim:schemas:extension:SuryenduB:1.0:User":  {
                                                                                                           "OrgUnitPath":  "/Test Unit/No Auto License",
                                                                                                           "Career_Step":  "",
                                                                                                           "Business_Unit":  "",
                                                                                                           "employeeID":  "ababaobcaoba",
                                                                                                           "PrimaryEmail":  "admintest1@SuryenduB.com"
                                                                                                       },
                                        "addresses":  [
                                                          {
                                                              "postalCode":  null,
                                                              "streetAddress":  null,
                                                              "type":  "work",
                                                              "locality":  null,
                                                              "country":  null
                                                          }
                                                      ],
                                        "urn:ietf:params:scim:schemas:extension:enterprise:2.0:User":  {
                                                                                                           "organization":  null,
                                                                                                           "division":  null,
                                                                                                           "manager":  {
                                                                                                                           "value":  null
                                                                                                                       },
                                                                                                           "employeeNumber":  "abjossa",
                                                                                                           "department":  null,
                                                                                                           "costCenter":  null
                                                                                                       },
                                        "name":  {
                                                     "familyName":  "Bob\u0026peter",
                                                     "givenName":  "admintest"
                                                 },
                                        "phoneNumbers":  [
                                                             {
                                                                 "value":  null,
                                                                 "type":  "work"
                                                             }
                                                         ],
                                        "active":  true,
                                        "title":  "",
                                        "displayName":  "admintest Bob\u0026peter"
                                    }
                       }
Upload bulk request payload using Managed Identity Credential
I have modified the script Microsoft provided to use with Managed Identity that we set up in the previous step.
I had to remove the references for ClientID and Client Certificate and Used the following line to connect using Managed Identity. I am using a systen assigned managed Identity. If you are using a user assigned managed identity, you will need to add support for the Client ID parameter.
Connect-MgGraph -Identity
.\CSV2SCIM.ps1 -Path 'UserFile.CSV' -AttributeMapping $AttributeMapping -ServicePrincipalId 00000000-0000-0000-0000-000000000000 -TenantId 00000000-0000-0000-0000-000000000000
Once we run the script you will be able to verify that attributes for users in scope (Previously Hybrid Synced User) are now getting updated using the new application.
Now that we are provisioning directly from HR application to Entra ID, without requiring Hybrid Identity setup we can conclude we have removed our dependency on Active Directory and Microsoft Identity Manager.
Conclusion
In this article, we’ve made big changes to how we handle user accounts and access. We started by decoupling our enterprise user accounts from the regular Hybrid IAM System components Azure AD Connect, Microsoft Identity Manager, and Azure AD Connect from the cloud-based Entra ID for a small group of users. These users got set up in the cloud just like before but now as Cloud Users.
Moving forward, we managed to directly connect our HR Data System to Entra ID. This means we’re skipping the old-fashioned ways of connecting different systems. We got help from a special tool provided by Microsoft, which allows us to do a lot of actions quickly.
We carefully set up our Powershell Client, making sure it’s safe and ready to work. We also made sure everything is secure. We locked the doors by using Managed Identity so only from within our enterprise we can trigger the provisioning Job.
With all these changes, we’ve made our user accounts and access more modern and easier to manage. We don’t need to rely on old systems like before. Instead, we’ve built a better way to make sure the right people can access the right things at the right times.
In the end, we’ve transformed how we handle user accounts, making everything smoother and more efficient and faster. Our journey from traditional methods to these new, smart ways is a big step towards a future where managing enterprise identity is simple and effective.
Appendix: Powershellshell Client Documentation
PowerShell Function - ConvertTo-ScimBulkPayload
The following code demonstrates a PowerShell function named ConvertTo-ScimBulkPayload. This function takes an array of objects as input and converts them into a SCIM bulk payload. The SCIM (System for Cross-domain Identity Management) protocol is used to manage user identities across different systems.
Function Parameters
InputObject(mandatory): Represents the array of objects to be converted.ScimSchemaNamespace(optional): Allows users to specify a custom SCIM namespace.AttributeMapping(optional): Enables mapping of input properties to SCIM attributes.OperationsPerRequest(optional): Specifies the number of operations per bulk request.PassThru(optional): Allows returning the SCIM bulk object instead of a JSON string.
Function Workflow
- The function initializes a new SCIM bulk object with required properties.
- It creates a copy of this object and initializes
$paramConvertToScimPayloadhashtable usingAttributeMappingparameter if provided. - Looping through each object in the
InputObjectarray, it creates a new SCIM operation object for each one. This object contains method (POST), bulk ID (a new GUID), path (/Users), and data (the converted object). - Each SCIM operation object is added to the
Operationsproperty of the SCIM bulk object instance. - If the operation count limit is reached, the function outputs the SCIM bulk object as a JSON string or object (if
PassThruis specified). - The function then resets and continues processing the remaining objects.
- Once all objects are processed, the remaining SCIM bulk object is output as a JSON string or object (if
PassThruis specified).
PowerShell Function - ConvertTo-ScimPayload
This code showcases a PowerShell function named ConvertTo-ScimPayload. The function takes an array of objects as input and transforms them into a SCIM payload. The SCIM (System for Cross-domain Identity Management) protocol is utilized to manage user identities across various systems.
Function Parameters 2
InputObject(mandatory): Represents the input array of objects for conversion.ScimSchemaNamespace(optional): Allows specifying a custom SCIM namespace.AttributeMapping(optional): Facilitates mapping input properties to SCIM attributes.PassThru(optional): Enables returning the SCIM object instead of a JSON string.
Helper Functions
-
Resolve-ScimAttributeMapping: Resolves attribute mapping for input properties. It takes an input object, an attribute mapping hashtable, and an optional target object. It resolves keys to corresponding input object properties, handling arrays and nested hashtables.
-
Resolve-PropertyMappingValue: Resolves property mapping values for input properties. It takes an input object and a property mapping value. It handles script blocks and nested hashtables, recursively using
Resolve-ScimAttributeMapping. -
Invoke-Transformation: Invokes transformations using a script block for an input object. It handles script blocks and nested script blocks, returning resolved values.
Function Workflow 2
- The function loops through each object in the
InputObjectarray. - For each object, it creates a new SCIM object, initializing it with required properties.
- The
Resolve-ScimAttributeMappingfunction is used to populate the SCIM object with input properties. - If
ScimSchemaNamespaceis specified, the object is added under the provided namespace. - The function outputs the SCIM object as a JSON string or object (if
PassThruis specified).
PowerShell Function - Resolve-ScimAttributeMapping
This code demonstrates a PowerShell function named Resolve-ScimAttributeMapping. The function is designed for mapping input properties to SCIM attributes, which are used in the System for Cross-domain Identity Management (SCIM) protocol for managing user identities across diverse systems.
Function Parameters 3
InputObject(mandatory): Represents the input object to be mapped.AttributeMapping(mandatory): Represents the hashtable used for input property to SCIM attribute mapping.TargetObject(optional): Represents the object to which the mapped properties will be added.
Function Workflow 3
- The function iterates through each key-value pair in the
AttributeMappinghashtable. - If the key starts with ‘urn:’, the function checks if the
schemasproperty of theTargetObjectcontains the key. If not, it adds the key to theschemasproperty. - If the value of the key-value pair is an array, the function calls the
Resolve-PropertyMappingValuefunction for each array element, and the resulting array is added to theTargetObject. - If the value is not an array, the function calls the
Resolve-PropertyMappingValuefunction for the value, and the resulting value is added to theTargetObject. - The function returns the
TargetObjectcontaining the resolved attributes.
PowerShell Function - Resolve-PropertyMappingValue
This code illustrates a PowerShell function named Resolve-PropertyMappingValue. The function’s purpose is to resolve a property mapping value to the corresponding property in an input object.
Function Parameters 4
InputObject(mandatory): Represents the input object to be mapped.PropertyMappingValue(mandatory): Represents the property mapping value to be resolved.
Function Workflow 4
- The function iterates through each element of the
PropertyMappingValuearray. - If the element is a script block, the function calls the
Invoke-Transformationfunction with the input object and the script block. - If the element is a hashtable or an ordered dictionary, the function calls the
Resolve-ScimAttributeMappingfunction with the input object and the hashtable/ordered dictionary. - If the element is neither a script block nor a hashtable, the function returns the value of the corresponding property in the input object.
- The function then returns the resolved value.