How to add claims from external systems in Entra ID token using the custom claims provider
How often while integrating an application to Entra ID, do we realize all the attributes that we require are not available to the Entra ID or maybe these are confidential attributes that we do not want to store in Entra ID that need to be stored in different systems? You may have some user data stored in other systems, such as legacy identity systems, data stores, or third-party systems such as files, LDAP Directory, or databases. These systems may have some restrictions or requirements that prevent you from migrating or syncing the data to Microsoft Entra ID.
In such cases, we can use a custom claims provider to add claims from external systems into the token. A custom claims provider is a feature of the custom authentication extension framework that allows you to customize the token issuance process for your application.
Table of Contents
- How to add claims from external systems in Entra ID token using the custom claims provider
- Table of Contents
- Custom Claim Pipeline for ADFS
- What is a custom claims provider in EntraID?
- When do you need a custom claims provider?
- How does a custom claims provider work?
- How to get started with a custom claims provider?
- Step 1. Creating External API to fetch claims from external LDAP Directory
- Step 2: Create and register a custom authentication extension
- Step 3: Configure our applications to receive tokens with claims from an external store
- Conclusion
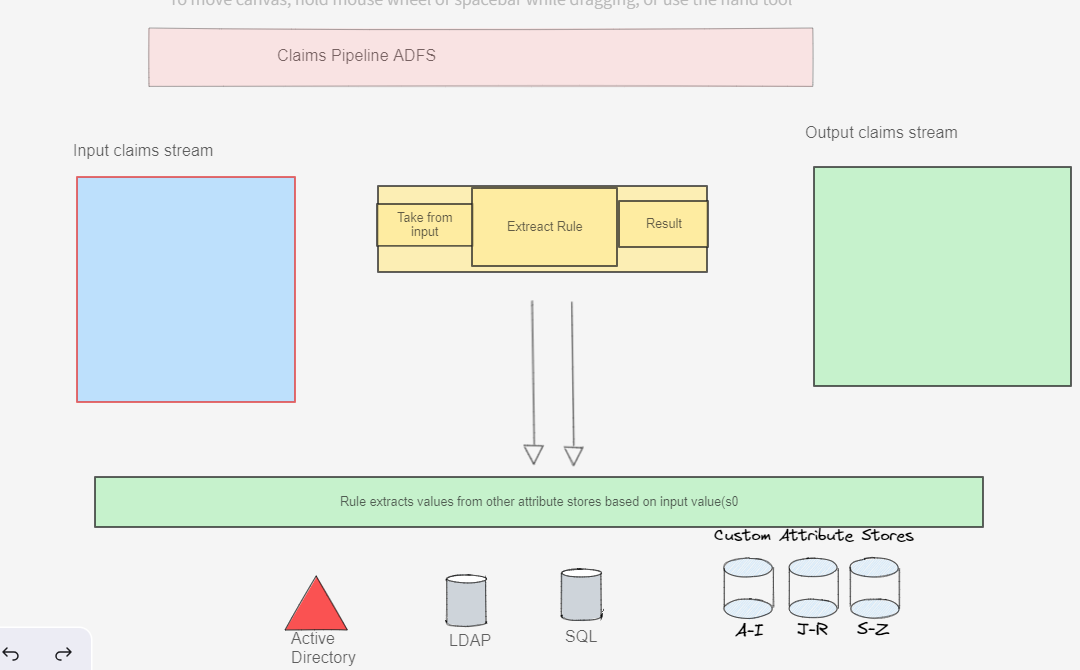
Custom Claim Pipeline for ADFS

For folks, who are familiar with ADFS, this seems all too familiar. In ADFS, you can provide claims from different types of attribute stores by using the store argument in the issue statement of a custom claim rule. The store argument specifies the name of the attribute store that you want to query for claim information. You can use any of the built-in attribute stores, such as Active Directory, LDAP, or SQL Server, or you can define your own custom attribute store by implementing the IAttributeStore interface. You can also use multiple attribute stores in the same claim rule by using multiple issue statements with different store arguments. This way, you can combine claim information from various external data sources.
Here is an example of a claim rule that uses the FileAttributeStore to issue claims from a file-based attribute store:
=> issue(store = "FileAttributeStore", types = ("https://schemas.microsoft.com/ws/2008/06/identity/claims/name", "https://schemas.microsoft.com/ws/2008/06/identity/claims/role"), query = "Age={0};EmployeeName,Role", param = "33");
What is a custom claims provider in EntraID?
A Custom Claim Provider is Microsoft Entra ID Implementation of ADFS Custom Claim Pipeline that fetches claims from external systems and adds them to the token. It uses a custom authentication extension to call an External Rest API to fetch claims from external systems. The external REST API can be any API that you have access to and that can return user data in a JSON format.
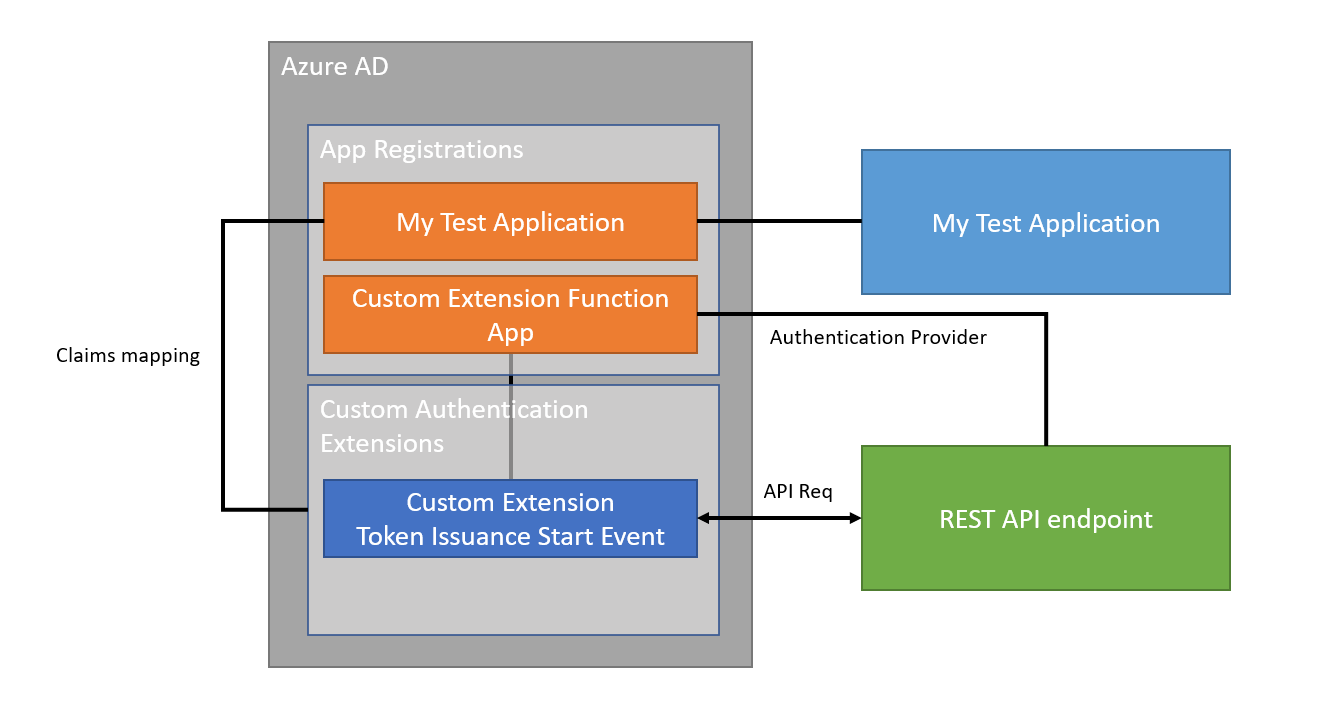
A custom claims provider consists of the following 5components:
- A publicly available REST API Endpoint that implements the logic for fetching claims from external systems. registered with Microsoft Entra Microsoft Entra application registration.
- A custom authentication extension that implements the logic for fetching claims from external systems.
- A custom claims provider configuration for attribute mapping defines the mapping between the claims from the external systems and the claims in the token.
- An Application that consumes the claims from the custom claims provider.
- A custom claims provider configuration for attribute mapping defines the mapping between the claims from the custom claim provider and the required claims in the token.
You can assign a custom claims provider to one or more applications in your directory. When a user authenticates to an application that has a custom claims provider assigned, the custom authentication extension is invoked to fetch claims from external systems and add them to the token based on the application and custom claim provider configuration.
When do you need a custom claims provider?
You may need a custom claims provider if you have one of the following scenarios:
-
Migration of legacy systems: You have some legacy identity systems, such as Active Directory Federation Services (AD FS) or data stores (such as LDAP directory) that hold information about users. You want to migrate these applications to Microsoft Entra ID, but you can’t fully migrate the identity data. Your applications may depend on certain information in the token, and you can’t rearchitect them.
-
Integration with other data stores that can’t be synced to the directory: You have some third-party systems, or your own systems that store user data. Ideally, you would like to consolidate this information, either through synchronization or direct migration, in the Microsoft Entra ID directory. However, that is not always feasible. The restriction may be because of data residency, regulations, or other requirements.
How does a custom claims provider work?
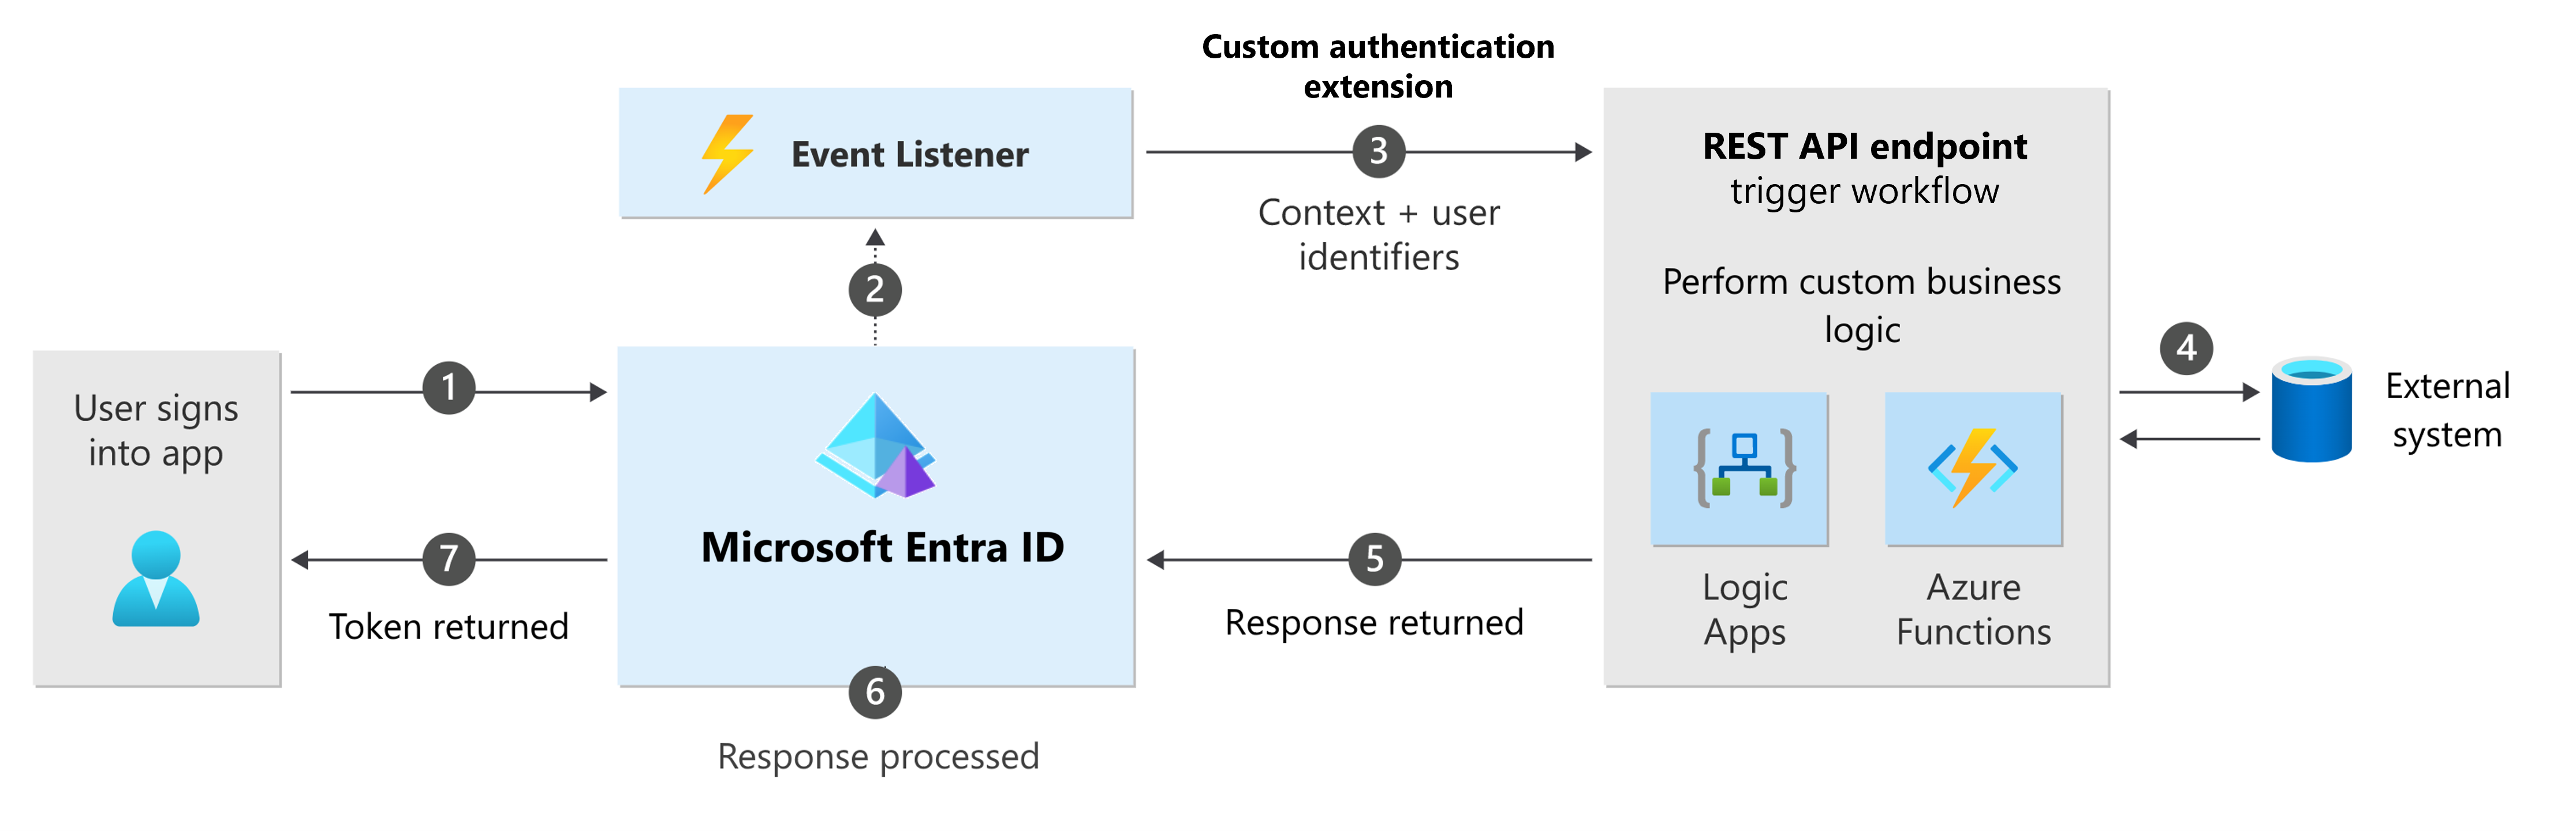
- A custom claims provider works by using a custom authentication extension that listens to the token issuance start event.
- This event is triggered when a token is about to be issued to your application when the user completes the authentication process.
- When the event is triggered, the custom authentication extension calls an external REST API to fetch claims from external systems.
- The external REST API can be any public API that you have access to and that can return user data in a JSON format.
- The custom authentication extension then maps the claims from the external systems to the claims in the token, according to the custom claims provider configuration.
- The custom authentication extension then adds the mapped claims to the token and returns it to Microsoft Entra ID.
- The token is then issued to your application, containing the claims from the external systems, along with the standard claims from Microsoft Entra ID. Your application can then use the token to access the user data and perform the desired actions.
How to get started with a custom claims provider?
If you want to use a custom claims provider for your application, you need to do the following steps:
- Create and register a custom authentication extension that calls an external REST API to fetch claims from external systems. You can use the sample code and tutorial provided by Microsoft Entra ID to help you with this step.
- Assign the custom claims provider to your application in the Microsoft Entra ID portal.
- Update the application configuration that defines the mapping between the claims from the external systems and the claims in the token. You can use the reference article and schema provided by Microsoft Entra ID to help you with this step. You can use the OpenID Connect or SAML protocols to integrate your application with Microsoft Entra ID.
For more details and guidance on how to use a custom claims provider, you can check out the following two videos from John Craddock:
- Introducing Microsoft Entra Custom Authentication Extensions
- Configuring Microsoft Entra Custom authentication extensions
In this hands-on lab, we will explore how to configure a custom claims provider. Imagine a fictional organization called Manhattan Peace Organization, where scientists are working on a new Peace solution. The organization uses Entra ID as the identity source, but the scientists do not want to store the confidential attribute “telephoneNumber” in Entra ID. Instead, this attribute is stored in the old system, LDAP Directory. However, there is an application that requires access to the “telephoneNumber” attribute. Let’s see how we can achieve this using a custom claims provider.
Step 1. Creating External API to fetch claims from external LDAP Directory
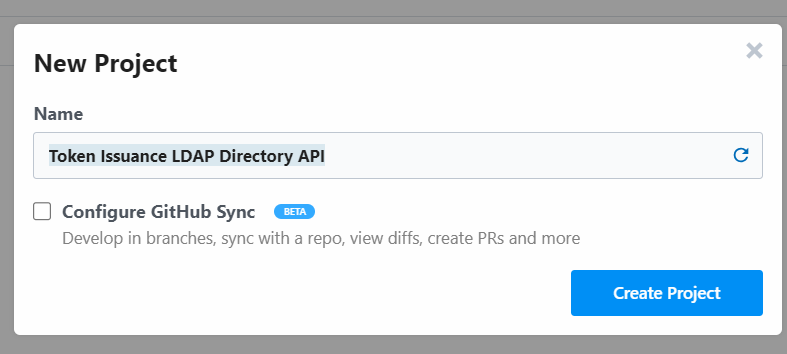
We will start by creating an external API that will fetch claims from the external LDAP Directory. We will use the Pipedream platform to create our API. Pipedream is a platform for building and running event-driven workflows. It provides a serverless programming model that allows you to create workflows using JavaScript. You can use Pipedream to create a REST API that fetches claims from external systems. You can then use this API as the external REST API for your custom claims provider. It would have been more convenient to do it using Azure Functions but as I do not have an Azure subscription, I will use Pipedream. Let’s start by creating a new Project in Pipedream. We will name it “Token Issuance LDAP Directory API”.
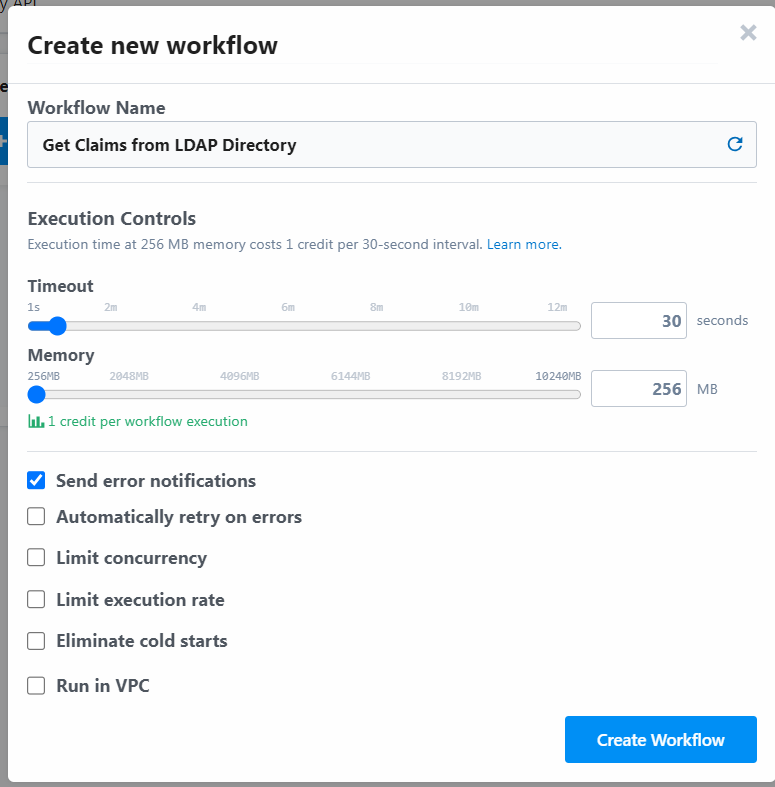
We will then create a new workflow in the project and name it “Get Claims from LDAP Directory”.
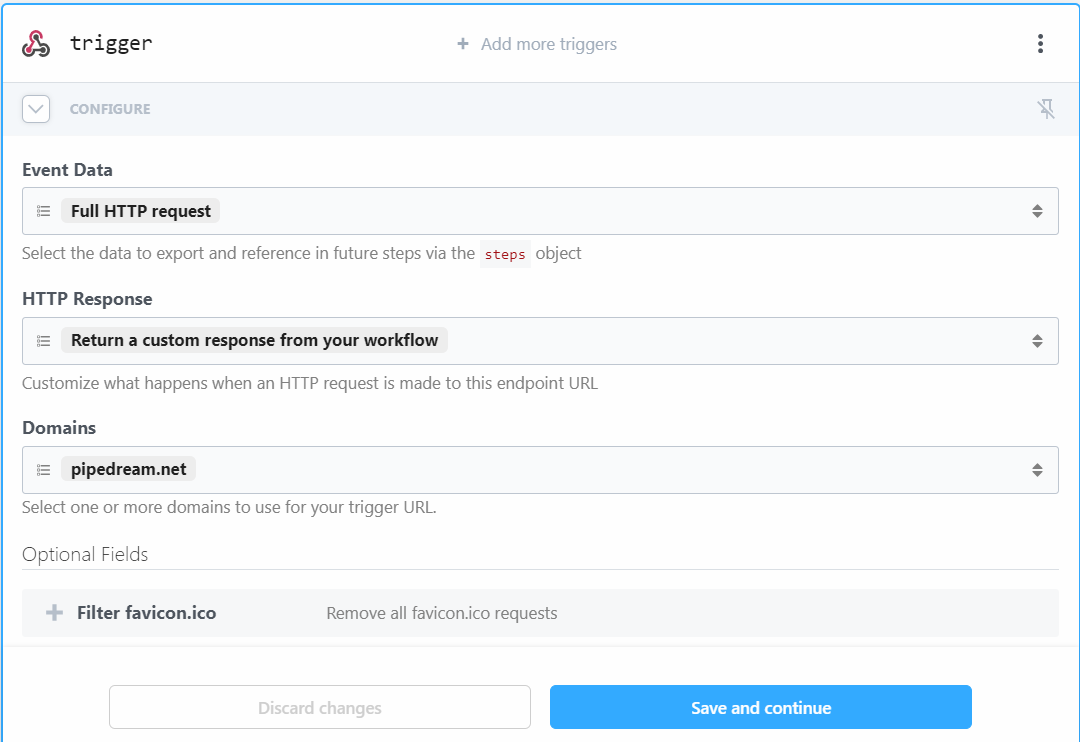
We will then add a new step to the workflow and select the “HTTP / Webhook” app as the trigger. Select HTTP API Request as the trigger event and click on Save and Continue.
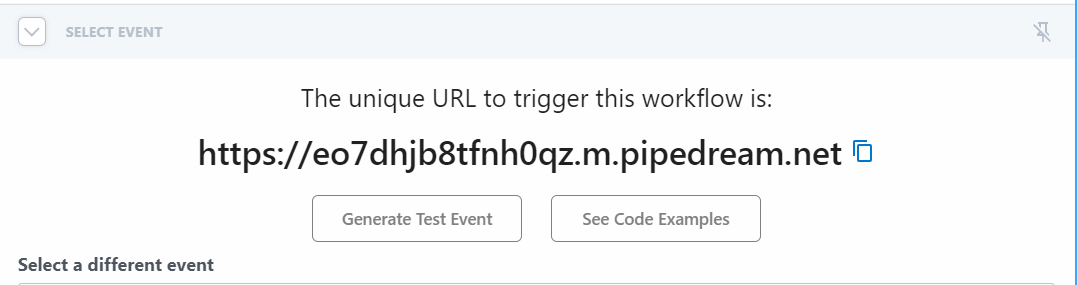
Pipedream will generate a unique URL for the API endpoint. We will use this URL as the Target URL for the Custom authentication extensions.
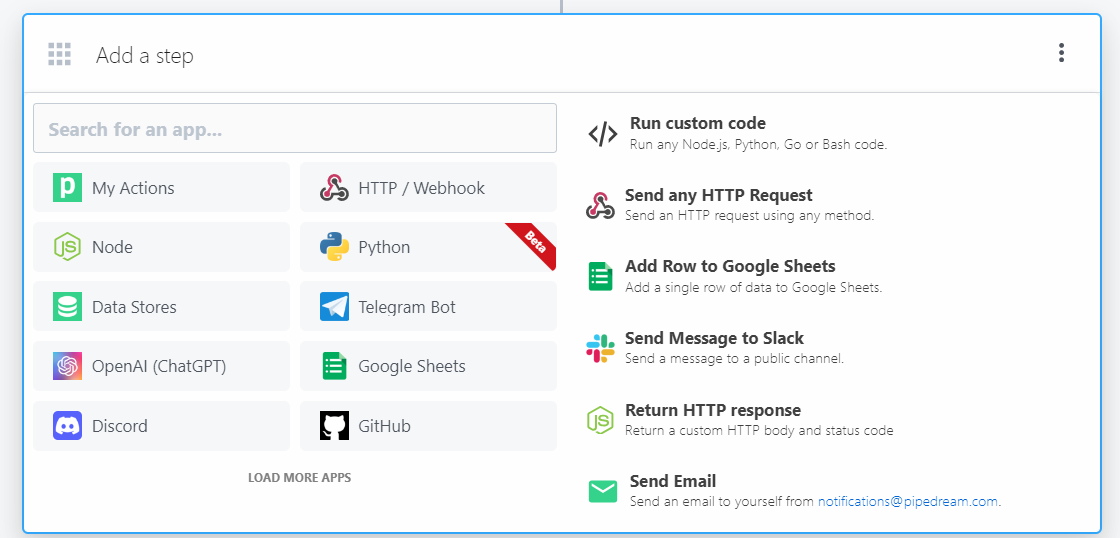
Next, click on + to add a new step to the workflow. Select Node as the action and select the step Return an HTTP Response.
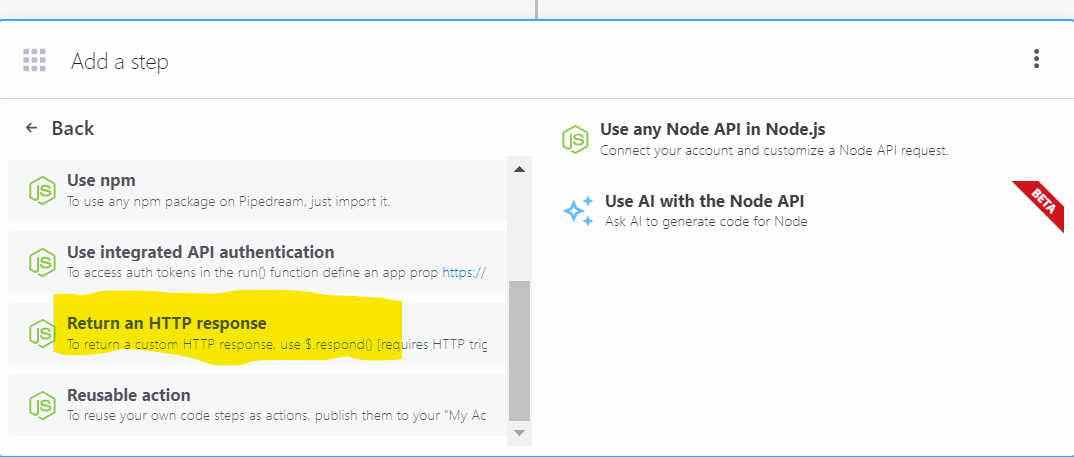
This will add a new step to the workflow. We will then add the following code to the step to fetch the telephoneNumber from the LDAP Server. Disclaimer: I am not a developer and I have no experience with Node.js. This is only for demonstration purposes. You can use this code as a reference and modify it as per your requirements.
Let’s deploy the API by clicking on the deploy button at the top right corner of the screen. Click on the green Deploy button in the dialog box that appears.
 .
.
Step 2: Create and register a custom authentication extension
2.1 Create a custom authentication extension
In this step, you register a custom authentication extension that is used by Microsoft Entra ID to call your Azure function. The custom authentication extension contains information about your REST API endpoint, the attribute collection start and submit actions that it parses from your REST API, and how to authenticate to your REST API.
-
Sign in to the Microsoft Entra admin center as at least an Application Administrator and Authentication Administrator.
-
Browse to Identity > External Identities > Custom authentication extensions.
-
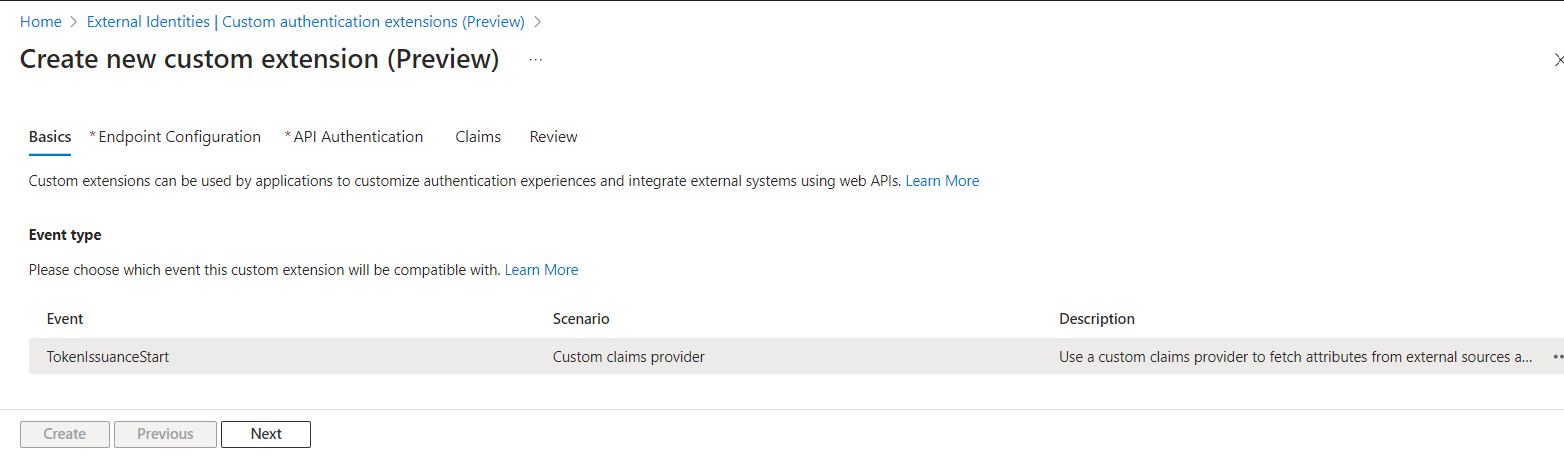
Select Create a custom extension.
-
In Basics, there is only a TokenIssuanceStart event and then select Next.
-
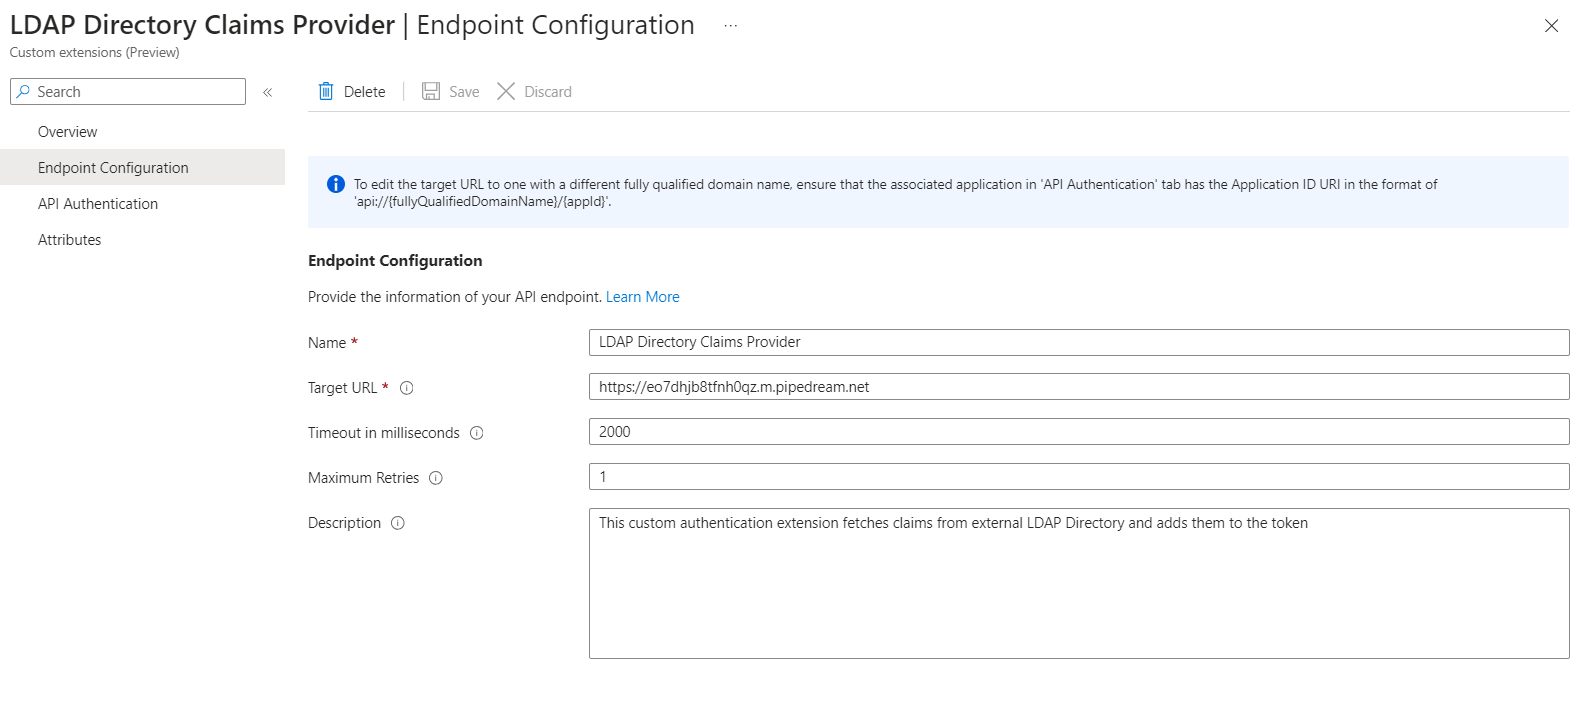
In Endpoint Configuration, we need to fill following properties:
- Name - A name for the custom authentication extension. I have named it as LDAP Directory Claims Provider.
- Target Url - The URL of the pipedream workflow, that we have saved in the previous step.
https://eo7dhjb8tfnh0qz.m.pipedream.net - Description - A description of your custom authentication extensions. I have added the following description:
This custom authentication extension fetches claims from the external LDAP Directory and adds them to the token. - Timeout in milliseconds - The maximum duration in milliseconds that Microsoft Entra ID will wait for a response from the API endpoint. If empty, will default to service default. The Valid range is 200 to 2000. I have set it to 2000 default.
- Maximum Retries - The maximum number of retries the API endpoint will be called in case of failure. If empty, will default to service default. It can have values 0 and 1. I have set it to 1 default.
-
Select Next.
-
In API Authentication, select the Create new app registration option to create an app registration that represents the pipedream workflow.
-
Give the app a name, I have named it Get Claims from LDAP Directory.

-
Select Next.
-
In API Authentication there is a textbox for the Claim name. Here we need to populate with the claims external API will return. I have populated it with the claim
telephoneNumber. -
Select Next.
-
Click Create to create the custom authentication extension.
2.2 Grant admin consent
After the custom authentication extension is created, grant application consent to the registered app, which allows the custom authentication extension to authenticate to your API.
-
Browse to Identity > External Identities > Custom authentication extensions (Preview).
-
Select the custom authentication extension from the list.
- On the Overview tab, select the Grant permission button to give admin consent to the registered app. The custom authentication extension uses
client_credentialsto authenticate to the Azure Function App using theReceive custom authentication extension HTTP requestspermission.
- If you like to see the required Graph API permission, Browse to Identity > Applications > App registrations.
- Select the All Applications tab and search for the app registration that you created in the previous step.

- On the left navigation pane, select API permissions under Manage. You can see the required Graph API permission is `
CustomAuthenticationExtension.Receive.Payload` of type Application.
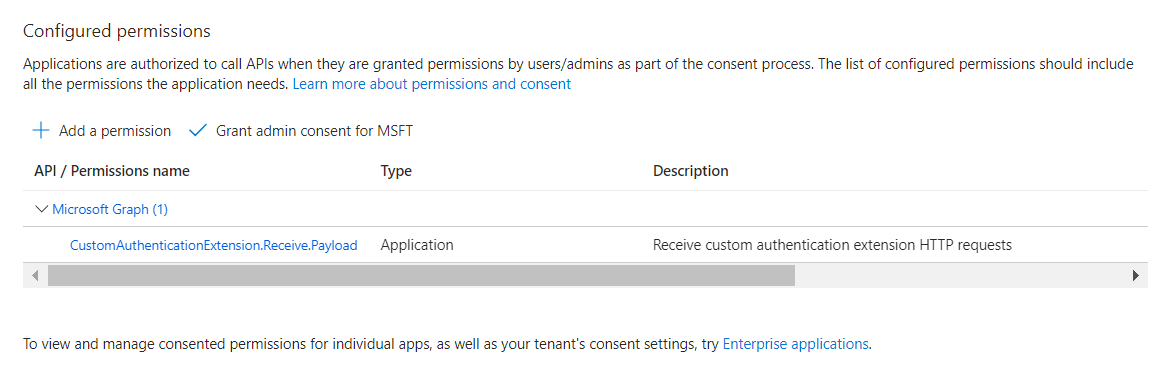
- Click Grant admin consent for the (Tenant Name) to grant admin consent to the registered app.
Step 3: Configure our applications to receive tokens with claims from an external store
In Manhatten Peace Organization, we have an application that requires access to the telephoneNumber attribute.
3.1 Configure the application to receive tokens with claims from an external store
-
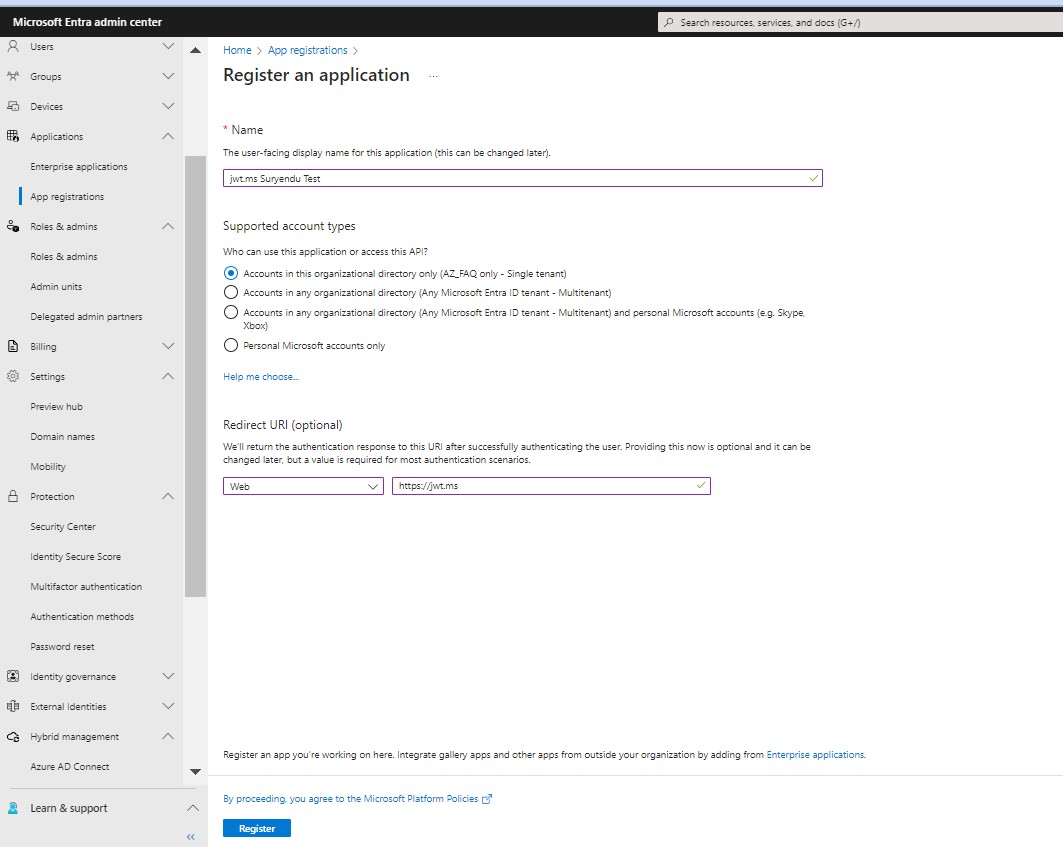
Go to your Entra ID portal and find “App registrations.” Click on “New registration.”
-
Name your application and choose the account types you want to support. For the Redirect URI, select “Web” and type in “https://jwt.ms”. Then, register your application.
-
After registration, go to the Authentication menu. Enable the “Implicit grant flow” for Access and ID tokens. Also, allow the public client flow. Save these changes.

-
Now, you need to create an application access URL. Use the following template (it should be in one line, but it’s broken into lines here for readability):
https://login.microsoftonline.com/<tenantName or ID>/oauth2/v2.0/authorize
?client_id=<AppID of the JWT app you just created>
&nonce=defaultNonce
&redirect_uri=https%3A%2F%2Fjwt.ms
&scope=<the scopes, separated by + , example openid+profile>
&response_type=<id_token or token>
&prompt=<login or consent> (optional, use login to force re-auth, or consent to force consent>
For ID Token
https://login.microsoftonline.com/XXXXXXXX-c5c4-4088-88cc-2f799eXXXXXX/oauth2/v2.0/authorize?client_id=xxxxxe391-5e42-44a2-93c4-f55867c08xxxxf&nonce=defaultNonce&redirect_uri=https%3A%2F%2Fjwt.ms&scope=openid+profile+User.read&response_type=id_token
For Access Token
https://login.microsoftonline.com/XXXXXXXX-c5c4-4088-88cc-2f799eXXXXXX/oauth2/v2.0/authorize?client_id=xxxxxe391-5e42-44a2-93c4-f55867c08xxxxf&nonce=defaultNonce&redirect_uri=https%3A%2F%2Fjwt.ms&scope=openid+profile+User.read&response_type=token
This setup allows you to test OAuth2.0 and troubleshoot token claims for your Entra ID SaaS Application and https://jwt.ms.
3.2 Update the application manifest to accept additional claims
-
Sign in to the Microsoft Entra admin center as at least an Application Developer.
- Browse to Identity > Applications > App registrations.
- Select the app you that need to get the claim from the external system.
- From the app’s Overview page, select the Manifest section. A web-based manifest editor opens, allowing you to edit the manifest. Optionally, you can select Download to edit the manifest locally, and then use Upload to reapply it to your application.
- In the manifest editor, search for the acceptMappedClaims property. By default, this property is set to null. Change the value to true and select Save.
"acceptMappedClaims": true,
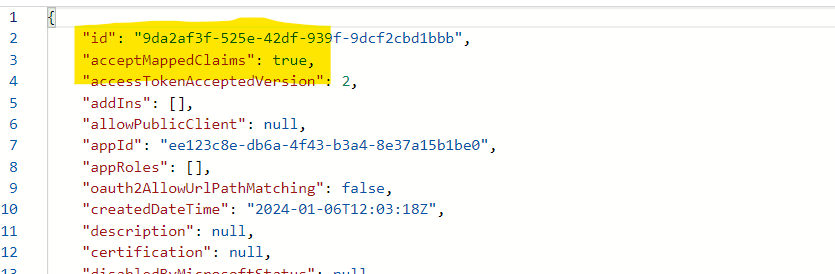
This allows an application to use claims mapping without specifying a custom signing key. Applications that receive tokens rely on the fact that the claim values are authoritatively issued by Microsoft Entra ID and cannot be tampered with. However, when you modify the token contents through claims-mapping policies, these assumptions may no longer be correct. Applications must explicitly acknowledge that tokens have been modified by the creator of the claims-mapping policy to protect themselves from claims-mapping policies created by malicious actors.
3.2 Configure Claims Mapping
-
On the Enterprise applications configuration page for the app (In my tenant
jwt.ms), we need to browse to the Single sign-on pane. -
Select on Edit for the Attributes & Claims section
-
Expand the Advanced settings section.
-
Select Configure for Custom claims provider.
-
We will Select the custom authentication extension we have registered previously in the Custom Claims Provider dropdown. Select Save.

-
Select Add new claim for adding a new claim.
-
We need to provide a name to the claim. I have named it as telephoneNumber.
-
For Source, let’s select Attribute and pick the attribute provided by the custom claims provider from the Source attribute dropdown. Attributes shown are the attributes defined as ‘to be made available’ by the custom claims provider in our custom claims provider configuration. Attributes provided by the custom claims provider are prefixed with customclaimsprovider. I have selected customclaimsprovider.telephoneNumber.
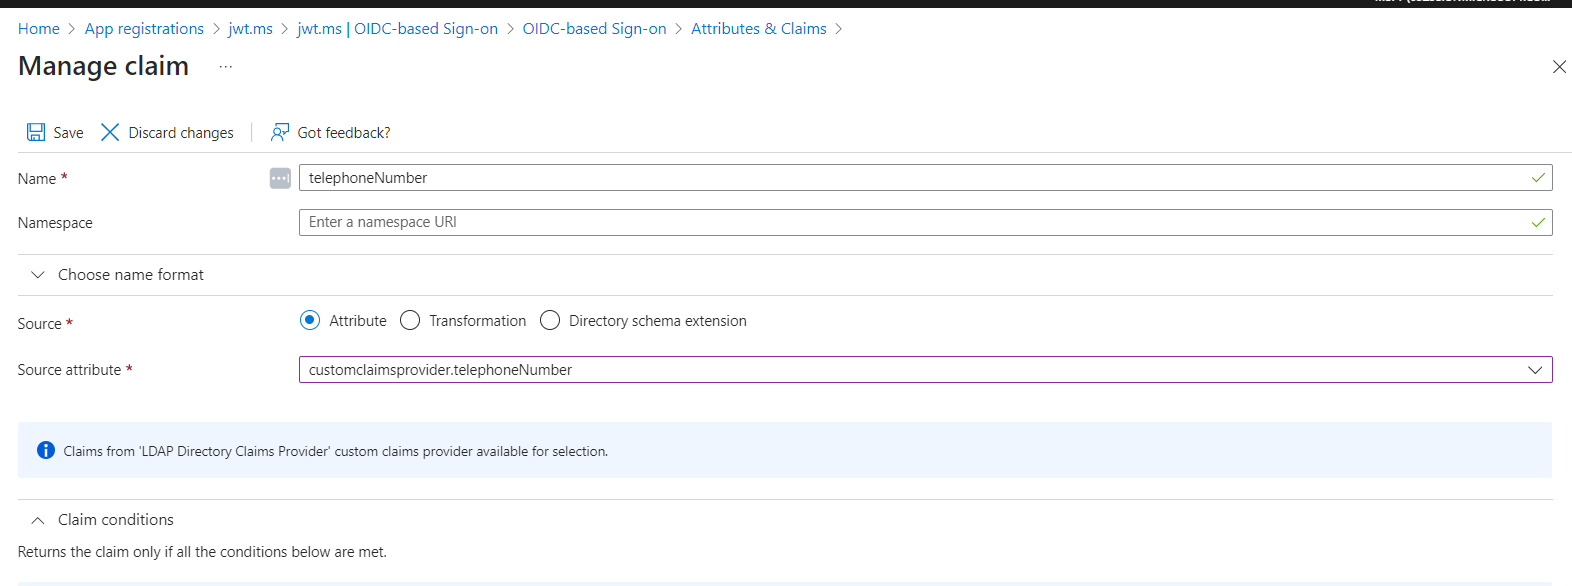
-
Complete the step by selecting Save to add the claim to the token configuration of our
jwt.msapplication.
Test the application
Now it is time to test the entire setup. We will use the application access URL that we have created in Step 3.1 to test the application. We will use the URL for id_token to test the application. If we are logging in for the first time to the application, we will be prompted to consent to the permissions requested by the application. We will select Accept to continue.
Now it will be a good idea to discuss the code snippet we have used in Step 1 to fetch the claims from the external LDAP Directory. The code snippet is as follows:
The code essentially lookup the LDAP directory with the first part of the userPrincipalName and fetch the telephoneNumber attribute from the LDAP Directory. If the telephoneNumber attribute is found, it is added to the token else a default value is added to the token.
const AZUREAD_LoginName = steps.trigger.event.body.data.authenticationContext.user.userPrincipalName;
        const uid = AZUREAD_LoginName.split('@')[0];
*** Ommitted for brevity ***
            // Perform the LDAP search
            const res = await searchAsync('dc=example,dc=com', opts);

*** Ommitted for brevity ***
 // Update the telephoneNumber claim in the body object if it was found
            if (telephoneNumber) {
                body.data.actions[0].claims.telephoneNumber = telephoneNumber;

            }
            *** Ommitted for brevity ***
            // Respond with the updated body object
        await $.respond({
            status: 200,
            headers: { 'Content-Type': 'application/json' },
            body,
        });
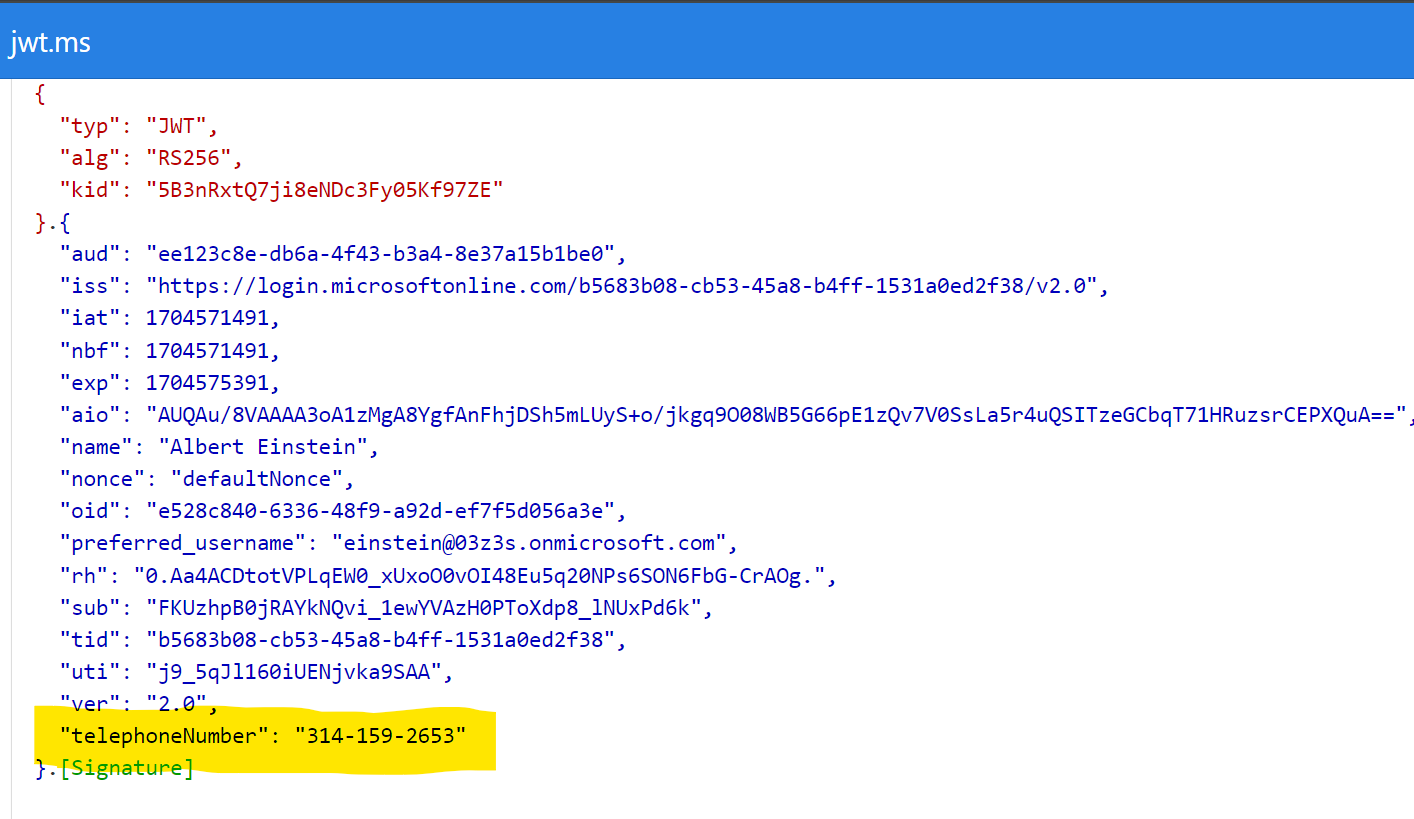
We have two prominent scientists using the Application, Albert Einstein and Nicola Tesla. Let’s see what happens when they login to the application.
First the greatest scientist of all time, Albert Einstein logs in to the application. He logs in using his userPrincipalName einstein@03z3s.onmicrosoft.com and we can see the token returned by the application contains the telephoneNumber attribute.
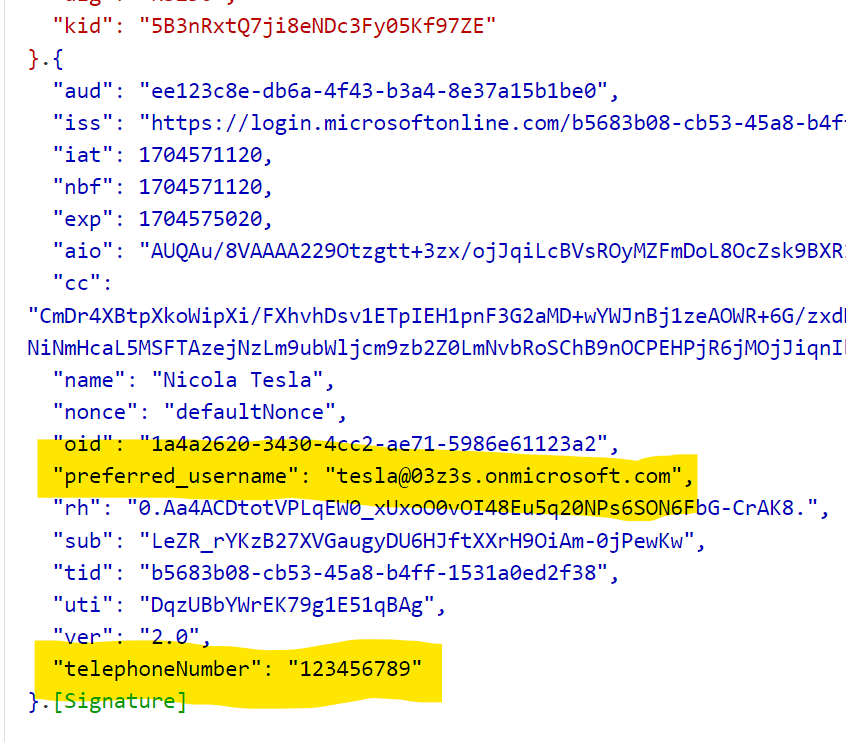
Now let’s see what happens when Nicola Tesla logs in to the application. He logs in using his userPrincipalName tesla@03z3s.onmicrosoft.com and we can see the token returned by the application contains the default value for the telephoneNumber attribute.
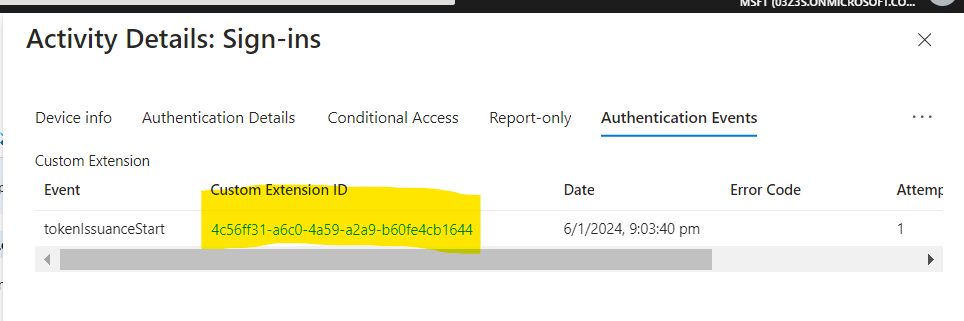
We can see the Sign-in logs in the Entra ID portal. We can see the Authentication Event for the specific sign-in instance. It also have the CustomExtensionID which is the ID of the custom authentication extension that was used to fetch the claims from the external LDAP Directory.
 .
.
For failed sign-in events we can see the error code
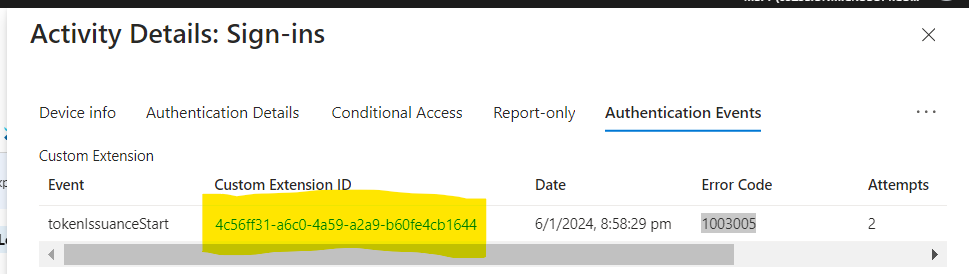 .We can look up the error code to troubleshoot the issue. In this case, the error code is
 1003005 which means The custom extension didn't respond within the allowed timeout.
Conclusion
I have just scratched the surface of the custom claims provider, my friends. There are some specific guidelines from Microsoft on how to secure APIs for custom claims providers, and I must admit, in my code snippets, I have committed some cardinal sins. I used clear text passwords (and even revealed Einstein’s telephone number!). But fear not, my friends, in a more real-world scenario, I would expect to work with SQL databases or more complex federated identity systems like Okta or Ping Identity. So, my dear readers, I hope this blog post will help you get started with the custom claims provider and explore the endless possibilities it offers. Stay curious, my friends!