Table of Contents
Introduction
Identity Architects and Identity Architect Consultants have different jobs. As an external consultant, you might help organizations implement identity lifecycle management solutions or set up effective identity governance strategies. As an enterprise IAM architect, you’re responsible for providing the best IAM solution for all technology questions, including those from other architects and engineers.
For example, For your organization that deals with Cat Food products, a data architect might want to create a dashboard for the internal audit team that leverages an internal API to get consumer data stored in an SQL database. As an IAM architect, it’s your job to suggest the most secure and efficient way to do this.
The easiest method would be to suggest using an API key to retrieve the data. However, this would compromise the exclusivity of the API consumer, the dashboard.
A better approach would be to use API authentication logic to look for a specific client and authenticate the request based on the presence of the client in the access token. This would provide more flexibility and security, but it would require more expertise in authentication paradigms.
However, it’s worth noting that your API developers may excel in designing Microservice-based architectures but might not possess a deep understanding of the intricacies of authentication paradigms. In such cases, you must step in and collaborate with these talented individuals to bridge the gaps in knowledge and ensure a well-rounded solution.
What about the IDP (Identity Provider) question? As your organization expands, the number of IDPs utilized for various purposes also increases. As a developer, you may desire your API Consumer application (in this instance, a dashboard) to accommodate as many IDPs as possible. However, managing multiple IDPs can result in duplicated accounts and excessively privileged accounts. Generally, it is advisable to adopt a unified IDP as a best practice.
Diagram

Steps
-
API Consumer dashboard application authenticates with Client ID and Client Secret to the token’s endpoint (Client Credentials flow) alternatively user can authenticate with delegated permissions (Authorization Code flow or implicit grant flow) and get the access token from the token endpoint.
-
IDP (in our case Entra ID) validates the Client ID, Client Secret, and API claim, and creates the access token for API.
-
Access Token is sent to the dashboard application.
-
Now the dashboard application can request data from the backend API by sending the access token retrieved from IDP (Entra ID) in the HTTP Request in the bearer authorization header.
-
Backend API validates the access token, specifically audience and issuer claims.
-
After validating the token the API retrieves the data from the backend database.
-
Data is presented to the user in the API dashboard.
To get the audience claim in the access token, it is necessary to register the target API. In the next section, we are going to explore how can we achieve this in Entra ID.
Entra ID Implementation
Register an Application in Azure AD to Represent the API
-
In the Entra ID, navigate to App registrations.
-
Click on New Registration.
-
Fill out the application’s registration information on the Register an application page:
-
In the Name section, provide a descriptive application name (e.g., CAT API) that will be visible to app users.
-
In the Supported Account Types section, select the option that aligns with your scenario. In our case, the dashboard is going to be used by users within our organization, so we are going to select Accounts in this organizational directory only.
-
Leave the Redirect URI section empty for now.
-
- Click Register to create the application.

-
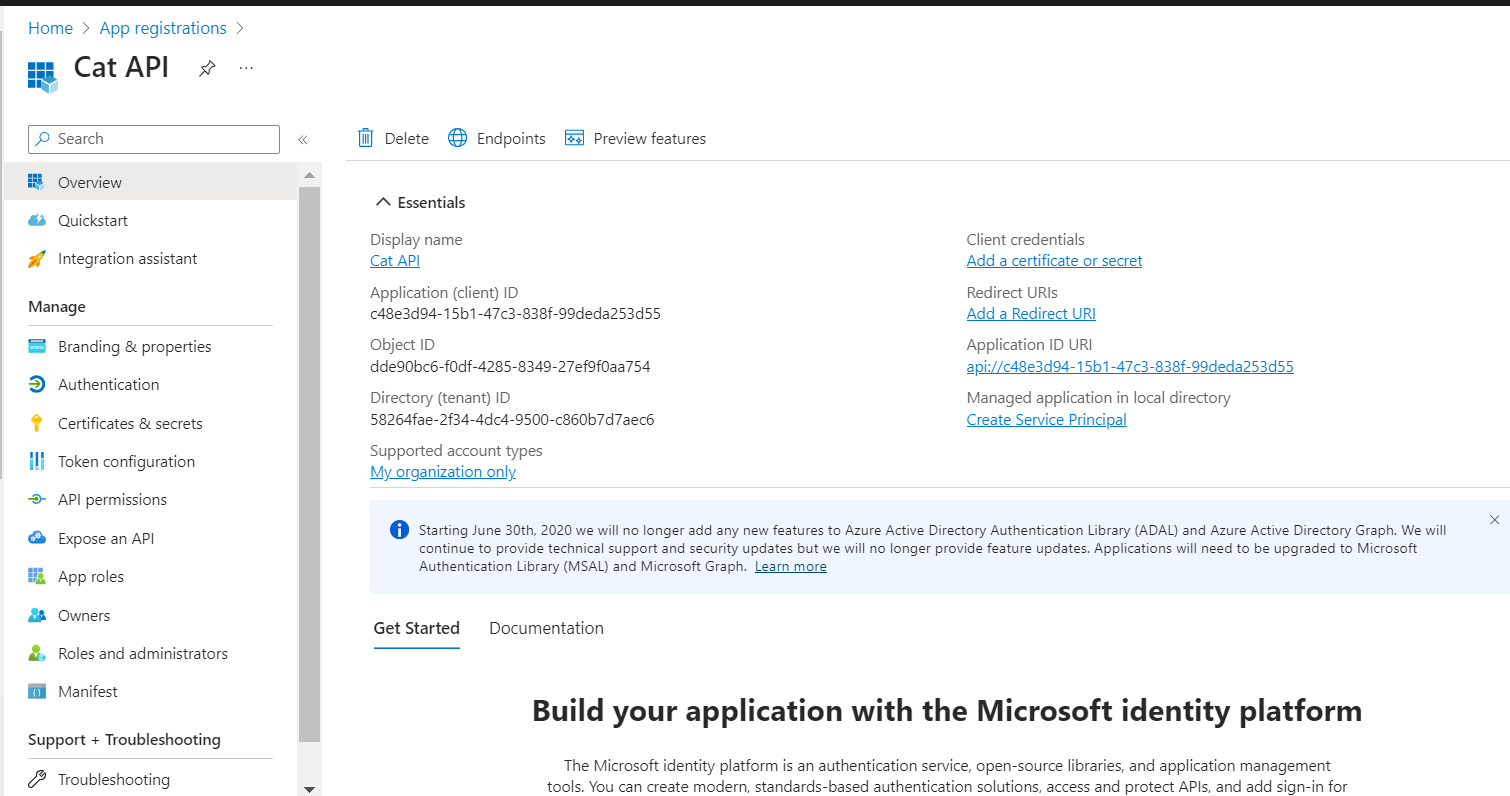
On the application’s Overview page, take note of the Application (client) ID value for future reference.
-
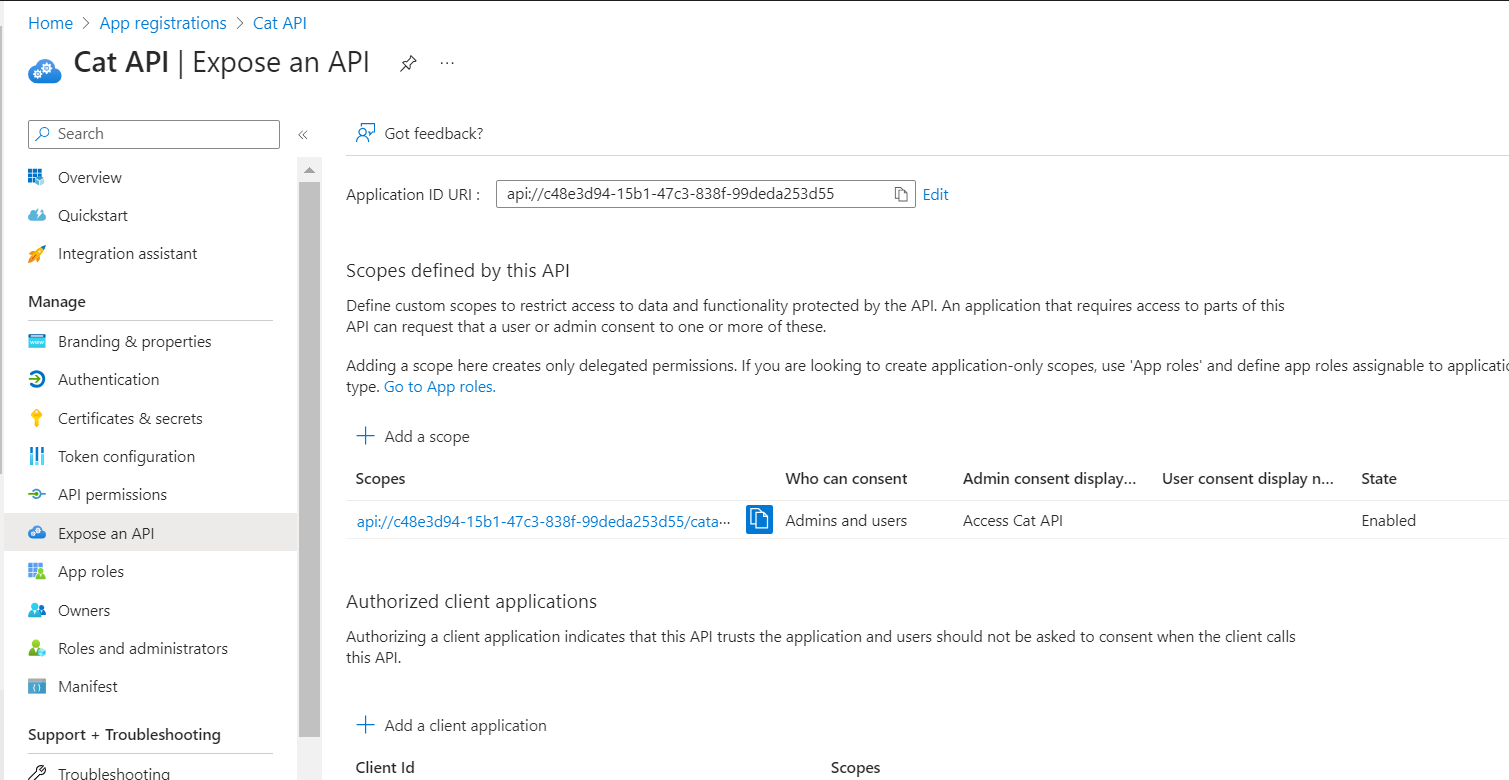
In the side menu under Manage, choose Expose an API, and set the Application ID URI to the default value. Make a record of this value. We will use the format
api://<Application ID>as the identifier URI for the API. -
To define a scope, click the Add a Scope button, which will open the Add a Scope page:
- Specify a Scope name that corresponds to a scope supported by the API. We are going to expose the API ‘catapi.access’ scope.
-
Under Who can consent?, select the appropriate option based on your scenario (e.g., Admins and users or Admins only for higher-privileged scenarios). We are going to select Admins and users.
-
Provide an Admin consent display name and Admin consent description.
- Ensure that the Enabled scope state is selected.
-
Click Add scope to create the scope.
-
Repeat the previous two steps for each scope supported by your API.
- Once all scopes are created, make a note of them for use in subsequent steps.
You can also use the following PowerShell script to register the application in Azure AD to represent the API.
# Register an application in Azure AD to represent the API
Import-Module Microsoft.Graph.Applications

$params = @{
	displayName = "Cat API"
}

$app = New-MgApplication -BodyParameter $params


$applicationId = $app.Id
$AppID = $app.AppId
$APIScopeID = $(New-Guid).Guid

Import-Module Microsoft.Graph.Applications

$params = @{
	SignInAudience = "AzureADMyOrg"
    IdentifierUris =@( "api://$AppID")
    Api = @{
        requestedAccessTokenVersion = 2
        oauth2PermissionScopes = @(
            @{
                adminConsentDescription = "Allow the application to access Cat API ."
                adminConsentDisplayName = "Access Cat API"
                isEnabled = $true
                id = $APIScopeID
                type = "User"
                value = "catapi.access"
            }
        )


}
}
Update-MgApplication -ApplicationId $applicationId  -BodyParameter $params -Debug


// For Applications created using API , we need to explicitly created Service Principal
// to instantiate the Application in local directory

$params = @{
 appId = $AppID
}


$spn = New-MgServicePrincipal -BodyParameter $params
Register an Application in Azure AD to Represent the API Consumer Dashboard App
-
In the Entra ID Portal, go to App registrations.
-
Click on New registration.
-
Fill in the registration details for your application on the Register an application page:
-
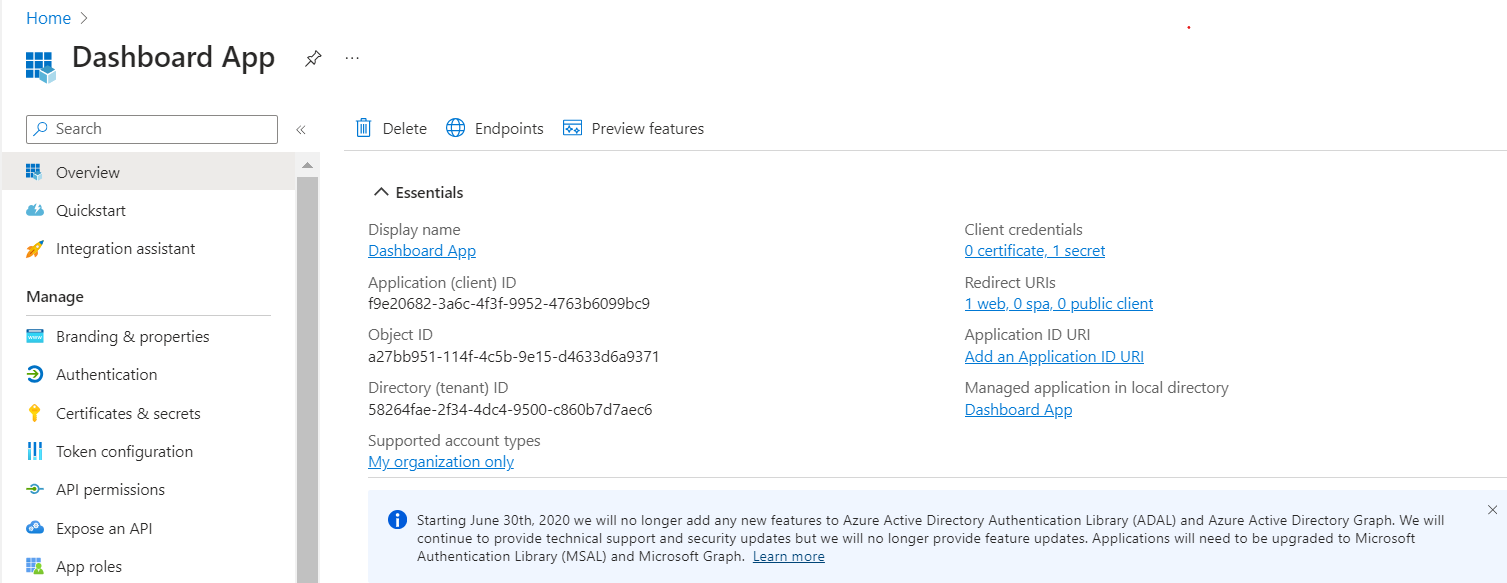
In the Name section, provide a meaningful name for the application that will be visible to its users, in our case, we are naming it Dashboard-App.
-
In the Supported Account Types section, select the option that aligns with your use case which is Accounts in this organizational directory only.
-
In the Redirect URI section, choose Web and add the redirect URL where the token will be sent after the user signs in. I have added the URL https://jwt.ms for testing purposes.
-
-
Click Register to create the application.
-
On the application’s Overview page, make a note of the Application (client) ID for future reference.
-
Create a client secret for this application to be used in subsequent steps.
-
In the side menu under Manage, select Certificates & secrets.Under Client Secrets, click + New client secret.
-
Provide a Description for the secret and choose the expiration period.
-
Click Add.
-
Once the secret is generated, take note of the key value for use in later steps. Please be aware that you won’t be able to access the secret again in the portal.
-
Now that we have registered the API and the API Consumer application, we need to grant the API Consumer application access to the API. To do this, navigate to the API permissions section of the API Consumer application’s Overview page.
-
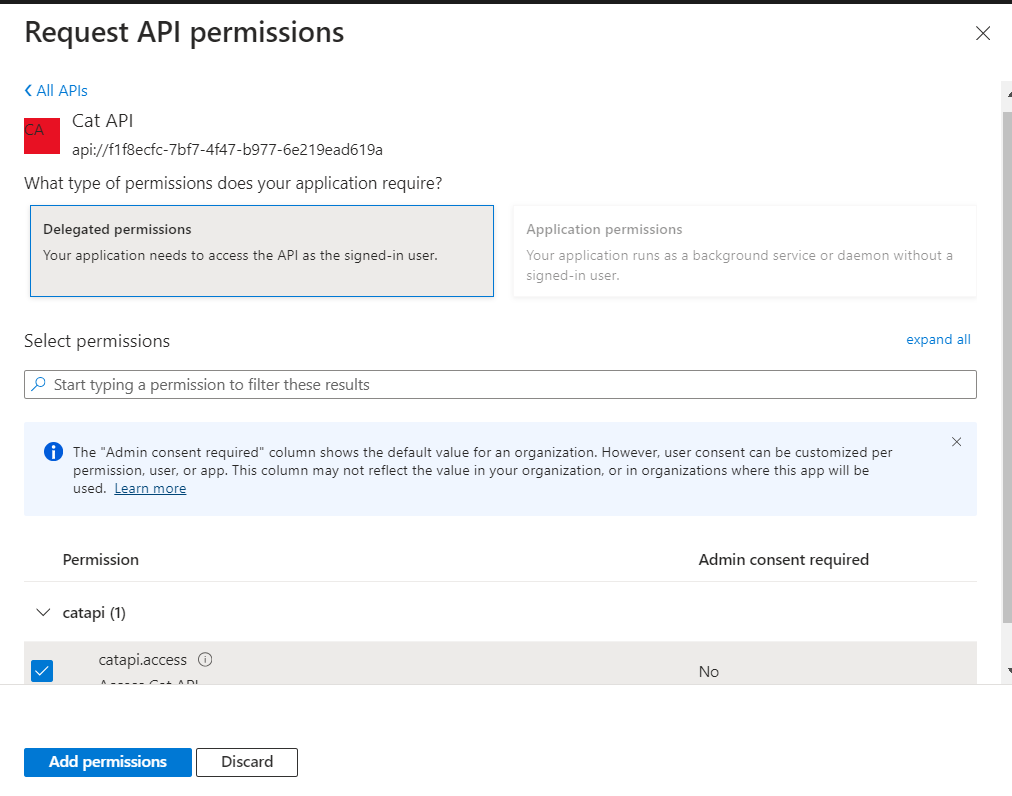
Click + Add a permission.
-
In the Request API permissions pane, select APIs my Organization Use.
-
Find the API you created earlier, select the appropriate scope(s), and click Add permissions.
-
Click Grant admin consent for {tenant} and click Yes when prompted.
#Create Consumer App

$params = @{
    displayName = "Dashboard App"
    SignInAudience = "AzureADMyOrg"
    Web = @{
        redirectUris = @(
            "https://jwt.ms"
        )
        implicitGrantSettings = @{
            enableIdTokenIssuance = $false
            enableAccessTokenIssuance = $true
        }
    }
    requiredResourceAccess = @(
        @{
            resourceAppId = $AppID
            resourceAccess = @(
                @{
                    id = $APIScopeID
                    type = "Scope"
                }
            )
        }

    )
}

$appConsumer = New-MgApplication -BodyParameter $params


$ConsumerapplicationId = $appConsumer.Id
$ConsumerAppID = $appConsumer.AppId

Import-Module Microsoft.Graph.Applications

$params = @{
    passwordCredential = @{
    displayName = "Dashboard App Credential"
    }
}

$AppCred = Add-MgApplicationPassword -ApplicationId $ConsumerapplicationId -BodyParameter $params


$ConsumerSPN = New-MgServicePrincipal -AppId $ConsumerAppID
Now that we have registered the API and the API Consumer application, and granted the API Consumer application access to the API, we need to configure the API to accept the access token from the API Consumer application.
Showing this is beyond the scope of this article, as an alternative you can use the Azure API Management to offload the authentication and authorization logic from the API.
Now let’s add a user to the Dashboard App and request the access token.
https://login.microsoftonline.com//oauth2/v2.0/authorize?client_id=&nonce=defaultNonce&response_type=token&redirect_uri=https%3A%2F%2Fjwt.ms&scope=api:///catapi.access
User will be prompted to sign in and consent to the API permissions.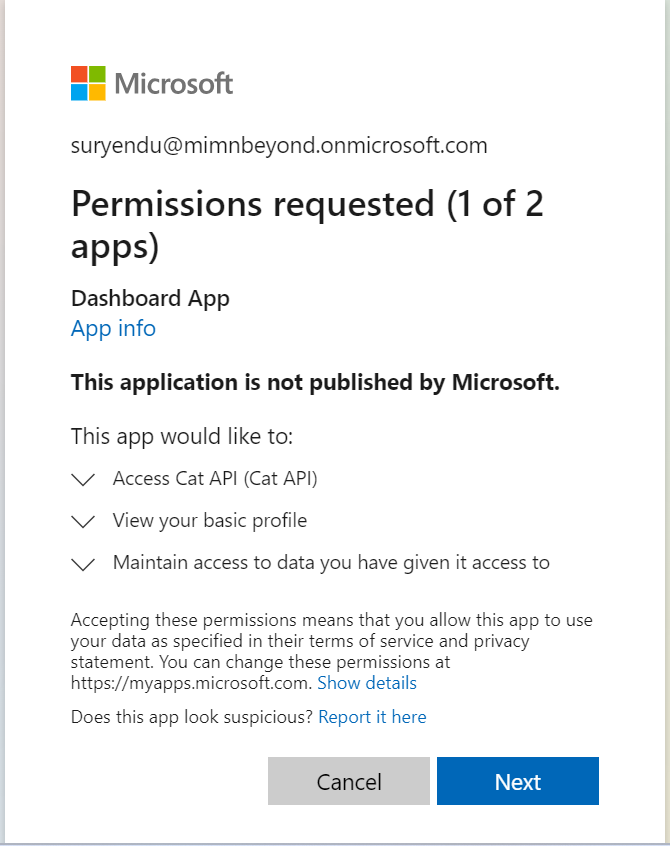 . Notice that the access token requires permission for the Access Cat API scope.
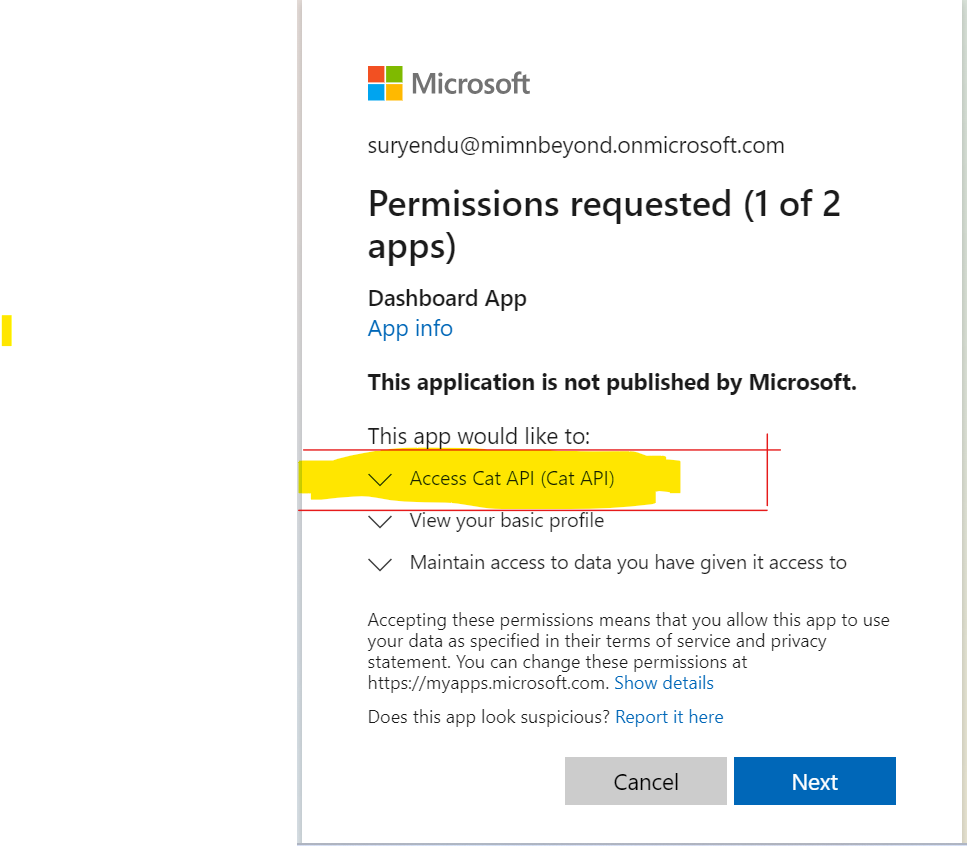
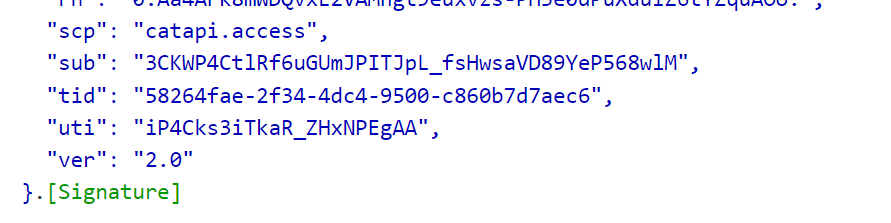
We can verify the access token at https://jwt.ms. The access token is a JWT token and it contains the audience claim which is the API App ID, the issuer claim which is the Entra ID tenant ID, and the scp claim is is the API scope configured.
 .
.
 .
.
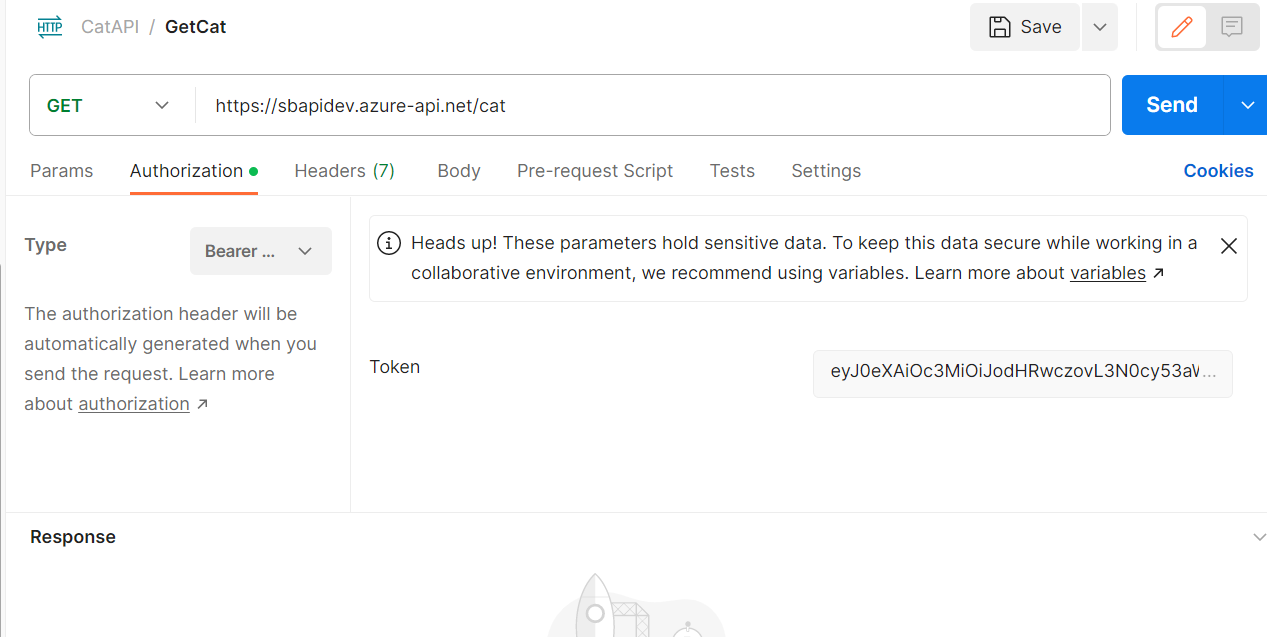
Now our dashboard app can make HTTP calls to the API by passing the access token in the Authorization header.
 .
.
 .
.
Conclusion
API Authentication with OAuth is a secure and efficient way to protect your API from unauthorized access. It allows you to grant different levels of access to different users and applications, and to easily manage those permissions.
In this article, we have discussed the steps involved in implementing API Authentication with OAuth using Entra ID. We have also covered how to register the API and the API Consumer application in Azure AD, and how to grant the API Consumer application access to the API.
Once you have followed the steps in this article, your API will be protected by OAuth and your API Consumer application will be able to authenticate and access the API securely.
Additional considerations
-
Use a unified IDP: A unified IDP simplifies the user experience and makes it easier for developers to support effective authorization.
-
Use strong passwords and enable multi-factor authentication (MFA): This will help to protect your API and your user accounts from unauthorized access.
-
Monitor your API logs: This will help you to identify any suspicious activity and to take corrective action as needed.