Simplifying GitHub Authentication with Entra ID Federated Credentials: Terraforming Conditional Access Policies via GitHub Workflows - Part 1
- Simplifying GitHub Authentication with Entra ID Federated Credentials: Terraforming Conditional Access Policies via GitHub Workflows - Part 1
- Introduction
- Steps
- Create an Application Object in Entra ID Tenant
- Add Federated Credential for GitHub Repo
- Authentication Challenge
- Advantages of Workload Identity Federation (WIF)
- Create an Application Object in Entra ID Tenant
- Add Federated Credential for GitHub Repo
- Introduction to Entra ID Module For Terraform
- Authenticating with Federated Credentials
- Azure AD Conditional Access Policy Configuration
- Setting up GitHub Action Workflow for Conditional Access Policy Deployment
- Conclusion
Introduction
Almost a year ago, I found myself facing a captivating challenge: deploying Privilege Identity Management (PIM) roles using Terraform and orchestrating the deployment process through GitHub Workflows. The organization I worked with was no stranger to the cloud, hosting its entire infrastructure there and wholeheartedly embracing automated continuous deployment as the standard practice for all deployment operations. Their unwavering commitment to this approach extended even to Identity and Access Management (IAM) deployment, a decision that, as you’ll discover, was entirely justified.
My background primarily revolved around IAM intricacies, and this project propelled me into the realm of DevOps – a world characterized by automation and unceasing workflows. I was, to be honest, a relative newcomer to this landscape. Yet, this project was not just another technical endeavor; it was an opportunity to bridge the gap between IAM and DevOps, leveraging GitHub authentication, Azure Active Directory (Azure AD), and Terraform.
This journey was a challenge worth embracing, a path that would reveal the remarkable potential of blending IAM and DevOps in a more agile and efficient manner. In this article, we’ll take a technical dive into the process I followed, detailing the authentication flow within Entra ID, and the deployment of conditional access policies using Terraform – all orchestrated through the magic of GitHub Workflows. Join us as we explore how this combination of technologies can simplify your access management and enhance security within the DevOps realm.
Authentication Challenge
Our journey begins by addressing the crucial issue of authentication. For our purposes, we opt for the Client Credentials flow using Client ID and Client Secrets. However, securely managing these secrets for Terraform and subsequent GitHub Workflow integration poses a significant challenge for developers, DevOps teams, and IT administrators. While incorporating secrets into application configurations or exposing them as environment variables may appear intuitive, storing them directly in code and committing them to GitHub repositories can lead to potential security disasters. To counter this vulnerability, developers often seek secure storage solutions such as a vault. Nevertheless, this approach necessitates periodic expiration and rotation of secrets in Key Vaults, a task that, if not executed correctly, can introduce service availability challenges. Additionally, manual management of secrets carries the risk of individuals departing from the organization with access to critical secrets, potentially resulting in unauthorized resource access. Striking the right balance between security and service continuity becomes a complex endeavor in the realm of secrets management.
Advantages of Workload Identity Federation (WIF)
We’ve chosen to implement Workload Identity Federation (WIF) due to its numerous advantages:
- No Secrets to Manage
- Use of Azure AD Graph API Permissions
- Short-Lived Tokens
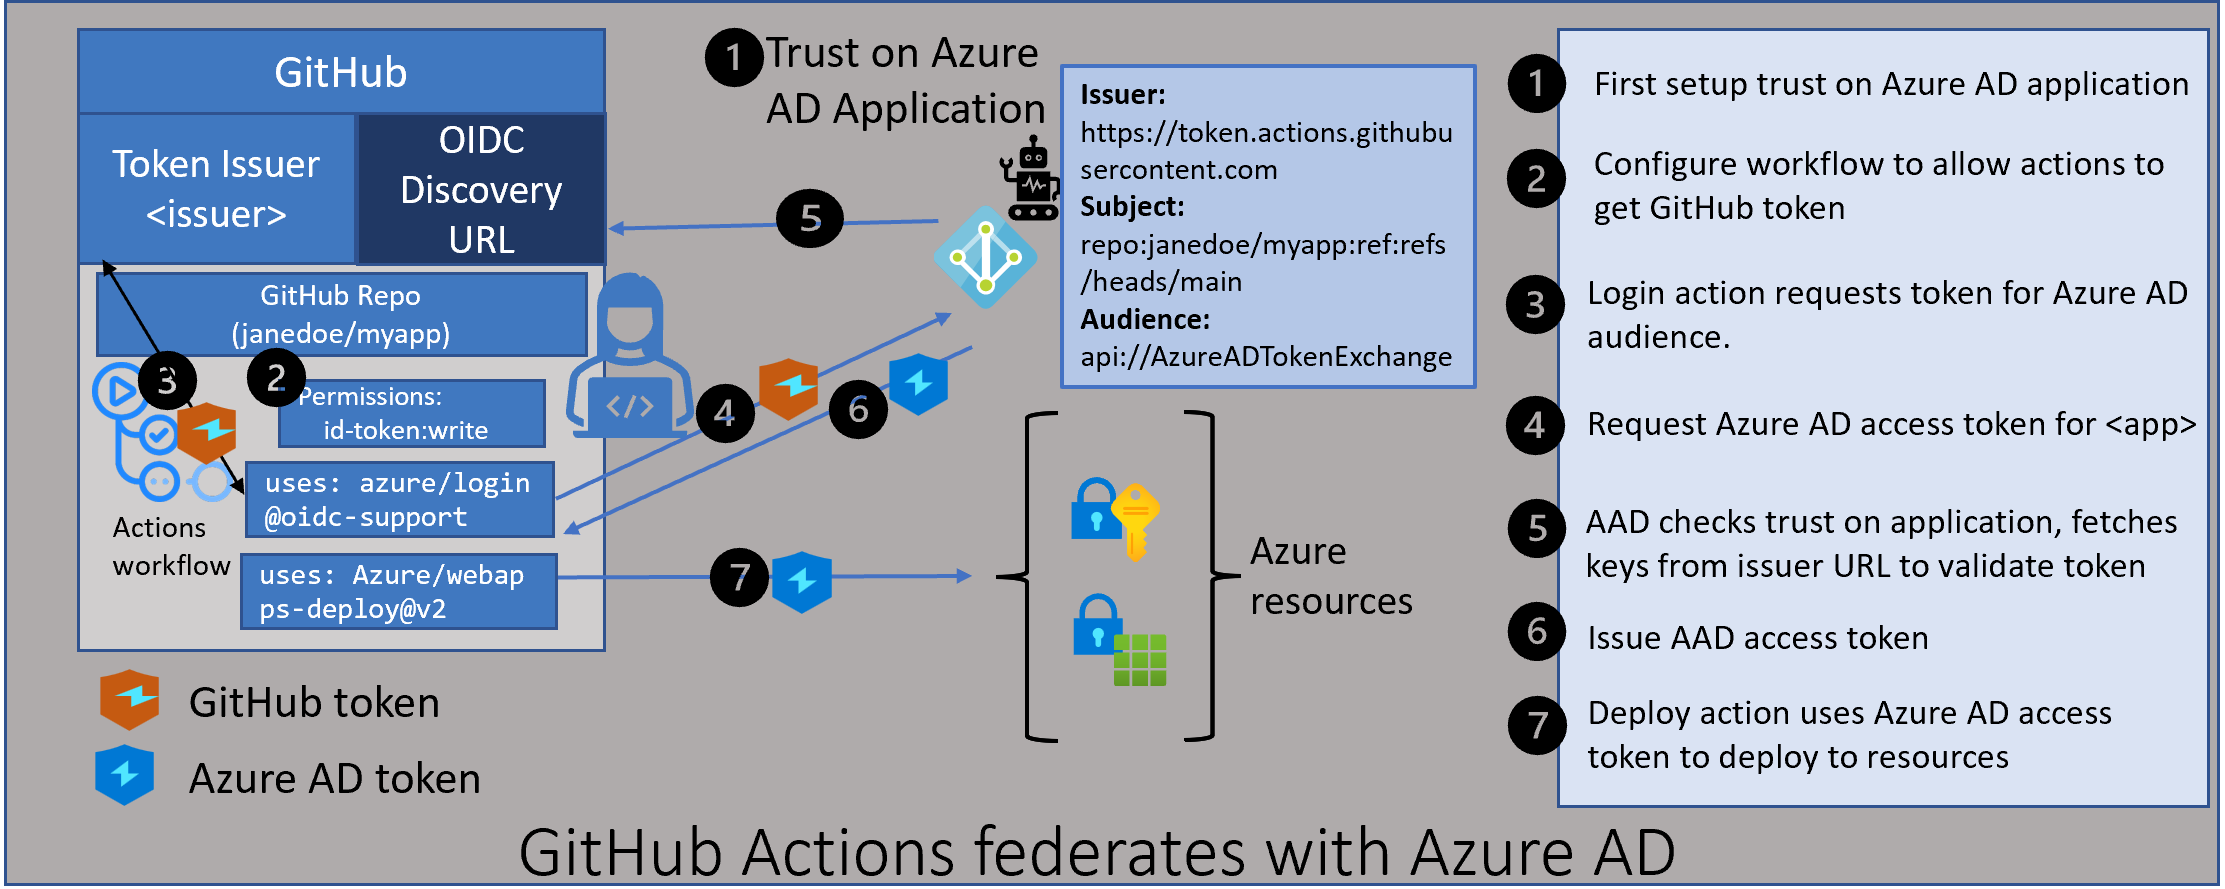
So, how do federated identity credentials interact with GitHub and Entra ID?
The process begins by establishing a trust relationship between an external identity provider (IdP), in this case, GitHub, and an app in Entra ID with a federated identity credential. This federated identity credential specifies which tokens from GitHub should be trusted by your application. Once this trust relationship is established, GitHub can exchange trusted tokens from the external identity provider for access tokens from the Microsoft identity platform. GitHub then utilizes this access token to access Azure AD-protected resources granted access by the workload. This eliminates the manual credential management burden and minimizes the risk of secret leakage or certificate expiration. For additional information and supported scenarios, please refer to workload identity federation.
Steps
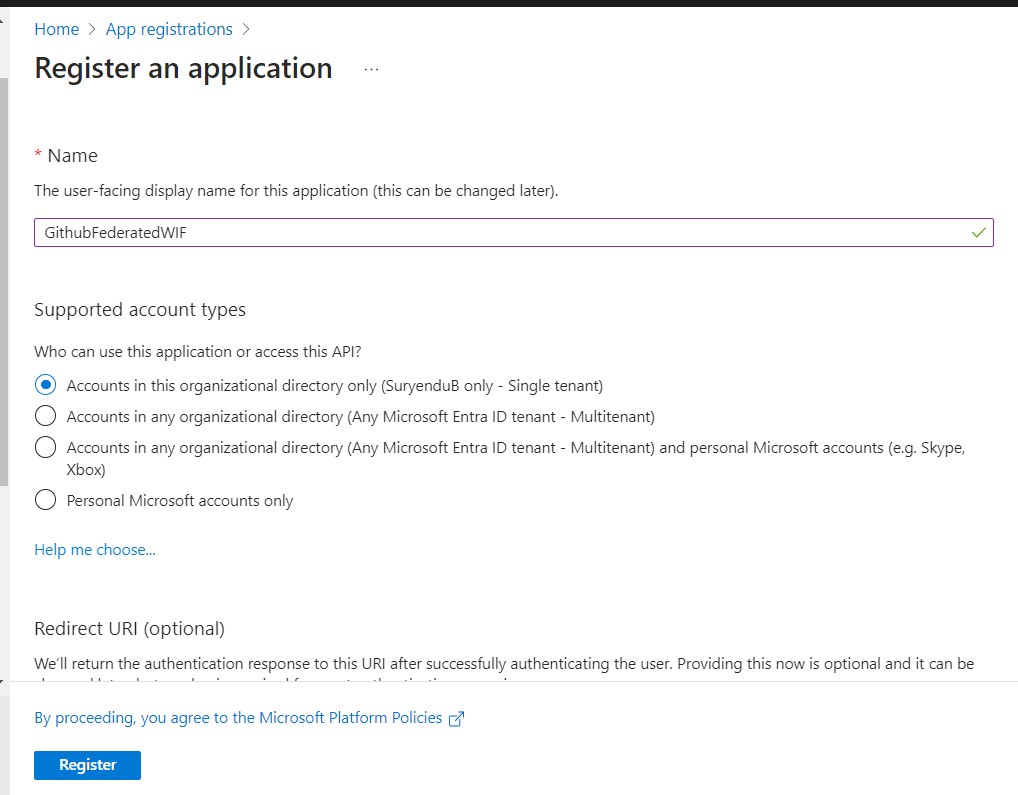
Create an Application Object in Entra ID Tenant
Our initial step is to create an Application Object or User Assigned Managed Identity in Entra ID.
As a best practice, I recommend configuring this using the Graph API, facilitating easier migration between staging and production tenants.
Import-Module Microsoft.Graph.Beta.Applications
Connect-MgGraph -TenantID '****************-2f34-4dc4-9500-****************' -Scope 'Application.ReadWrite.All'
$params = @{
 displayName = "GithubFederatedWIF2"
}

$Application = New-MgBetaApplication -BodyParameter $params
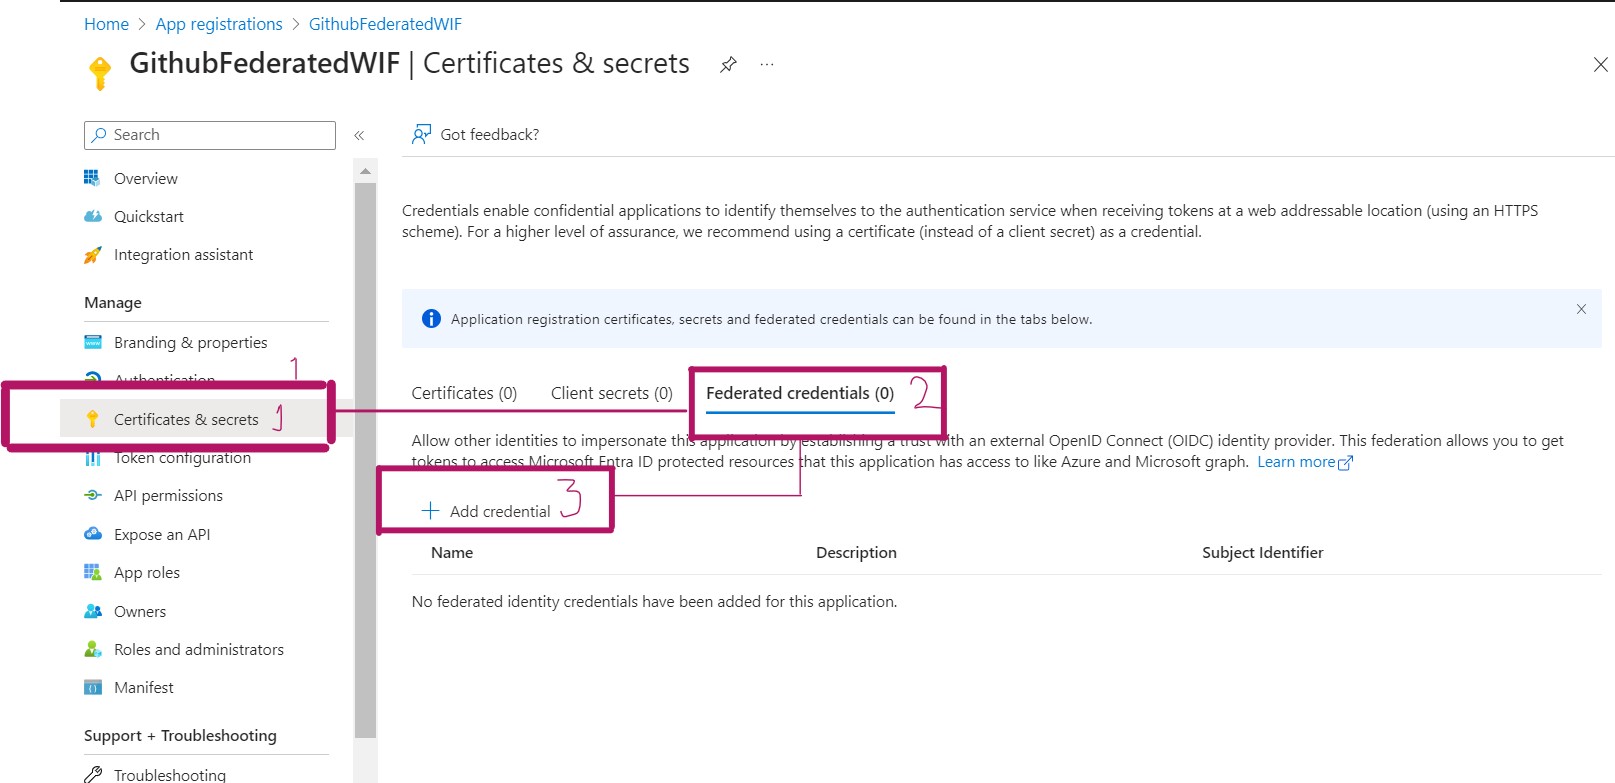
Add Federated Credential for GitHub Repo
Follow the instructions mentioned in the steps below to add Federated Credentials for your Github Repository. As I am doing this using my Personal Github Repo, I went with the branch strategy.

Import-Module Microsoft.Graph.Beta.Applications
$applicationId = $Application.Id
$params = @{
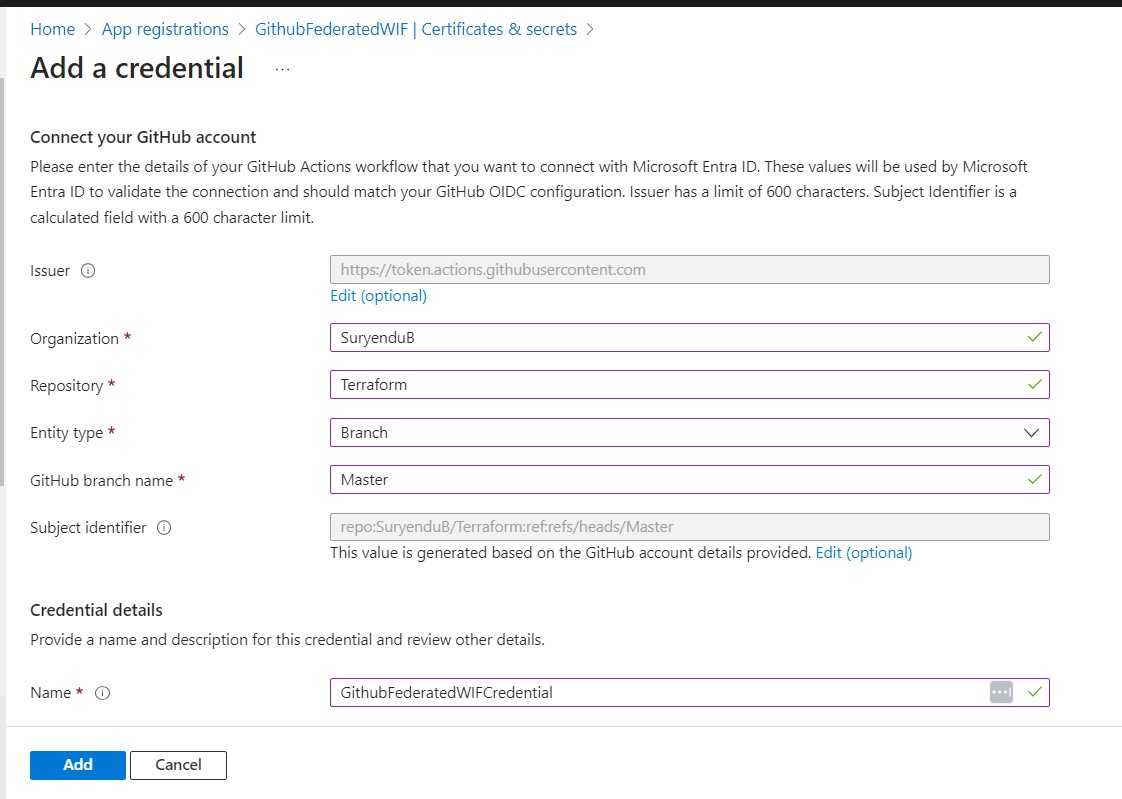
name = "GithubFederatedWIFCredential"
issuer = "https://token.actions.githubusercontent.com"
subject = "repo:SuryenduB/Terraform:ref:refs/heads/Master"
audiences = @(
"api://AzureADTokenExchange"
)
}
New-MgBetaApplicationFederatedIdentityCredential -ApplicationId $applicationId -BodyParameter $params

Given that our application’s primary objective is to grant necessary permissions for modifying Conditional Access Policies, I’ll add the following permissions to the Application Object Policy.Read.All, Policy.ReadWrite.ConditionalAccess, and Application.Read.All.

Introduction to Entra ID Module For Terraform
We will use the official AzureAD provider from Hashicorp. List of Actions that you can perform using this Provider is very extensive. I have listed down available resources you can work using this terraform provider.
- Authentication
- Upgrade Guides
- Administrative Units
- App Role Assignments
- Applications
- Base
- Conditional Access
- Delegated Permission Grants
- Directory Role Templates
- Directory Roles
- Domains
- Groups
- Identity Governance
- Invitations
- Policies
- Service Principals
- Synchronization
- User Flows
- Users
There are few great guildelines on how to organize your terraform codes , I will not delve into that. But at the very basic I will separate the provider files from the resource file.
The terraform block at the beginning of the file defines the required provider for the configuration. In this case, the required provider is azuread, which is the provider for Microsoft Azure Active Directory. I am using the latest version available i.e. 2.42.0. This ensures that the same version of the provider is used when applying the configuration, which helps to prevent unexpected changes or errors.
The provider block configures the Microsoft Azure Active Directory provider for use in the configuration. Now our initial goal is to not use any secrets in entire deployment process. Keeping this in mind we will Authenticate to Entra ID using a Service Principal and OpenID Connect. The use_oidc attribute is set to true, which enables the provider to use OpenID Connect (OIDC) authentication to authenticate with Entra ID.
terraform {
  required_providers {
    azuread = {
      source  = "hashicorp/azuread"
      version = "=2.42.0"
    }
  }
}
# Configure the Microsoft Azure Provider
provider "azuread" {
  use_oidc = true


}
As we need to Obtain token using Federated Credentials , we need to nake the actions variable availble as Environment Variable.
export ARM_CLIENT_ID="00000000-0000-0000-0000-000000000000"
export ARM_TENANT_ID="00000000-0000-0000-0000-000000000000"
Authenticating with Federated Credentials
To configure secrets or variables on GitHub, your level of access depends on the repository type:
-
Personal Account Repository: You must be the repository owner to create secrets or variables.
-
Organization Repository: Admin access is required to create secrets or variables for organization repositories.
-
REST API Access: To create secrets or variables for either personal account or organization repositories via the REST API, you need collaborator access.
Here’s a step-by-step guide:
-
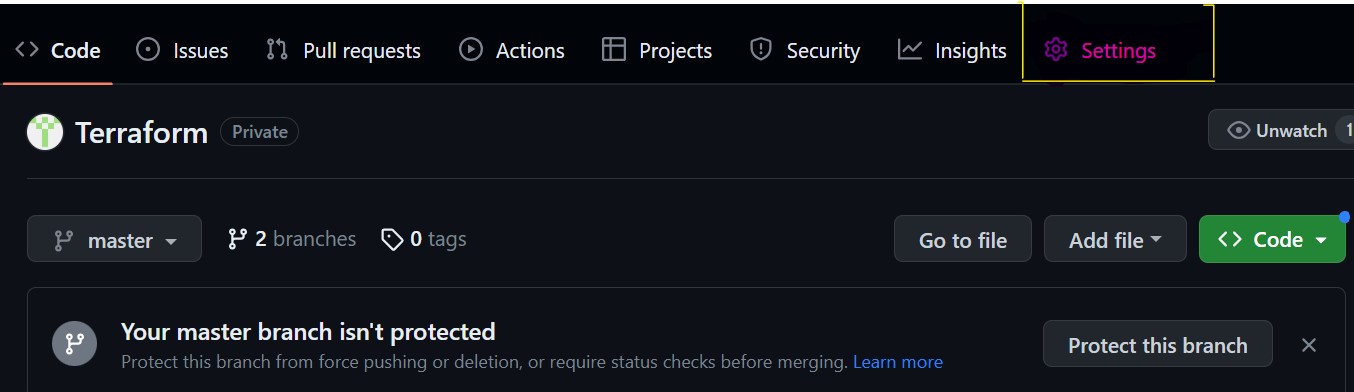
Go to GitHub.com and navigate to the main page of your repository.
-
Under the repository name, click on “Settings.” If you don’t see the “Settings” tab, click on the dropdown menu, then select “Settings.”
-
In the sidebar, under the “Security” section, select “Secrets and variables,” then click “Actions.”
-
Click on the “Secrets” tab.
-
To create a new repository secret, click on “New repository secret.”
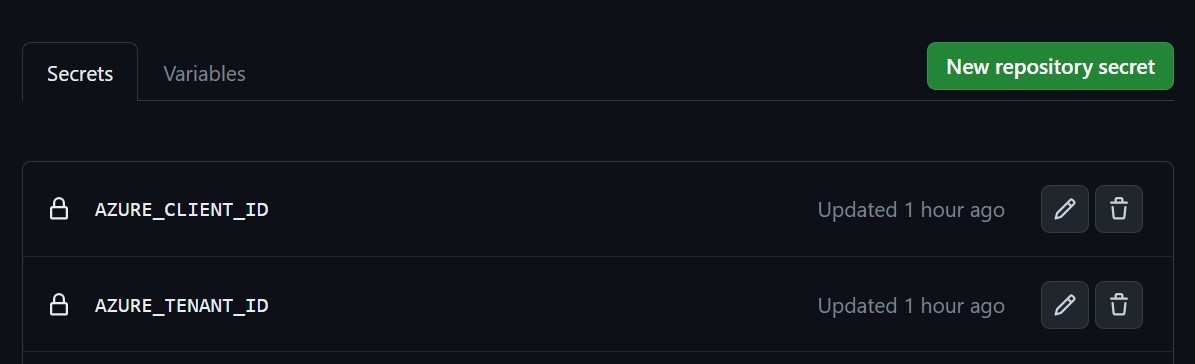
-
In the “Name” field, provide a name for your secret. In our case, we need to create two secrets: AZURE_CLIENT_ID and AZURE_TENANT_ID. Note that there’s no need to store a client secret anymore.
-
In the “Secret” field, enter the value for your secret. For AZURE_CLIENT_ID, provide the Application ID of the application you’ve configured for federated credentials. For AZURE_TENANT_ID, provide the Tenant ID of the Entra ID Tenant.
-
Click “Add secret.”
Creating a Terraform Folder Structure for Conditional Access Policy Deployment
I’ll keep the folder structure simple for now. Typically, it’s a best practice to have separate Terraform files for specific resource types within an environment folder.
I’ve created only one file, main.tf, which will serve as the container for the Conditional Access Policy I’m going to deploy.

Our objective is to deploy a Conditional Access Policy that restricts access to Entra ID Tenants for high-risk users. This aligns with the Zero Trust strategy adopted by the organization SuryenduB.
Azure AD Conditional Access Policy Configuration
In this Terraform configuration, we define an azuread_conditional_access_policy resource named “CA01-BlockHighRiskUsers” to manage Azure AD conditional access policies. Let’s break down the key attributes and settings:
resource "azuread_conditional_access_policy" "CA01-BlockHighRiskUsers" {
  display_name = "Block high risk users"
  state        = "enabledForReportingButNotEnforced"
}
display_name: Specifies the name of the policy, which is set to “Block high risk users.”state: Sets the state of the policy to “enabledForReportingButNotEnforced.” This means that the policy is enabled for reporting purposes but not yet enforced.
Policy Conditions
The conditions block defines the conditions under which the policy applies. Let’s look at the specific conditions:
conditions {
  client_app_types    = ["all"]
  sign_in_risk_levels = ["high"]
  user_risk_levels    = ["high"]
}
client_app_types: Specifies the types of client applications that are allowed to access Azure AD resources. In this case, all client application types are allowed.sign_in_risk_levels: Sets the risk levels for sign-in events that trigger the policy. Here, only high-risk sign-in events trigger the policy.user_risk_levels: Determines the risk levels for users that trigger the policy. In this case, only high-risk users trigger the policy.
Application and User Settings
The applications block specifies which applications are included or excluded from the policy. In this scenario, all applications are included, and none are excluded. Additionally, the users block defines which users are included or excluded from the policy. Here, all users are included, except for guests or external users.
applications {
  included_applications = ["All"]
  excluded_applications = []
}
Grant Controls
Finally, the grant_controls block specifies the grant controls that come into play when the policy is triggered. It involves logical operators and built-in controls:
grant_controls {
  operator          = "OR"
  built_in_controls = ["block"]
}
operator: Specifies the logical operator used to combine the built-in controls. In this case, it’s “OR.”built_in_controls: Lists the built-in controls applied when the policy is triggered. Here, the sole built-in control is “block,” which effectively blocks access to Azure AD resources.
Complete Code Below :
resource "azuread_conditional_access_policy" "CA01-BlockHighRiskUsers" {
  display_name = "Block high risk users"
  state        = "enabledForReportingButNotEnforced"

  conditions {
    client_app_types    = ["all"]
    sign_in_risk_levels = ["high"]
    user_risk_levels    = ["high"]

    applications {
      included_applications = ["All"]
      excluded_applications = []
    }


    users {
      included_users = ["All"]
      excluded_users = ["GuestsOrExternalUsers"]
    }
  }

  grant_controls {
    operator          = "OR"
    built_in_controls = ["block"]
  }


}
Setting up GitHub Action Workflow for Conditional Access Policy Deployment
With our Federated Credentials authentication configuration in place and the necessary Terraform code for deploying the Conditional Access (CA) policy ready, it’s time to create the GitHub Action Workflow for actual deployment.
Workflow Trigger
This workflow is triggered in response to two events:
- Pushes to the master branch.
- Pull requests (PRs) to the master branch that involve changes to files within either the
.github/workflows/terraform.yamlorEntraID/directories. These directories contain the IAM (Identity and Access Management) configurations necessary for our deployment.
Workflow Jobs
The GitHub Action Workflow is designed with two distinct jobs:
1. terraform-plan
This job focuses on the planning phase of the deployment process. It performs the following tasks:
- Checks out the repository to access the latest code.
- Sets up the Terraform CLI.
- Changes the working directory to
EntraID/where the Terraform configurations are stored. - Initializes the Terraform working directory.
- Ensures that all Terraform configuration files adhere to the canonical format.
- Logs in to Azure CLI with Federated Credentials.
- Generates an execution plan for Terraform and saves it as
tfplan. - Publishes the Terraform plan as an artifact for later stages.
2. terraform-apply
This job focuses on the application phase of the deployment process and is triggered under specific conditions:
- Only when changes are detected in the master branch (
github.ref == 'refs/heads/master'). - Only if the previous
terraform-planjob resulted in pending changes (needs.terraform-plan.outputs.tfplanExitCode == 2).
The tasks within this job include:
- Checking out the repository.
- Setting up the Terraform CLI.
- Logging in to Azure CLI with Federated Credentials.
- Initializing the Terraform working directory.
- Downloading the saved Terraform plan (
tfplanartifact) generated in theterraform-planjob. - Applying the Terraform plan to the Azure environment.
This structured workflow ensures that the CA policy deployment process is orchestrated efficiently, with clear separation between planning and application stages. Any changes detected in the master branch related to IAM configurations trigger the workflow, allowing for controlled and automated deployment.
name: 'Terraform Plan/Apply'

on:
  push:
    branches:
    - master
    paths:
    - '.github/workflows/terraform.yaml'
    - 'EntraID/**'

  pull_request:
    branches:
    - master
    paths:
The job or workflow run requires a permissions setting with id-token: write. We won’t be able to request the OIDC JWT ID token if the permissions setting for id-token is set to read or none.
#Special permissions required for OIDC authentication
permissions:
  id-token: write
  contents: read
  pull-requests: write
The terraform-plan job runs on an Ubuntu virtual machine in Github hosted runner following steps:
terraform-plan:
    name: 'Terraform Plan'
    runs-on: ubuntu-latest
    env:
      #this is needed since we are running terraform with read-only permissions
      ARM_SKIP_PROVIDER_REGISTRATION: true
    outputs:
      tfplanExitCode: $
- Checks out the repository to the GitHub Actions runner.
steps:
    # Checkout the repository to the GitHub Actions runner
    - name: Checkout
      uses: actions/checkout@v3
2.Installs the latest version of the Terraform CLI.
# Install the latest version of the Terraform CLI
    - name: Setup Terraform
      uses: hashicorp/setup-terraform@v2
      with:
        terraform_wrapper: false
3.Changes the working directory to the EntraID directory as this where we have configured our EntraID Configurations and prints the current working directory.
# Change Directory to EntraID Directory and Print Working Directory
    - name: Change Directory
      run: cd EntraID && pwd && ls -la
4.Initializes the Terraform working directory by creating initial files, loading any remote state, and downloading modules.
# Initialize a new or existing Terraform working directory by creating initial files, loading any remote state, downloading modules, etc from the EntraID Directory

    - name: Terraform Init
      run: cd EntraID && terraform init
5.Formats all Terraform configuration files to adhere to a canonical format.
# Checks that all Terraform configuration files adhere to a canonical format
    # Will fail the build if not
    - name: Terraform Format
      run: terraform fmt -check
6.Logs in to Azure CLI with federated credentials.
# Az CLI Login with Federated Credentials
    - name: 'Az CLI login with Federated Credentials'
      uses: azure/login@v1
      with:
          client-id: $
          tenant-id: $
          allow-no-subscriptions: true
7.Generates an execution plan for Terraform and saves it to the EntraID/tfplan file.
# Generates an execution plan for Terraform
    # An exit code of 0 indicated no changes, 1 a terraform failure, 2 there are pending changes.
    - name: Terraform Plan
      id: tf-plan
      run: |
        export exitcode=0
        cd EntraID && terraform plan -detailed-exitcode -no-color -out tfplan || export exitcode=$?

        echo "exitcode=$exitcode" >> $GITHUB_OUTPUT

        if [ $exitcode -eq 1 ]; then
          echo Terraform Plan Failed!
          exit 1
        else
          exit 0
        fi
8.Publishes the Terraform plan as an artifact.
# Save plan to artifacts
    - name: Publish Terraform Plan
      uses: actions/upload-artifact@v3
      with:
        name: tfplan
        path: EntraID/tfplan
9.Creates a string output of the Terraform plan and publishes it as a task summary.
# Create string output of Terraform Plan
    - name: Create String Output
      id: tf-plan-string
      run: |
        TERRAFORM_PLAN=$( cd EntraID && terraform show -no-color tfplan)

        delimiter="$(openssl rand -hex 8)"
        echo "summary<<${delimiter}" >> $GITHUB_OUTPUT
        echo "## Terraform Plan Output" >> $GITHUB_OUTPUT
        echo "<details><summary>Click to expand</summary>" >> $GITHUB_OUTPUT
        echo "" >> $GITHUB_OUTPUT
        echo '```terraform' >> $GITHUB_OUTPUT
        echo "$TERRAFORM_PLAN" >> $GITHUB_OUTPUT
        echo '```' >> $GITHUB_OUTPUT
        echo "</details>" >> $GITHUB_OUTPUT
        echo "${delimiter}" >> $GITHUB_OUTPUT
10.Posts the Terraform plan as a comment on the pull request (if applicable).
# If this is a PR post the changes
    - name: Push Terraform Output to PR
      if: github.ref != 'refs/heads/master'
      uses: actions/github-script@v6
      env:
        SUMMARY: "$"
      with:
          github-token: $
          script: |
            const body = `${process.env.SUMMARY}`;
            github.rest.issues.createComment({
                issue_number: context.issue.number,
                owner: context.repo.owner,
                repo: context.repo.repo,
                body: body
            })
Next it is the turn of The terraform-apply job to run (similarly in an Ubuntu virtual machine for Github Runner) and performs the following steps:
terraform-apply:
    name: 'Terraform Apply'
    env:
      #this is needed since we are running terraform with read-only permissions
      ARM_SKIP_PROVIDER_REGISTRATION: true

    if: github.ref == 'refs/heads/master' && needs.terraform-plan.outputs.tfplanExitCode == 2
    runs-on: ubuntu-latest
    needs: [terraform-plan]
- Checks out the repository to the GitHub Actions runner.
    # Checkout the repository to the GitHub Actions runner
    - name: Checkout
      uses: actions/checkout@v3
- Installs the latest version of the Terraform CLI and configures the Terraform CLI configuration file with a Terraform Cloud user API token.
# Install the latest version of Terraform CLI and configure the Terraform CLI configuration file with a Terraform Cloud user API token
    - name: Setup Terraform
      uses: hashicorp/setup-terraform@v2
3.Logs in to Azure CLI with federated credentials.
4.Initializes the Terraform working directory by creating initial files, loading any remote state, and downloading modules.
5.Downloads the saved Terraform plan from the tfplan artifact from the previous Job.
- name: Terraform Init
      run: cd EntraID && terraform init

# Download saved plan from artifacts  q
- name: Download Terraform Plan
 uses: actions/download-artifact@v3
      with:
        name: tfplan
6.Applies the Terraform plan to the Azure environment.
# Terraform Apply
    - name: Terraform Apply
      run: cd EntraID && terraform apply -auto-approve ../tfplan
Here is the complete workflow stored in .github/workflow folder.
name: 'Terraform Plan/Apply'

on:
  push:
    branches:
    - master
    paths:
    - '.github/workflows/terraform.yaml'
    - 'EntraID/**'

  pull_request:
    branches:
    - master
    paths:
    - 'EntraID/**'


#Special permissions required for OIDC authentication
permissions:
  id-token: write
  contents: read
  pull-requests: write

#These environment variables are used by the terraform azure provider to setup OIDC authenticate.
env:
  ARM_CLIENT_ID: $
  ARM_TENANT_ID: $


jobs:
  terraform-plan:
    name: 'Terraform Plan'
    runs-on: ubuntu-latest
    env:
      #this is needed since we are running terraform with read-only permissions
      ARM_SKIP_PROVIDER_REGISTRATION: true
    outputs:
      tfplanExitCode: $

    steps:
    # Checkout the repository to the GitHub Actions runner
    - name: Checkout
      uses: actions/checkout@v3

    # Install the latest version of the Terraform CLI
    - name: Setup Terraform
      uses: hashicorp/setup-terraform@v2
      with:
        terraform_wrapper: false

    # Change Directory to EntraID Directory and Print Working Directory
    - name: Change Directory
      run: cd EntraID && pwd && ls -la


    # Initialize a new or existing Terraform working directory by creating initial files, loading any remote state, downloading modules, etc from the EntraID Directory

    - name: Terraform Init
      run: cd EntraID && terraform init

    # Checks that all Terraform configuration files adhere to a canonical format
    # Will fail the build if not
    - name: Terraform Format
      run: terraform fmt -check

    # Az CLI Login with Federated Credentials
    - name: 'Az CLI login with Federated Credentials'
      uses: azure/login@v1
      with:
          client-id: $
          tenant-id: $
          allow-no-subscriptions: true

    # Generates an execution plan for Terraform
    # An exit code of 0 indicated no changes, 1 a terraform failure, 2 there are pending changes.
    - name: Terraform Plan
      id: tf-plan
      run: |
        export exitcode=0
        cd EntraID && terraform plan -detailed-exitcode -no-color -out tfplan || export exitcode=$?

        echo "exitcode=$exitcode" >> $GITHUB_OUTPUT

        if [ $exitcode -eq 1 ]; then
          echo Terraform Plan Failed!
          exit 1
        else
          exit 0
        fi


    # Save plan to artifacts
    - name: Publish Terraform Plan
      uses: actions/upload-artifact@v3
      with:
        name: tfplan
        path: EntraID/tfplan

    # Create string output of Terraform Plan
    - name: Create String Output
      id: tf-plan-string
      run: |
        TERRAFORM_PLAN=$( cd EntraID && terraform show -no-color tfplan)

        delimiter="$(openssl rand -hex 8)"
        echo "summary<<${delimiter}" >> $GITHUB_OUTPUT
        echo "## Terraform Plan Output" >> $GITHUB_OUTPUT
        echo "<details><summary>Click to expand</summary>" >> $GITHUB_OUTPUT
        echo "" >> $GITHUB_OUTPUT
        echo '```terraform' >> $GITHUB_OUTPUT
        echo "$TERRAFORM_PLAN" >> $GITHUB_OUTPUT
        echo '```' >> $GITHUB_OUTPUT
        echo "</details>" >> $GITHUB_OUTPUT
        echo "${delimiter}" >> $GITHUB_OUTPUT

    # Publish Terraform Plan as task summary
    - name: Publish Terraform Plan to Task Summary
      env:
        SUMMARY: $
      run: |
        echo "$SUMMARY" >> $GITHUB_STEP_SUMMARY

    # If this is a PR post the changes
    - name: Push Terraform Output to PR
      if: github.ref != 'refs/heads/master'
      uses: actions/github-script@v6
      env:
        SUMMARY: "$"
      with:
          github-token: $
          script: |
            const body = `${process.env.SUMMARY}`;
            github.rest.issues.createComment({
                issue_number: context.issue.number,
                owner: context.repo.owner,
                repo: context.repo.repo,
                body: body
            })

  terraform-apply:
    name: 'Terraform Apply'
    env:
      #this is needed since we are running terraform with read-only permissions
      ARM_SKIP_PROVIDER_REGISTRATION: true

    if: github.ref == 'refs/heads/master' && needs.terraform-plan.outputs.tfplanExitCode == 2
    runs-on: ubuntu-latest
    needs: [terraform-plan]

    steps:
    # Checkout the repository to the GitHub Actions runner
    - name: Checkout
      uses: actions/checkout@v3

    # Install the latest version of Terraform CLI and configure the Terraform CLI configuration file with a Terraform Cloud user API token
    - name: Setup Terraform
      uses: hashicorp/setup-terraform@v2

    # Az CLI Login with Federated Credentials
    - name: 'Az CLI login with Federated Credentials'
      uses: azure/login@v1
      with:
          client-id: $
          tenant-id: $
          allow-no-subscriptions: true

    # Change Directory to HF Directory and Print Working Directory
    - name: Change Directory
      run: cd EntraID && pwd && ls -la

    # Initialize a new or existing Terraform working directory by creating initial files, loading any remote state, downloading modules, etc.
    - name: Terraform Init
      run: cd EntraID && terraform init

    # Download saved plan from artifacts  q
    - name: Download Terraform Plan
      uses: actions/download-artifact@v3
      with:
        name: tfplan

    # Terraform Apply
    - name: Terraform Apply
      run: cd EntraID && terraform apply -auto-approve ../tfplan
Now it is time to test the entire thing. I have pushed the code to the master branch and this triggers the action workflow.
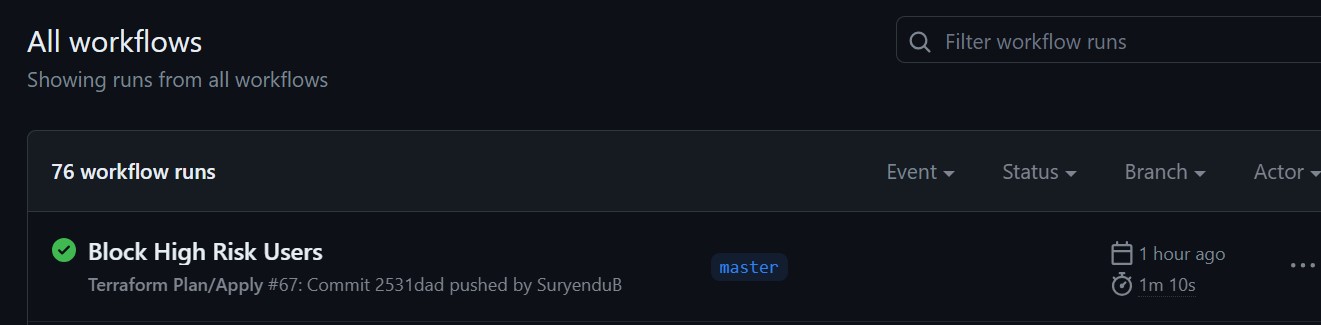
We can see the Workflow Steps for Terraform Plan and Terraform Apply has been successfully completed.
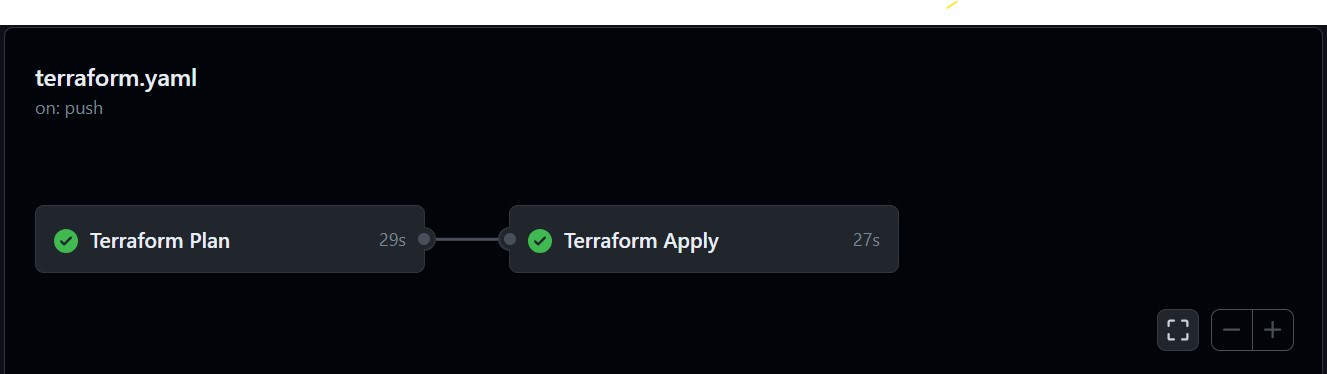
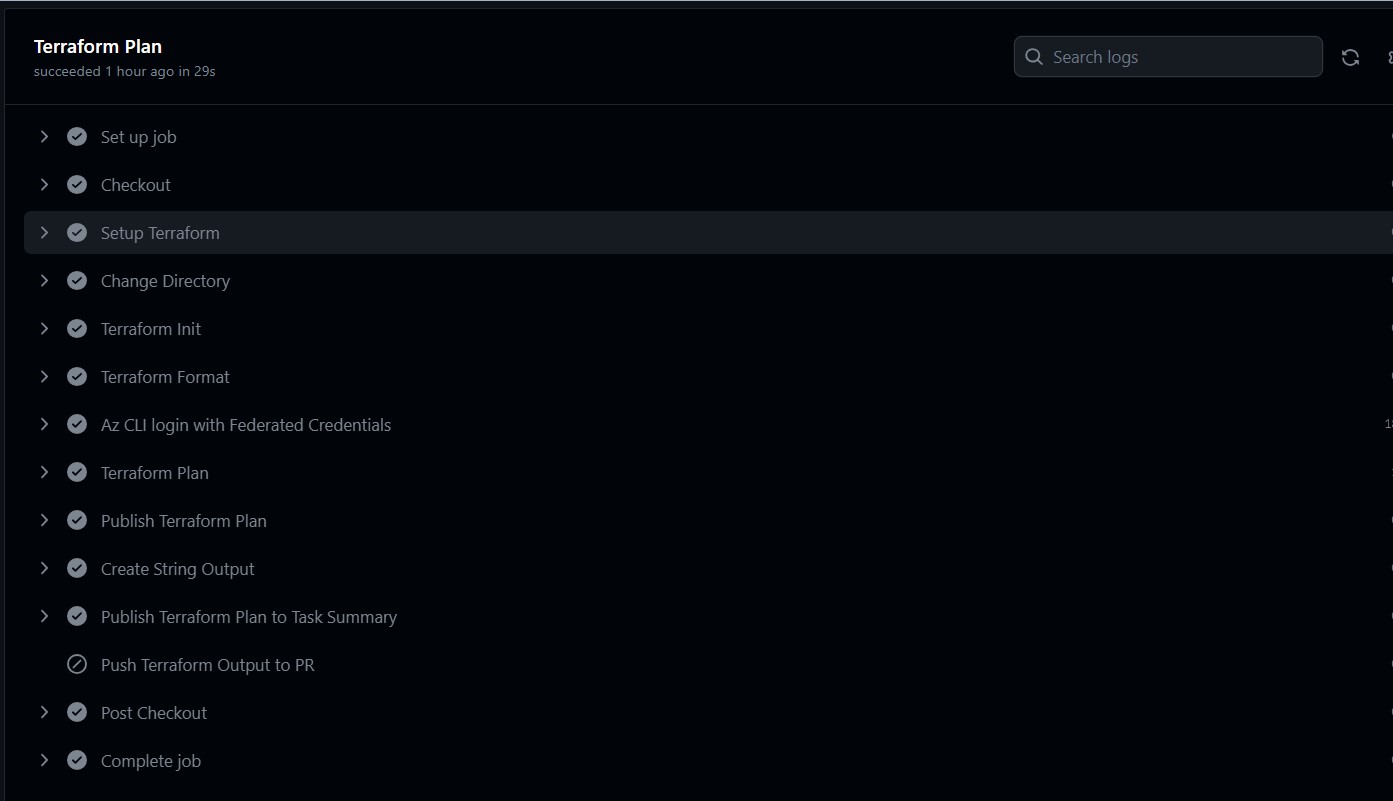
If we look at the each steps of terraform-plan job we can see all the steps are completed.
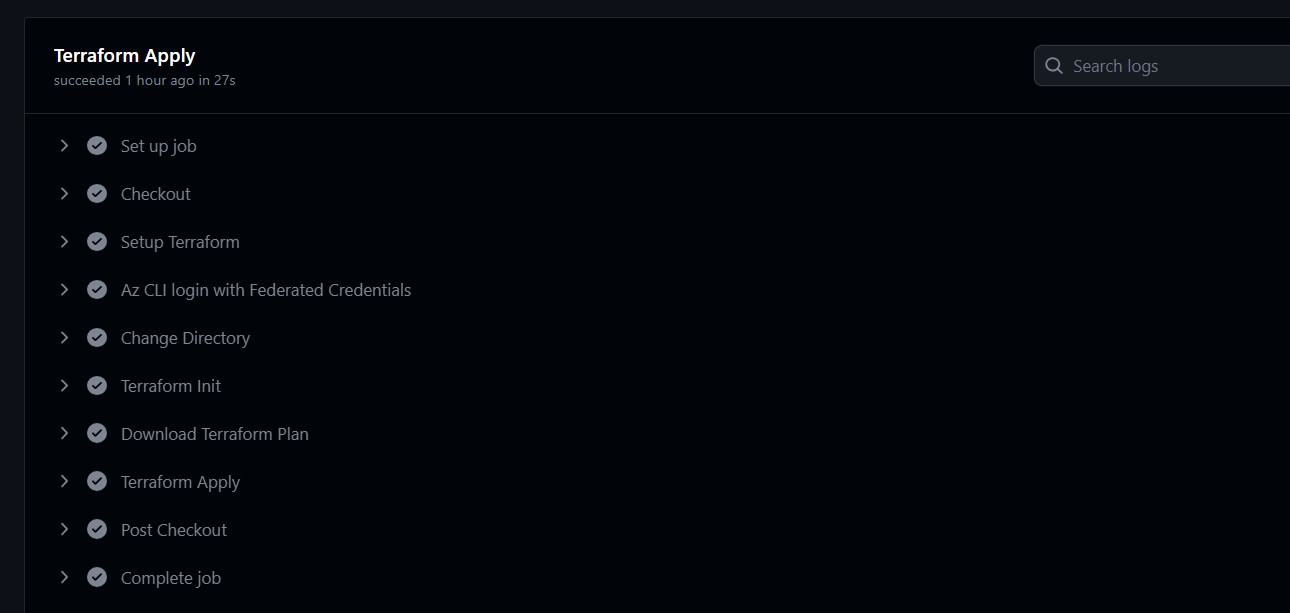
Similarly for terraform-apply job we can verify all the necessary steps are completed.
Now it is time to Log in to Entra ID portal and verify if the Conditional Access Policy is deployed and as we can see it is successfully configured with the necessary settings we require.
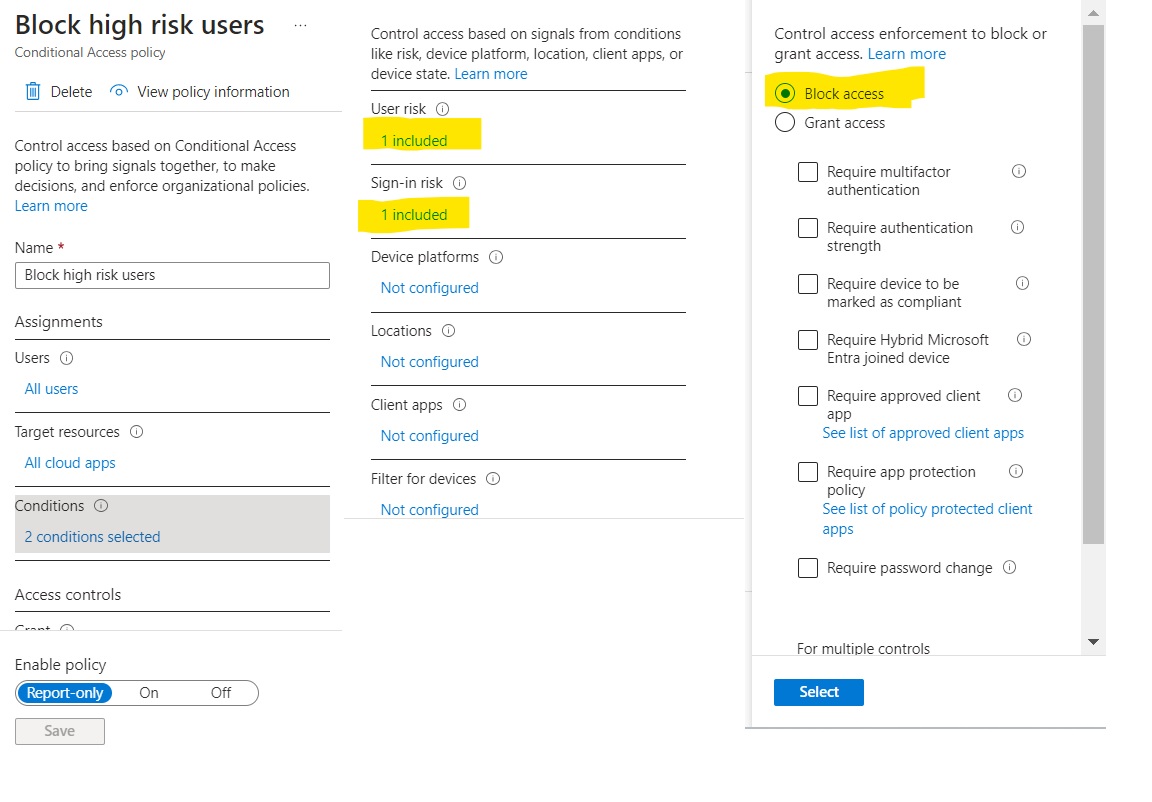 All of this, and more, is accomplished without relying on cloud secrets.
Conclusion
In this article, we have discussed how to use Entra ID federated credentials to authenticate to Azure AD and deploy conditional access policies using Terraform and GitHub Workflows. This approach offers a number of benefits, including:
- Eliminates the need to manage secrets: With Entra ID federated credentials, there is no need to store or manage secrets in your code or environment variables. This reduces the risk of unauthorized access and makes your code more secure.
- Simplifies deployment: By using GitHub Workflows to deploy your conditional access policies, you can automate the process and ensure that your policies are always up-to-date. This can save you time and effort, and help you to improve your overall security posture.
We hope you have found this article helpful. Please stay tuned for the next part of the series! Cover Image from IdentityDigest blog.