Securely Manage Application SSO Claims with Claims Mapping Policies in Microsoft Entra
Table of Contents
- Introduction
- What are Claims Mapping Policies?
- Creating a new Claims Mapping Policy
- Assigning the Claims Mapping Policy to the Application
- Update the Claims Mapping Policy to include additional claims
- Send Group Claims to the Applications using Claims Transformation
- Transforming Claims using Claims Transformation
- Remove Claims Mapping Policy from the Application
- Create Claims Mapping Policy Using Terraform
- Conclusion
Introduction
Identity and Access Management (IAM) Engineer, I grapple with a crucial challenge: securely onboarding applications into an organization’s identity system.. This is a critical task because it ensures that the organization’s applications are secure and compliant with the organization’s security policies.
In a previous article, I delved into the process of securely onboarding applications using Terraform. You can find that piece here: Securely Onboarding Applications with Terraform.
Recently, I came across an insightful blog post by one of my favorite Microsoft Identity bloggers, Eric Woodruff, In his article titled “Spam Spoofing Users in Azure AD with SAML Claims Transformations”, Eric highlights a critical point: SAML claims management in Entra ID is not inherently secure.
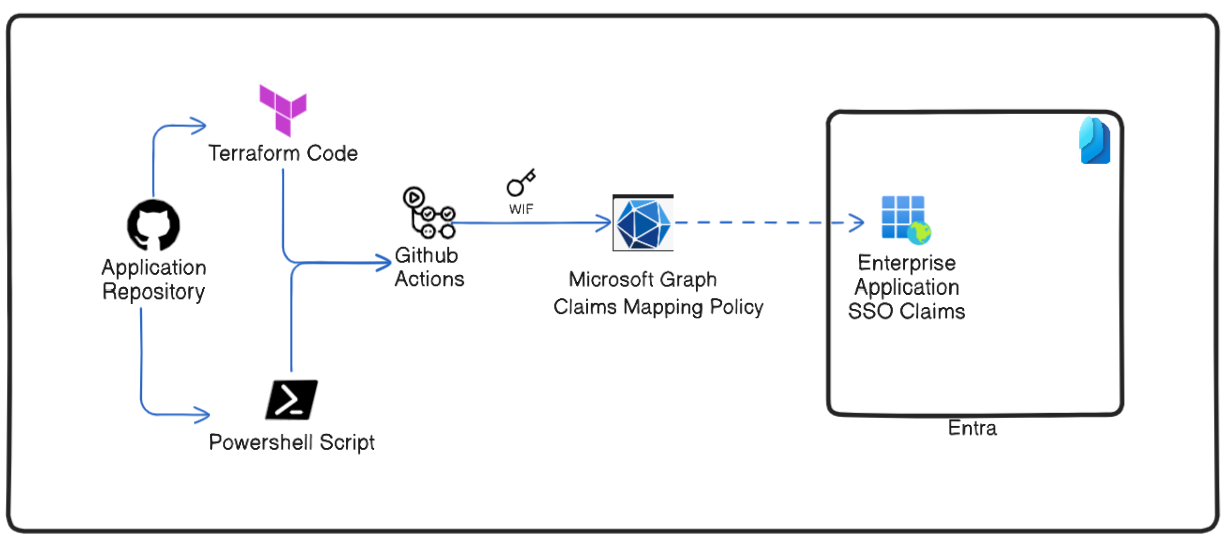
In this blogspot, I will show you how to use claims mapping policies to manage how you can securely manage application claims and take one more step towards Git-Ops management model of IAM from the error-prone manual Click-Ops process and have a robust security posture.
What are Claims Mapping Policies?
A claims mapping policy object represents a set of rules enforced on individual applications or on all applications within an organization that modifies the claims included in tokens issued to the application.
Creating a new Claims Mapping Policy
Let us first create a Claim Mapping policy for SAML application that send basic claims to the application.
Import-Module Microsoft.Graph.Identity.SignIns

$params = @{
 definition = @(
  '{"ClaimsMappingPolicy":{"Version":1,"IncludeBasicClaimSet":"true"}}'
 )
 displayName = "New Saml Claims Policy"
}

$policy = New-MgPolicyClaimMappingPolicy -BodyParameter $params
Assigning the Claims Mapping Policy to the Application
Now that we have created a new Claims Mapping Policy we need to assign it to our application. I have previously written about the ADFS Claims X-Ray tool that can be used to see the claims that are being sent to the application. Let us use the same application to see the claims that are being sent to the application.
First, we need to retrieve the service principal ID of the application.
$servicePrincipalId = Get-MgServicePrincipal -Filter "DisplayName eq 'Entra Claims XRay'" | Select -ExpandProperty Id
We will now assign the Claims Mapping Policy to the application.
$claimsMappingPolicyId = $policy.Id
$params = @{
 "@odata.id" = "https://graph.microsoft.com/v1.0/policies/claimsMappingPolicies/$claimsMappingPolicyId"
}
$assignment = New-MgServicePrincipalClaimMappingPolicyByRef -ServicePrincipalId $servicePrincipalId -BodyParameter $params
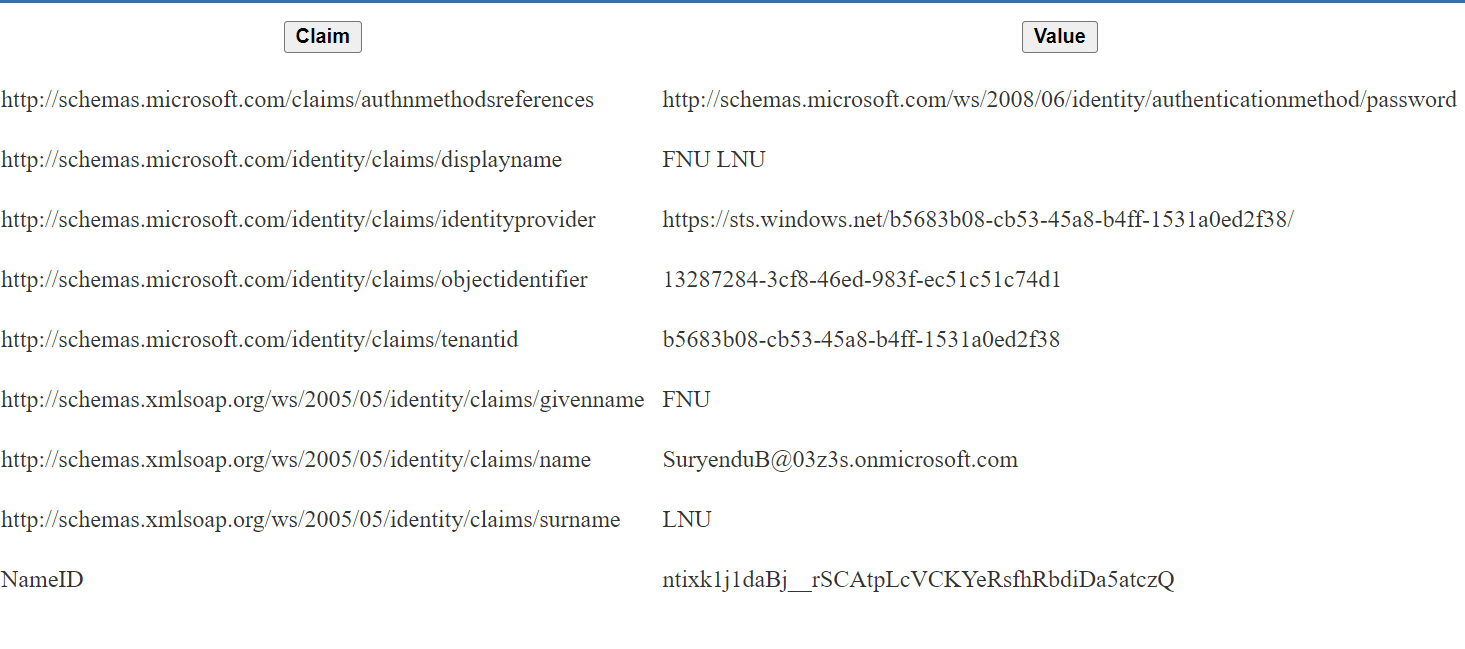
Now that we have assigned the Claims Mapping Policy to the application, we can see the claims that are being sent to the application.
Update the Claims Mapping Policy to include additional claims
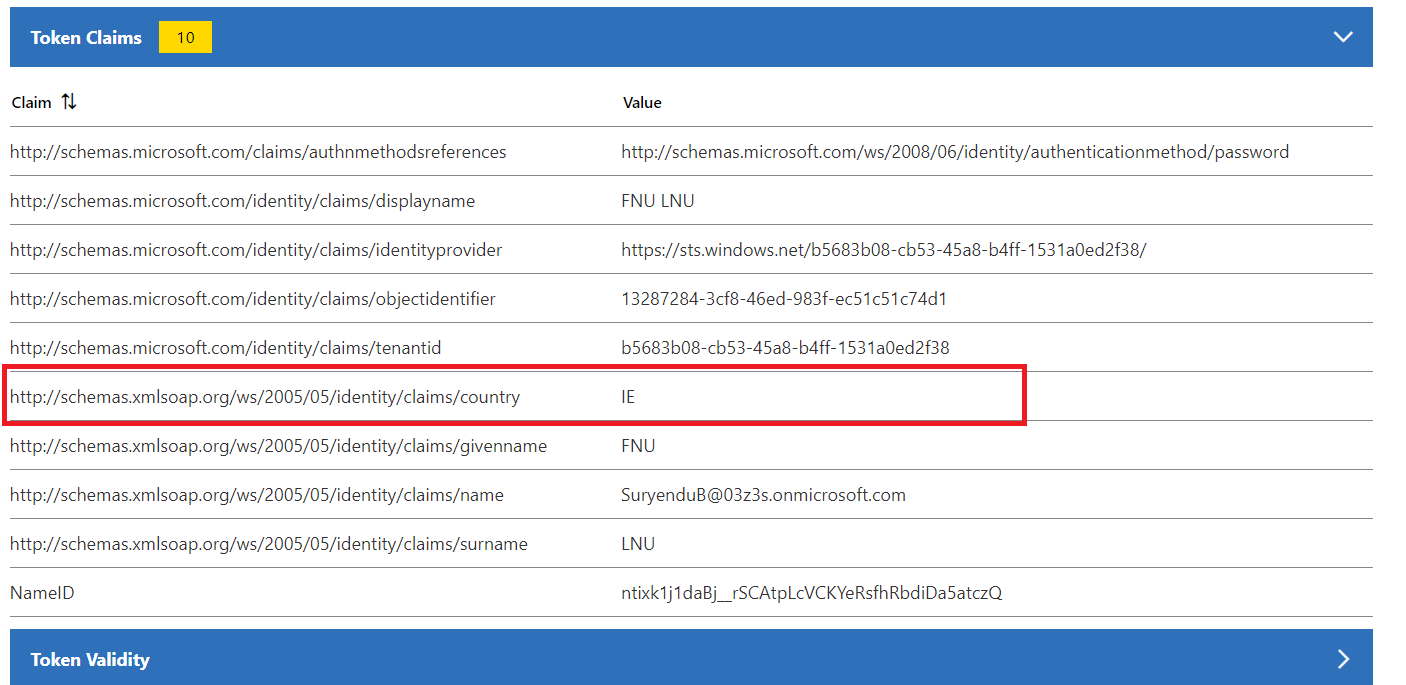
We have seen the basic claims that are being sent to the application, let us update the Claims Mapping Policy to include additional claims. In this example, we will add a new SAML claim to the application. In this example, we will add a new claim country to the application. This will send the country of the Entra ID Tenant to the application.
$params = @{
 definition = @(
  '{"ClaimsMappingPolicy":{"Version":1,"IncludeBasicClaimSet":"true","ClaimsSchema":[{"Source":"company","ID":"tenantcountry","SamlClaimType": "http://schemas.xmlsoap.org/ws/2005/05/identity/claims/country"}]}}'
 )

}

Update-MgPolicyClaimMappingPolicy -ClaimsMappingPolicyId $claimsMappingPolicyId -BodyParameter $params
Send Group Claims to the Applications using Claims Transformation
In the previous example, we saw how to send basic claims and additional claims to the application. In this example, we will see how to send group claims to the application. To send group displayname as claims, to the application we have to update the application manifest file.
$params = @{
 definition = @(
  '{"ClaimsMappingPolicy":{"Version":1,"IncludeBasicClaimSet":"true","ClaimsSchema":[{"Source":"company","ID":"tenantcountry","SamlClaimType": "http://schemas.xmlsoap.org/ws/2005/05/identity/claims/country"}]}}'
 )

}

Update-MgPolicyClaimMappingPolicy -ClaimsMappingPolicyId $claimsMappingPolicyId -BodyParameter $params
- Application Manifest
I have updated the application manifest to send the group displayname in token to the application.
You need to update the following values in the default manifest file. We need to set the acceptMappedClaims to true, groupMembershipClaims to ApplicationGroup, and add the groups claim to the saml2Token claims with the additional properties cloud_displayname.
"acceptMappedClaims": true,
------------
"groupMembershipClaims": "ApplicationGroup",

-------------
"optionalClaims": {
		"idToken": [],
		"accessToken": [],
		"saml2Token": [
			{
				"name": "groups",
				"source": null,
				"essential": false,
				"additionalProperties": [
					"cloud_displayname"
				]
			}
		]
	}
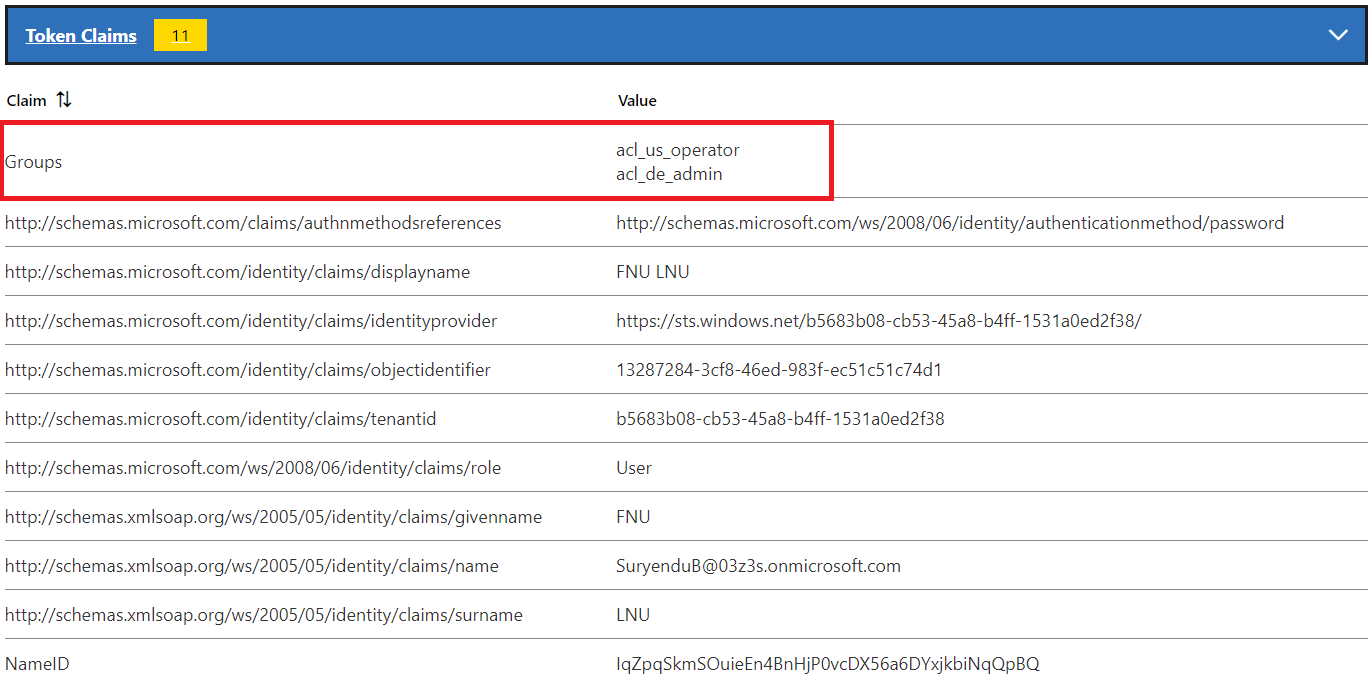
We can verify that the group claims are being sent to the application using the ADFS Claims X-Ray tool.
Transforming Claims using Claims Transformation
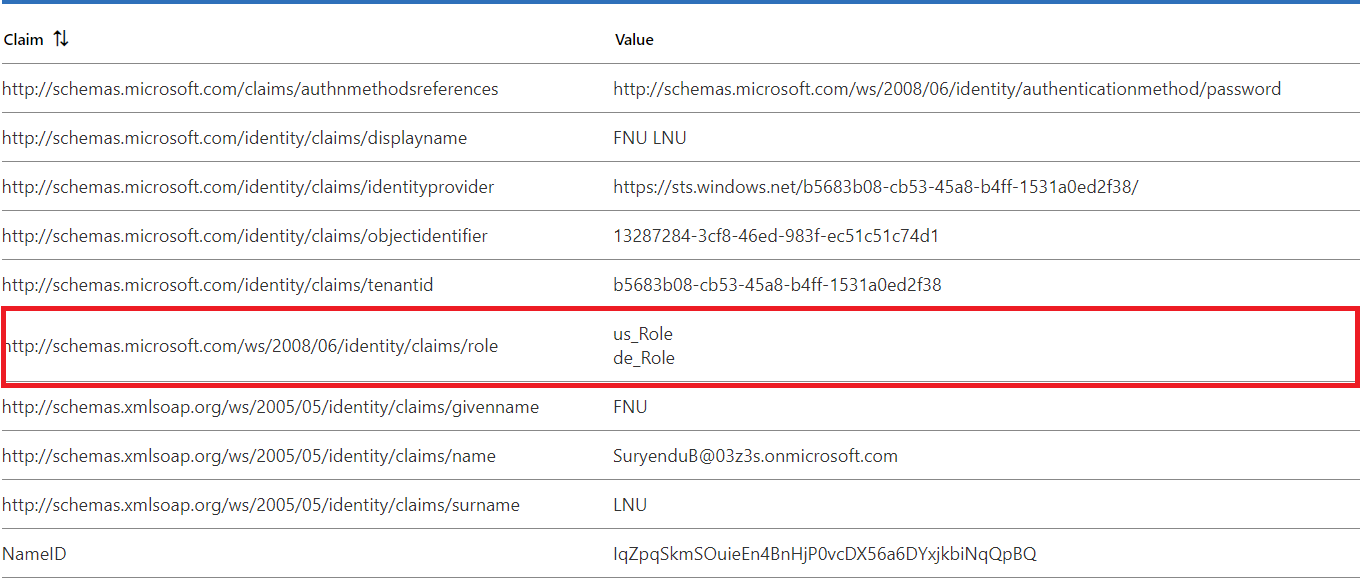
In this example, we will see how to use claims transformation to transform the group claims that are being sent to the application. We will also see how we can use claims transformation to apply regex replacement to the group claims that are being sent to the application. Many applications require Role claims in a specified format in the application. We can use the regex replace method in the Claims Mapping Policy to transform the group claims to the required format.
Update-MgPolicyClaimMappingPolicy -Definition @('{"ClaimsMappingPolicy":{"Version":1,"IncludeBasicClaimSet":"true", "ClaimsSchema":[{"Source":"user","ID":"groups"},{"Source":"transformation","ID":"ReplaceMail","TransformationId":"RegexReplaceTransform","SamlClaimType":"http://schemas.microsoft.com/ws/2008/06/identity/claims/role"}],"ClaimsTransformations":[{"ID":"RegexReplaceTransform","TransformationMethod":"RegexReplace","InputClaims":[{"ClaimTypeReferenceId":"groups","TransformationClaimType":"sourceClaim","TreatAsMultiValue":"true"}], "InputParameters": [{"ID":"regex","Value":"acl_(?<group>\\S{2})_.*"},{"ID":"replacement","Value":"{group}_Role"}],"OutputClaims":[{"ClaimTypeReferenceId":"ReplaceMail","TransformationClaimType":"outputClaim"}]}]}}') -DisplayName "TransformClaimsExample2" -ClaimsMappingPolicyId $claimsMappingPolicyId
Remove Claims Mapping Policy from the Application
Use the following command to remove the Claims Mapping Policy from the application.
Remove-MgServicePrincipalClaimMappingPolicyByRef -ServicePrincipalId $servicePrincipalId -ClaimsMappingPolicyId $($policy.Id)
Create Claims Mapping Policy Using Terraform
You can also create a Claims Mapping Policy using Terraform. Below is an example of how to create a Claims Mapping Policy using Terraform. We will create a new Claims Mapping Policy that sends the employeeid and tenantcountry claims to the application. We need to create a new azuread_claims_mapping_policy resource and set the definition and display_name properties.
Once the claims mapping policy is created, we can assign it to the service principal using the resource sazuread_service_principal_claims_mapping_policy_assignment.
data "azuread_client_config" "current" {}

resource "azuread_claims_mapping_policy" "my_policy" {
  definition = [
    jsonencode(
      {
        ClaimsMappingPolicy = {
          ClaimsSchema = [
            {
              ID            = "employeeid"
              JwtClaimType  = "name"
              SamlClaimType = "http://schemas.xmlsoap.org/ws/2005/05/identity/claims/name"
              Source        = "user"
            },
            {
              ID            = "tenantcountry"
              JwtClaimType  = "country"
              SamlClaimType = "http://schemas.xmlsoap.org/ws/2005/05/identity/claims/country"
              Source        = "company"
            }
          ]
          IncludeBasicClaimSet = "true"
          Version              = 1
        }
      }
    ),
  ]
  display_name = "My Policy"
}

resource "azuread_application" "example" {
  display_name = "example"
  owners       = [data.azuread_client_config.current.object_id]
}

resource "azuread_service_principal" "my_principal" {
  client_id                    = azuread_application.example.client_id
  app_role_assignment_required = false
  owners                       = [data.azuread_client_config.current.object_id]

  feature_tags {
    enterprise = true
    gallery    = true
  }
}

resource "azuread_service_principal_claims_mapping_policy_assignment" "app" {
  claims_mapping_policy_id = azuread_claims_mapping_policy.my_policy.id
  service_principal_id     = azuread_service_principal.my_principal.id
}
Conclusion
In this blog post, we have seen how to use Claims Mapping Policy to manage the claims that are being sent to the application. We have seen how to create a new Claims Mapping Policy, assign it to the application, update the Claims Mapping Policy to include additional claims, send group claims to the application, transform the group claims using Claims Transformation, and remove the Claims Mapping Policy from the application.
I hope this blog post has been helpful to you and this will give you a nudging push to start using the Claims Mapping Policy to manage the claims that are being sent to the application and stop using the manual Click-Ops process and start using the Git-Ops process to manage the Application SSO configurations.