Customize your Entra ID Tenant with Directory Extension Attributes and use in Custom SSO Claims, SCIM Provisioning and Dynamic Groups
Table of Contents
- Introduction
- Create a Directory Extension Attribute
- Using Directory Extension Attributes
- Add Directory Extension Attributes in SAML Claims
- Add Directory Extension Attributes in OIDC/OAuth JWT Claims
- Use Directory Extension Attributes in SCIM Provisioning
- Use the Directory Extension Attributes in Dynamic Groups
- Conclusion
Introduction
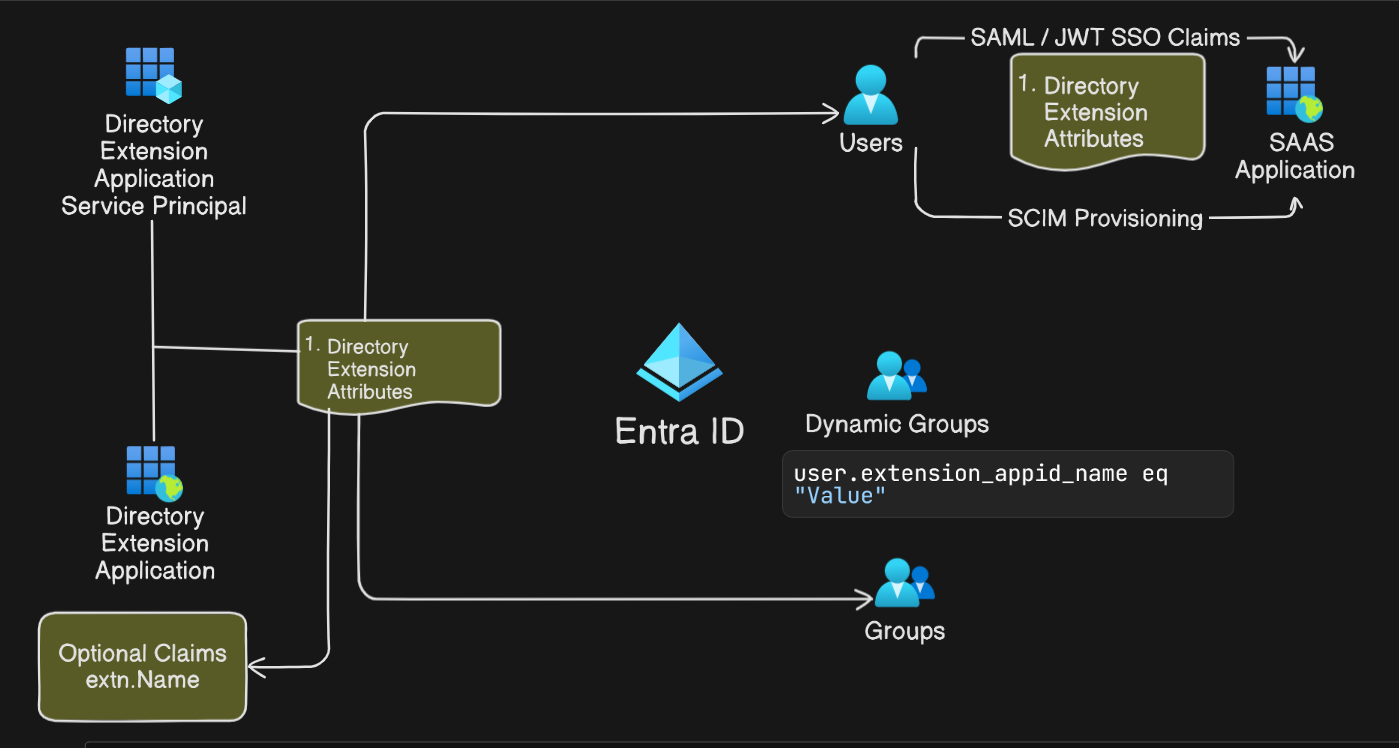
In the realm of identity management, seasoned professionals may find themselves reminiscing about the power and ease of customization offered by Microsoft Identity Manager (MIM). Its ability to extend the default schema and effortlessly add custom attributes to existing or new object types made it a beloved tool for integration. With Microsoft Entra ID, we lack some of the features that we are used to in MIM. However, Microsoft has introduced various ways to extend the schema and add custom attributes to the directory objects. In this article, we will explore how to leverage directory extension attributes in Entra ID for various use cases such as custom claims, SCIM provisioning, and dynamic group membership rules.
- Extension Attributes 1 - 15
- Directory Extensions
- Schema Extensions
- Open Extensions
These extension attributes can be used to store additional information that is not available in the default set of attributes. In many cases, we often need these attributes in downstream applications for various purposes such as user provisioning, identity synchronization, or attribute mapping. You can see this nice overview of the different ways to extend the schema here. Among these, the most commonly used method for extending the schema is the use of directory extension attributes as it can be used with the following features, not available with the other methods:
- Create dynamic membership rules using the extension attributes.
- Use the attributes in SCIM provisioning.
- Use the attributes in SAML and OIDC claims.
In this article, we will explore how to leverage directory extension attributes in Entra ID for previously mentioned use cases.
Create a Directory Extension Attribute
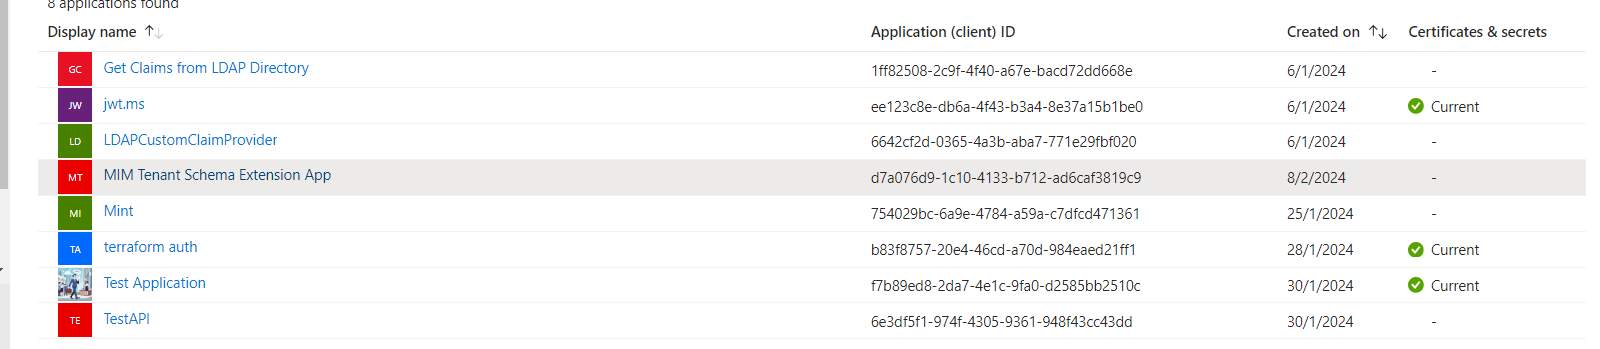
At the time of writing this article, there is no GUI option available to create directory extension attributes. However, we can use the Microsoft Graph API to create these attributes. The following is an example of how to create a directory extension attribute using the Microsoft Graph API with PowerShell. One important thing to note is that directory extension attributes are tied to an owner application. It is common to use one app to create and manage all the extension Attributes in a tenant.
$ExtensionApp = New-MgApplication -DisplayName "MIM Tenant Schema Extension App"
New-MgServicePrincipal -AppId $ExtensionApp.AppId
You can also create it using Graph Explorer or any other Graph API client. The following is an example of how to create a directory extension attribute using Graph Explorer.
POST https://graph.microsoft.com/v1.0/applications
Content-Type: application/json

{
  "displayName": "MIM Tenant Schema Extension App",

}

POST https://graph.microsoft.com/v1.0/servicePrincipals
Content-Type: application/json

{
  "appId": "{app-id-of-the-application-created-above}"
}
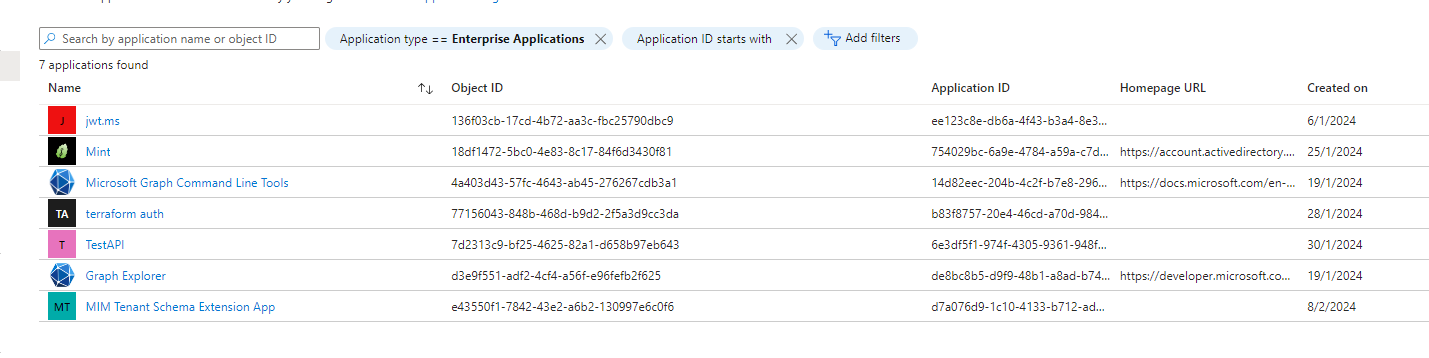
We need to create a service principal for the application to be able to use it as the default PowerShell cmdlets to create a multi-tenant application. After this step, directory extensions become available and consumed for users in the tenant.
we can verify in the Entra ID portal that the application and the service principal have been created.
Now that we have created our parent application to manage the extension attributes, we can create the extension attribute using the following PowerShell script.
$ExtensionProperty1 = New-MgApplicationExtensionProperty -Name "SkillSet" -DataType "String" -TargetObjects "User" -ApplicationId $ExtensionApp.Id
$ExtensionProperty2 = New-MgApplicationExtensionProperty -Name "supervisoryOrg" -DataType "String" -TargetObjects "User" -ApplicationId $ExtensionApp.Id
You can also create it using Graph Explorer or any other Graph API client. The following is an example of how to create a directory extension attribute using Graph Explorer.
POST https://graph.microsoft.com/v1.0/applications/{id}/extensionProperties
Body:
{
  "dataType": "String",
  "name": "SkillSet",
  "targetObjects": [
    "User"
  ]
}
POST https://graph.microsoft.com/v1.0/applications/{id}/extensionProperties
Body:
{
  "dataType": "String",
  "name": "supervisoryOrg",
  "targetObjects": [
    "User"
  ]
}
We cannot verify the extension attribute in the EntraID portal. However, we can use the graph API (or Powershell) to verify that the extension attribute has been created.
Get-MgApplicationExtensionProperty -ApplicationId $ExtensionApp.Id | Format-Table Name, DataType, TargetObjects

GET https://graph.microsoft.com/v1.0/applications/{id}/extensionProperties
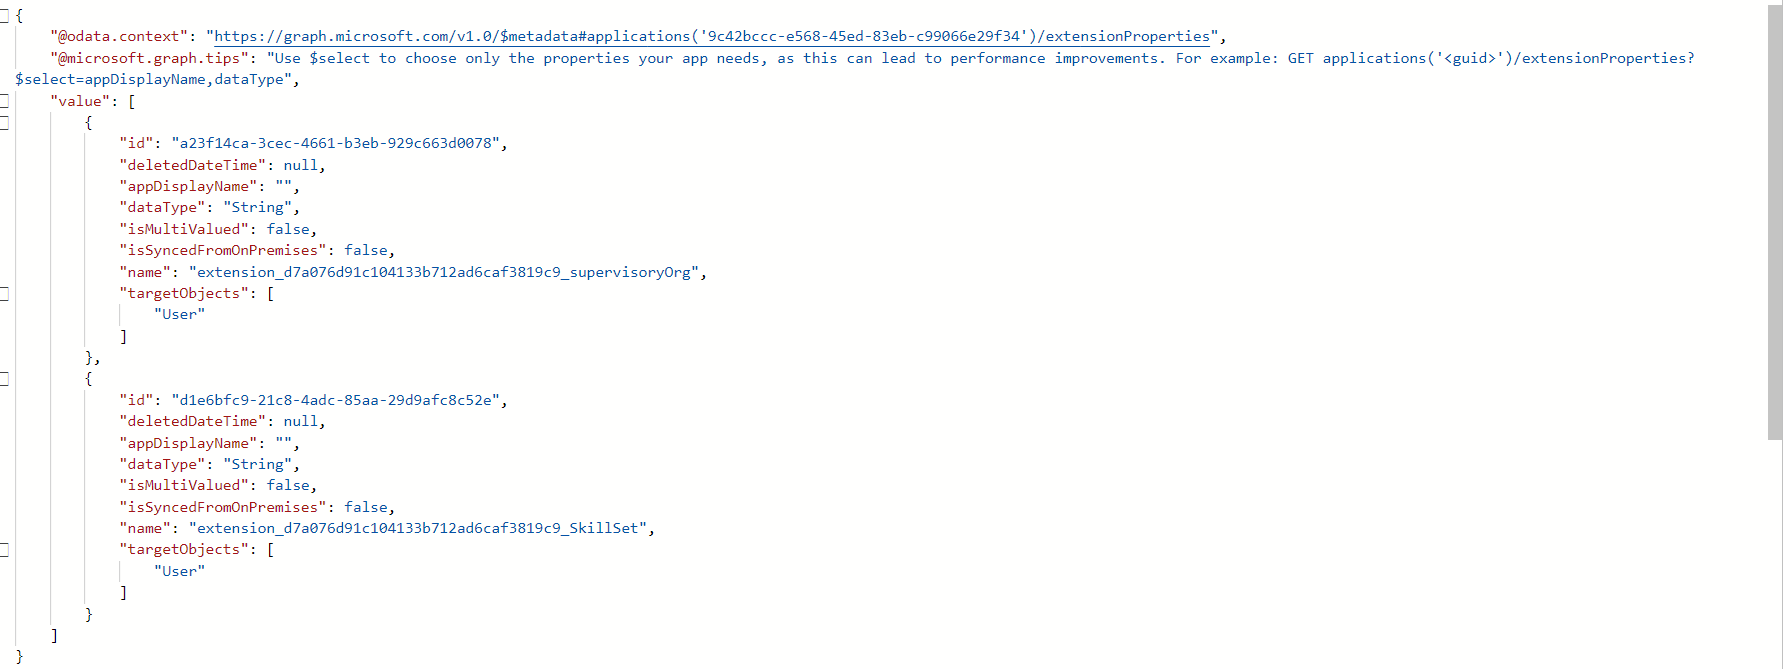
As you can notice, directory extension attributes follow a certain naming convention of the following format: extension_{Application (client) Id}_{name}. The Application (client) Id is the application ID of the parent application that owns the extension attribute. The name is the name of the extension attribute. We can use this naming convention to reference the extension attribute in the subsequent sections.
Similarly, we can list all the directory extension attributes in the tenant using the following Graph API (or PowerShell) command.
Get-MgDirectoryObjectAvailableExtensionProperty
POST https://graph.microsoft.com/v1.0/directoryObjects/microsoft.graph.getAvailableExtensionProperties
Using Directory Extension Attributes
Similar to the creation of Extension Attributes, at the time of writing this article, there is no GUI option available to use directory extension attributes. However, we can use the Microsoft Graph API to use these attributes. The following is an example of how to use directory extension attributes to enrich the user object.
$UserID = "{User Object ID}"
$BodyParam = @{
    extension_d7a076d91c104133b712ad6caf3819c9_supervisoryOrg = "IAM",
    extension_d7a076d91c104133b712ad6caf3819c9_SkillSet = "IAM"
}
Update-MgUser -UserId $UserID -BodyParameter $BodyParam
PATCH https://graph.microsoft.com/v1.0/users/{id}
Content-Type: application/json

{
  "extension_d7a076d91c104133b712ad6caf3819c9_supervisoryOrg": "IAM"
}
We can validate that the extension attribute has been updated using the following Graph API (or PowerShell) script.
# Get all Extension Properties - if run on a regular basis these could be cached
$extensions = Get-MgDirectoryObjectAvailableExtensionProperty

# Standard User Properties we want to Fetch
$properties = @("Displayname", "Id", "UserPrincipalName")

# Fetch all users and the Extension Properties
$users = Get-MgUser -All -Property ($properties + $extensions.Name)

$allUsersParsed = [System.Collections.Arraylist]::new()

# Flatten user data by merging extension properties from nested hashtables into a single-level hashtable
# Also filter out unnecessary fields from the full Graph User Schema to leave populated properties
Foreach ($u in $users){
    $userParsed = @{}
    Foreach ($prop in $properties) {
        $userParsed.$prop = $u.$prop
    }
    $userParsed += $u.AdditionalProperties
    $allUsersParsed.Add([pscustomobject]$userParsed) | Out-Null
}

$allUsersParsed | Format-Table ($properties + $extensions.Name)

GET https://graph.microsoft.com/v1.0/users?$select=displayName,id,userPrincipalName,extension_d7a076d91c104133b712ad6caf3819c9_supervisoryOrg,extension_d7a076d91c104133b712ad6caf3819c9_SkillSet

Here is one information, the Graph Connector of Microsoft Identity Manager supports the use of extension attributes from version 1.1.1301.0 August 2020. This means that you can use the extension attributes in MIM for user provisioning and synchronization from your source systems.
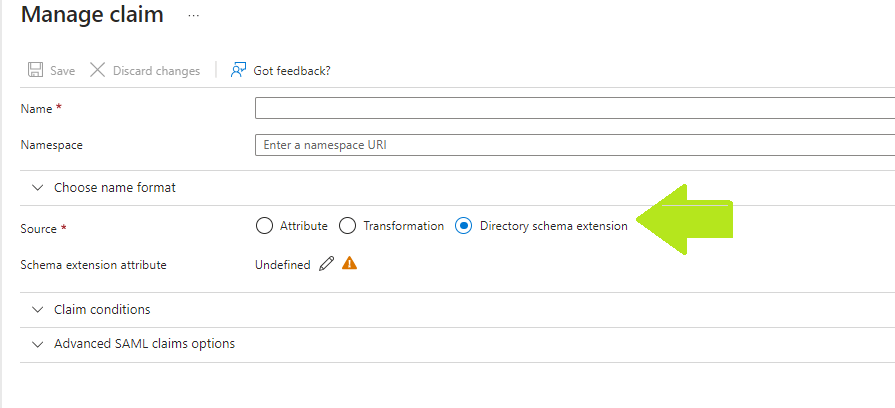
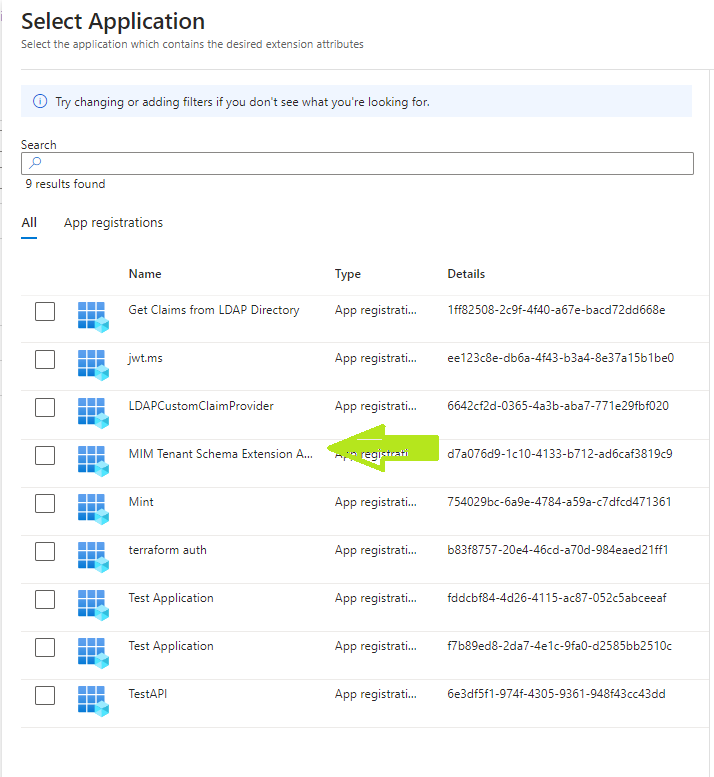
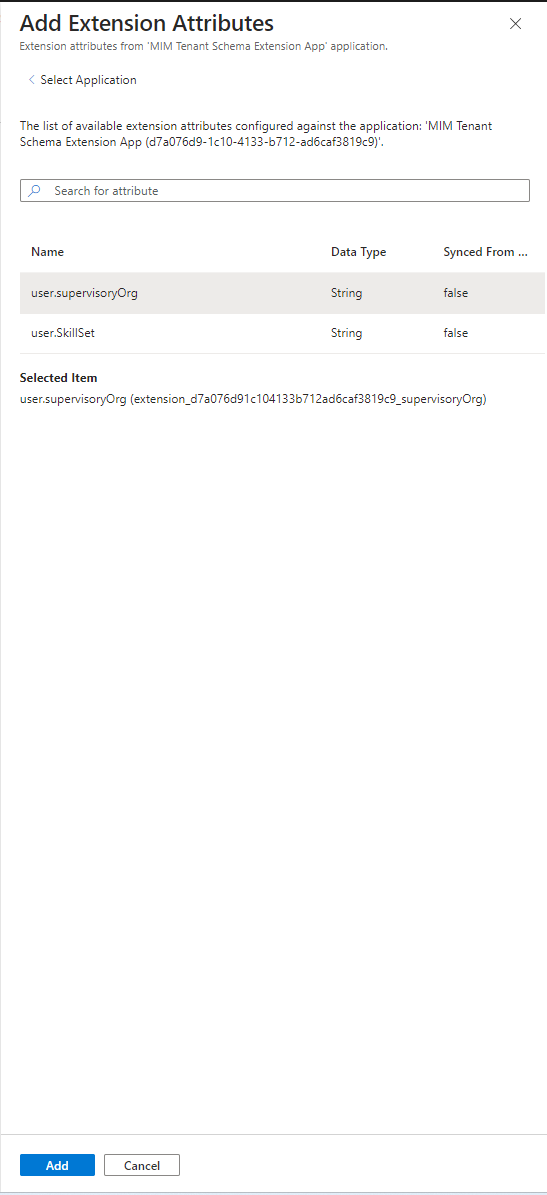
Add Directory Extension Attributes in SAML Claims
- On the Attributes & Claims blade, select Add new claim or edit an existing claim.
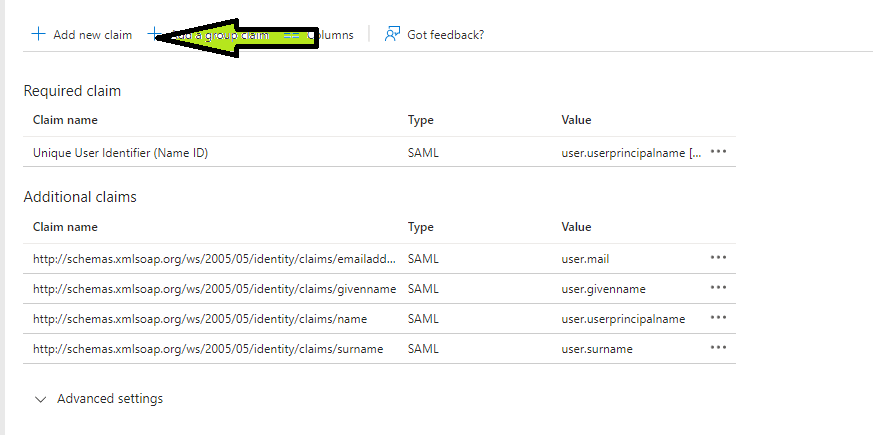
- Select Directory Schema Extension from the Source Checkbox and Select the parent application from the application picker, created in the previous section.
- Select Add to add the selection to the claims.
- Click Save to add the attribute.
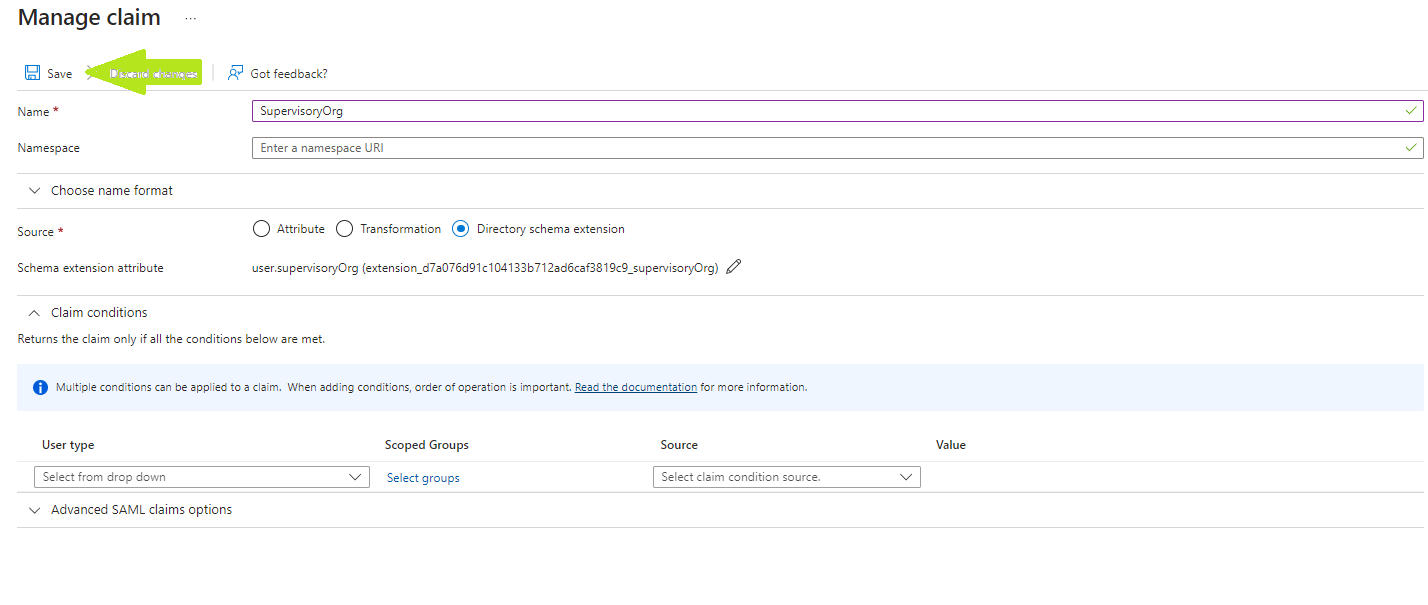
- We can verify that the SAML claim has been returned in our test application.

Add Directory Extension Attributes in OIDC/OAuth JWT Claims
In the scenario we have described above create all the extension attributes in a parent application and make the attribute available for other applications. We need to create a claims mapping policy to emit the extension attributes as claims in the token. The following is an example of how to create a claims mapping policy using the Microsoft Graph API with PowerShell.
$claimsMappingPolicy = [ordered]@{
    "ClaimsMappingPolicy" = [ordered]@{
        "Version" = 1
        "IncludeBasicClaimSet" = $true
        "ClaimsSchema" = @(
            [ordered]@{
                "Source" = "user"
                "ExtensionID" = "extension_d7a076d91c104133b712ad6caf3819c9_supervisoryOrg"
                "JwtClaimType" = "superVisoryOrg"
            },
            [ordered]@{
                "Source" = "user"
                "ExtensionID" = "extension_d7a076d91c104133b712ad6caf3819c9_SkillSet"
                "JwtClaimType" = "SkillSet"
            }

        )
    }
}

$definition = @($claimsMappingPolicy | ConvertTo-Json -Depth 4)
$BodyParam = [ordered]@{
    "displayName" = "Extension Claim Mapping Policy"
    "definition" = $definition
}

    $claimspolicy = New-MgPolicyClaimMappingPolicy -Definition $definition -DisplayName "Extension Claim Mapping Policy Multiclaims"  -Debug
Assign the claims mapping policy to the service principal in our tenant. The following is an example of how to assign the claims mapping policy using the Microsoft Graph API with PowerShell.
$servicePrincipalId = "{Service Principal Object ID}"
$params = @{
    "@odata.id" = "https://graph.microsoft.com/v1.0/policies/claimsMappingPolicies/$($claimspolicy.Id)"
}

New-MgServicePrincipalClaimMappingPolicyByRef -ServicePrincipalId $servicePrincipalId -BodyParameter $params
POST https://graph.microsoft.com/v1.0/servicePrincipals/{service-principal-id}/claimsMappingPolicies/$ref
Content-Type: application/json

{
  "@odata.id": "https://graph.microsoft.com/v1.0/policies/claimsMappingPolicies/{policy-id-from-above}"
}
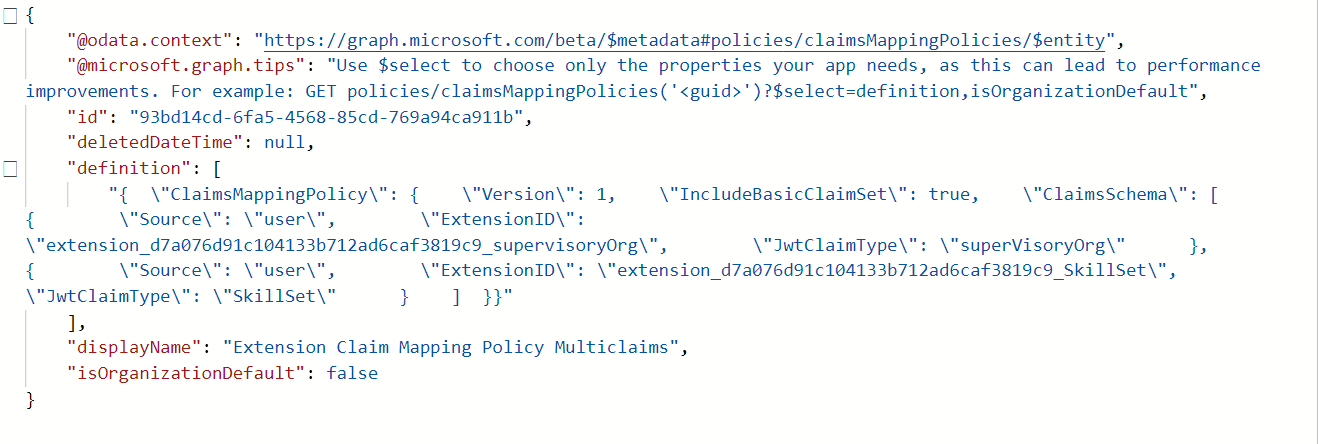
We can verify that the claims mapping policy has been created using the following Graph API (or PowerShell) script.
Get-MgPolicyClaimMappingPolicy --ClaimsMappingPolicyId $($claimsPolicy.Id)
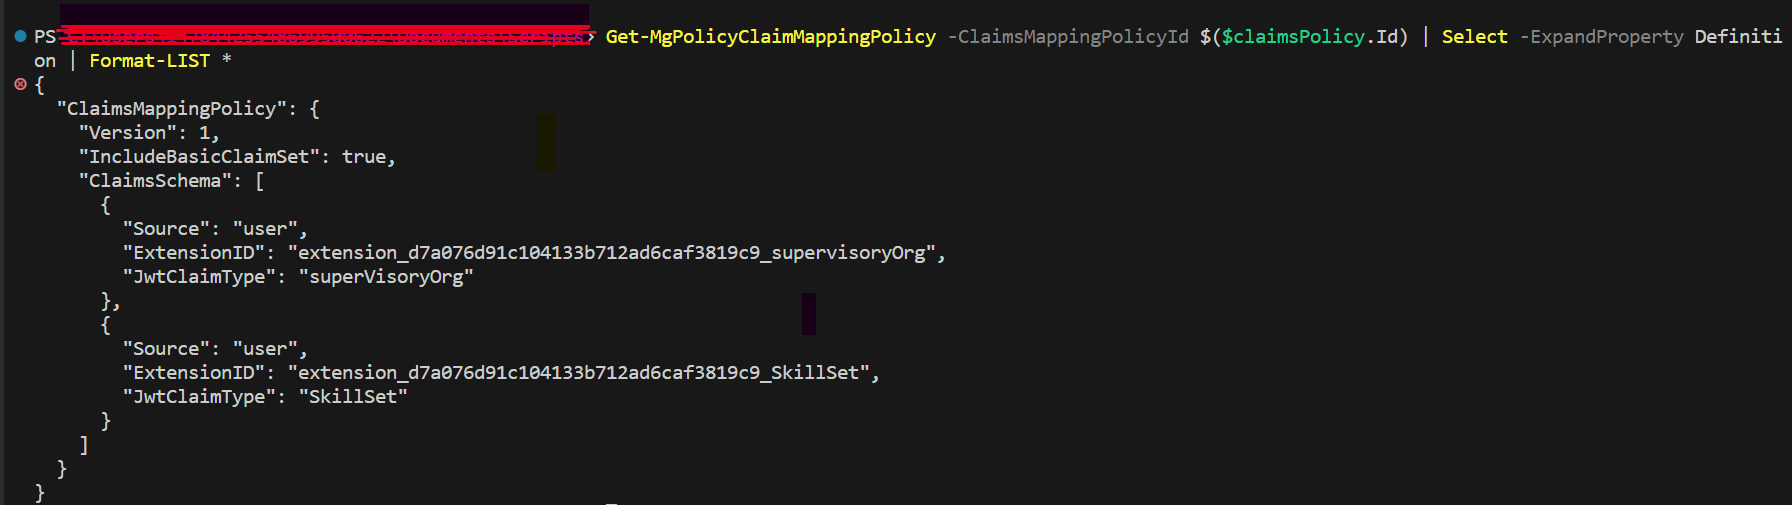
GET https://graph.microsoft.com/v1.0/policies/claimsMappingPolicies/{policy-id-from-above}
It is time to put our configuration to the test. Sign in to the application with a user that has the extension attributes populated. We can verify that the claims have been returned in our test application.
 .
.
We can also use the same method to send the extension attribute in SAML Claims. We just need to update the Claims Mapping Policy to include the SAMLClaim Type attribute in our policy.
```powershell
$claimsMappingPolicy = [ordered]@{
    "ClaimsMappingPolicy" = [ordered]@{
        "Version" = 1
        "IncludeBasicClaimSet" = $true
        "ClaimsSchema" = @(
            [ordered]@{
                "Source" = "user"
                "ExtensionID" = "extension_d7a076d91c104133b712ad6caf3819c9_supervisoryOrg"
                "JwtClaimType" = "superVisoryOrg"
                "SamlClaimType" = "http://schemas.xmlsoap.org/ws/2005/05/identity/claims/superVisoryOrg"
            },
            [ordered]@{
                "Source" = "user"
                "ExtensionID" = "extension_d7a076d91c104133b712ad6caf3819c9_SkillSet"
                "JwtClaimType" = "SkillSet"
                "SamlClaimType" = "http://schemas.xmlsoap.org/ws/2005/05/identity/claims/SkillSet"
            }

        )
    }
}
$definition = @($claimsMappingPolicy | ConvertTo-Json -Depth 4)
$BodyParam = [ordered]@{
    "displayName" = "Extension Claim Mapping Policy Multiclaims SAML"
    "definition" = $definition
}

    $claimspolicy = New-MgPolicyClaimMappingPolicy -BodyParameter $BodyParam  -Debug
You will notice in the Claims and Attributes tab that SAML Claims are overridden by the policy.
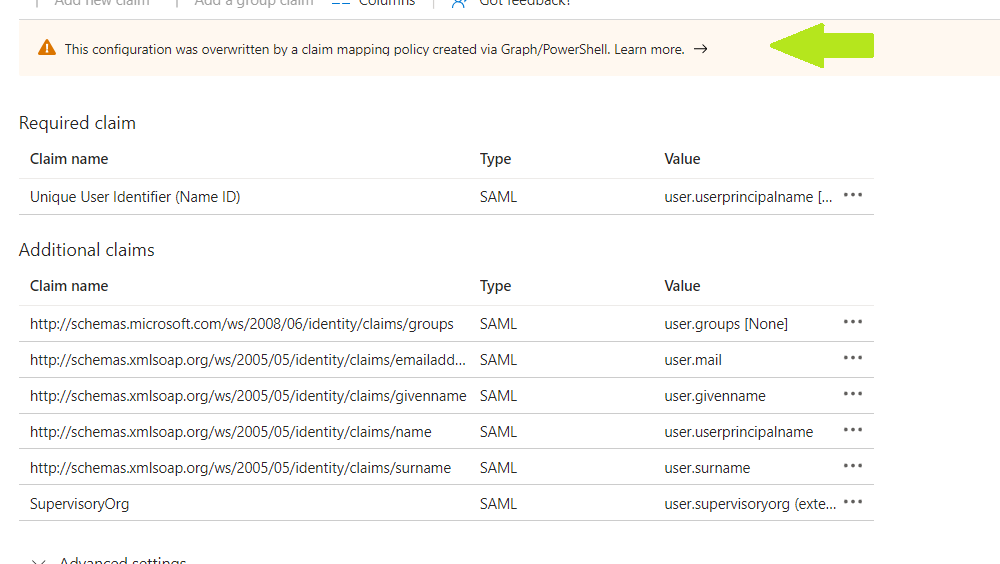
We can verify that the SAML claims have been returned in our test application.
 .
.
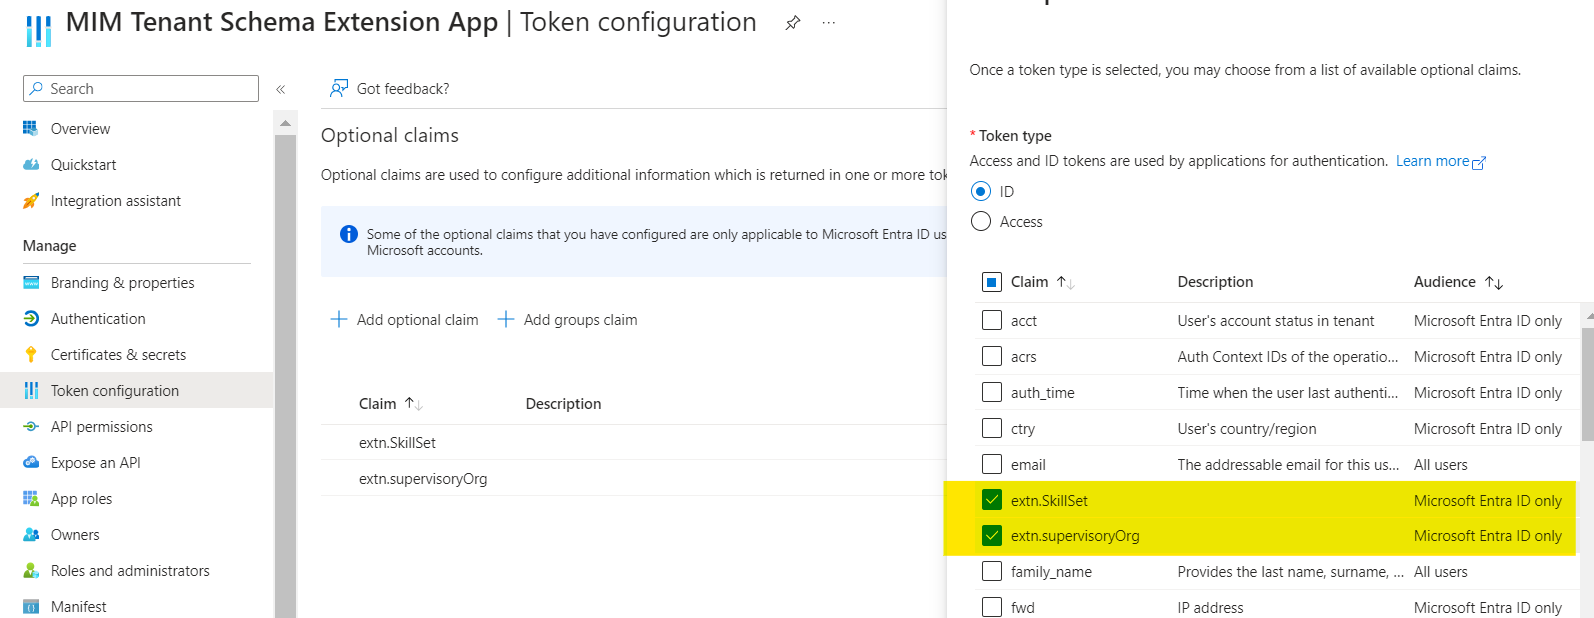
Add Directory Extension Attributes as Optional Claims
Applications, that require the extension attributes defined in the same application can add the defined application as optional claims or add the extension attributes as optional claims in the application manifest.
Honestly just use the Token Configuration page, because if you mess up in typing, the Token Configuration page will show you the error, which is kind of nice. Here is how you select this extension property.
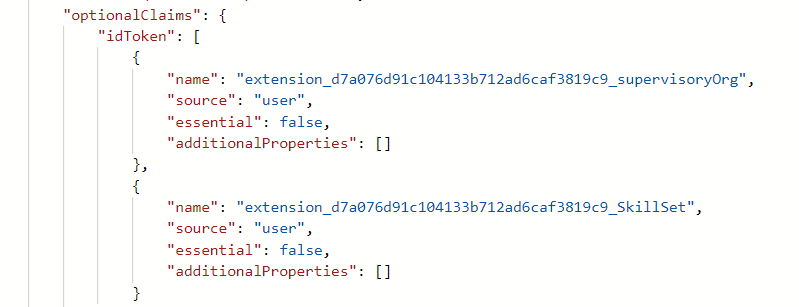
This is the change it made to manifest.xml.
Use Directory Extension Attributes in SCIM Provisioning
This is probably the least known capability of the directory extension attributes. For example, let’s say the knowledge management application in our fictitious company uses the SkillSet attribute to assign the right content to the right users. We can use the SkillSet extension attribute to provision the user in the knowledge management application.
However, the process of extending the list of source attributes available for provisioning from the Entra ID Directory is not straightforward.
Microsoft provides a special url to allow modification of the Entra ID Directory.
- Go to the Azure Portal using the special
URL. - Go to Microsoft Entra ID -> Enterprise applications -> Select the Application from the list -> Provisioning -> Click on Edit Provisioning.
- Click on Mappings and then select Provision Microsoft Entra ID Users.

- Scroll down to the checkbox and select Show advanced options. You will be able to see the option to Edit attribute list for Microsoft Entra ID. Click on Edit attribute list for Microsoft Entra ID.
- Add the extension attributes. In our case, we will add
sextension_d7a076d91c104133b712ad6caf3819c9_supervisoryOrgandSextension_d7a076d91c104133b712ad6caf3819c9_SkillSetto the list of supported attributes.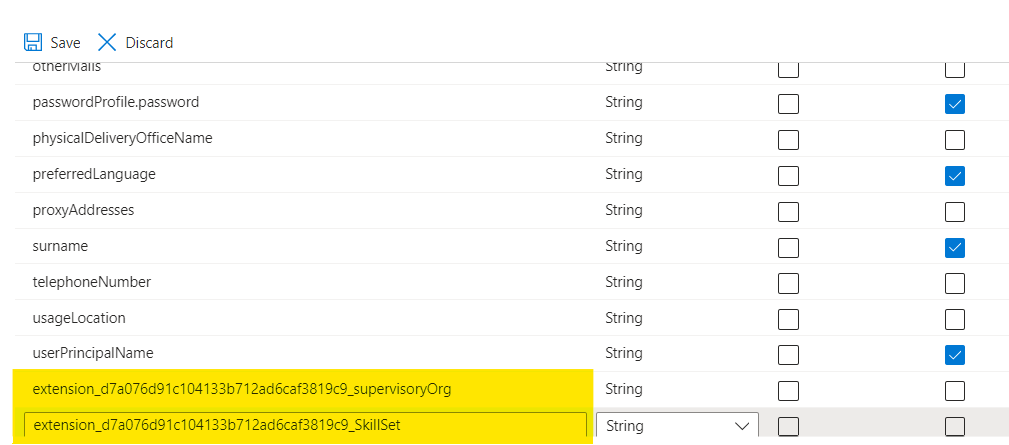
- Click Save to save the changes.
Note that directory extension attribute names are case-sensitive, make sure you enter it in the same format as defined in the directory. Provisioning multi-valued directory extension attributes is not supported.
Add the attributes to the application’s attribute mapping for User Object.

We can verify provisioning by checking the logs in the provisioning tab.

Add Directory Extension Attributes for SCIM Provisioning using Graph API
We can also use the Microsoft Graph API to add the extension attributes to the list of supported attributes for SCIM provisioning.
Make a GET Call to retrieve the existing Schema.
GET https://graph.microsoft.com/beta/servicePrincipals/{service-principal-id}/jobs/{sync-job-id}/schema
- Copy the existing Schema and modify the Entra ID Directory Section -> User Object -> Attribute list to include the extension attributes.
- Modify the Synchronization Rules -> Object Mappings -> Select the User Object(depending on the version it can have different names Provision Microsoft Entra ID Users or Provision Azure AD Users) -> Add the extension attribute to the application’s attribute mapping for User Object.
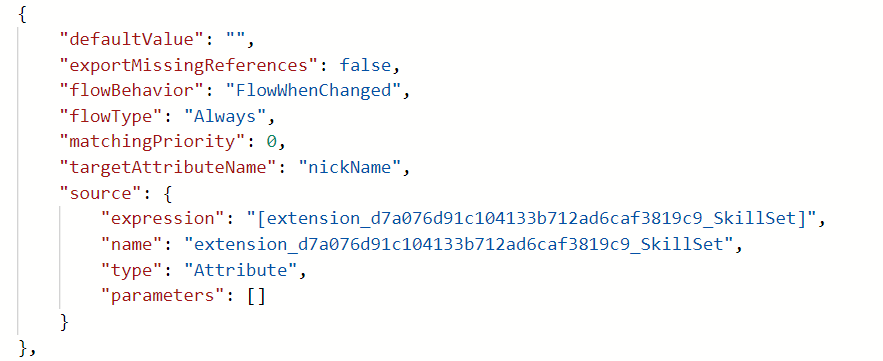
- Copy the modified schema and make a PUT call to update the provisioning job schema. Send the modified schema as the request body.
PUT https://graph.microsoft.com/beta/servicePrincipals/{service-principal-id}/jobs/{job-id}/schema
Content-Type: application/json
Body:
{
"directories": [
{
"name": "Microsoft Entra ID",
"objects": [
{
"name": "User",
"attributes": [
{
"anchor": false,
"caseExact": false,
"defaultValue": null,
"flowNullValues": false,
"multivalued": false,
"mutability": "ReadWrite",
"name": "extension_d7a076d91c104133b712ad6caf3819c9_SkillSet",
"required": false,
"type": "String",
"apiExpressions": [],
"metadata": [],
"referencedObjects": []
}
]
},
]
},
{
"name": "Salesforce",
}
],
"synchronizationRules":[
{
"name": "USERGROUP_OUTBOUND_USERGROUP",
"sourceDirectoryName": "Microsoft Entra ID",
"targetDirectoryName": "Knowledge Management Application",
"objectMappings": [
{
"sourceObjectName": "User",
"targetObjectName": "urn:ietf:params:scim:schemas:extension:enterprise:2.0:User",
"attributeMappings": [
{
"defaultValue": "",
"exportMissingReferences": false,
"flowBehavior": "FlowWhenChanged",
"flowType": "Always",
"matchingPriority": 0,
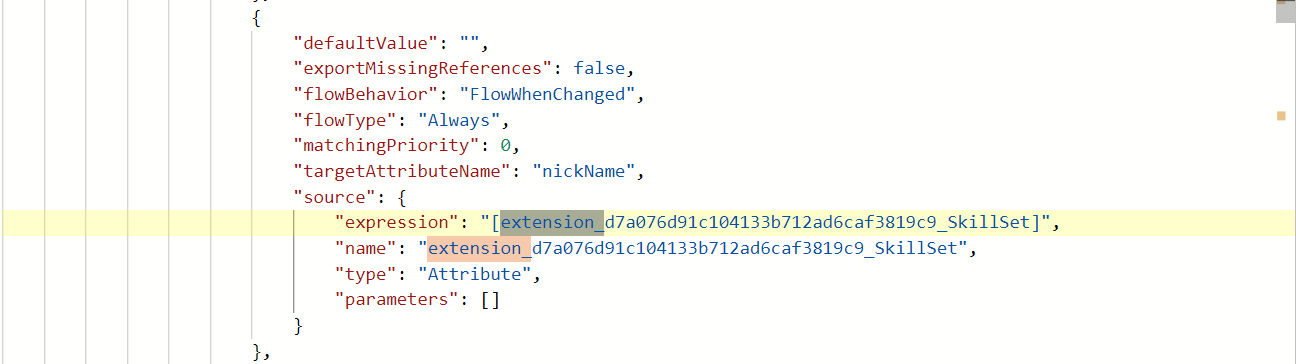
"targetAttributeName": "nickName",
"source": {
"expression": "[extension_d7a076d91c104133b712ad6caf3819c9_SkillSet]",
"name": "extension_d7a076d91c104133b712ad6caf3819c9_SkillSet",
"type": "Attribute",
"parameters": []
}
},
]
},
]
},
]
}
Use the Directory Extension Attributes in Dynamic Groups
Many organizations use dynamic groups to manage access to resources, drive business processes, lifecycle workflows and more. You can use directory extension attributes to create dynamic group membership rules. For example, you can create a dynamic group that includes all users who have a specific skill set or are part of a specific supervisory organization.
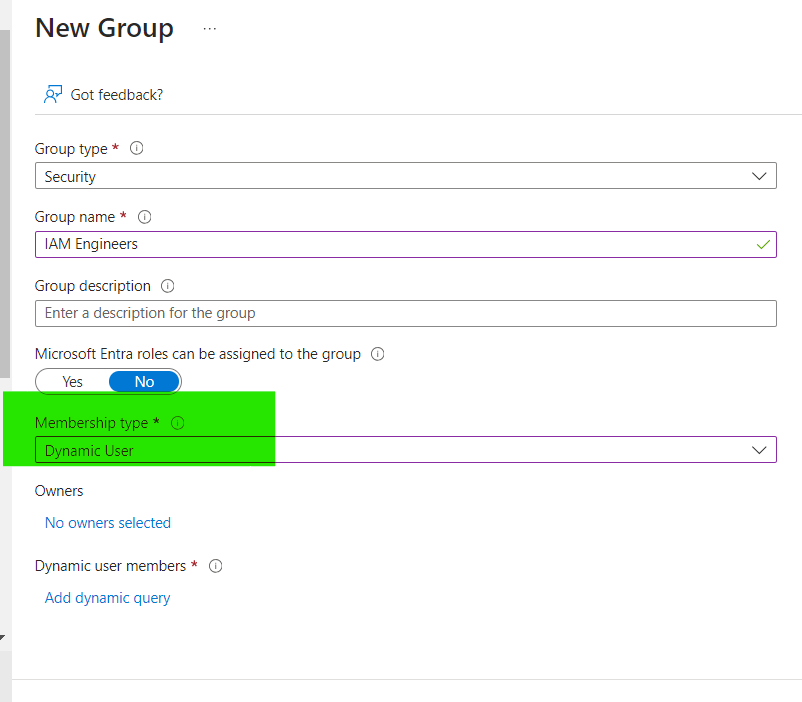
- Create a new group with the Membership type set to Dynamic User.
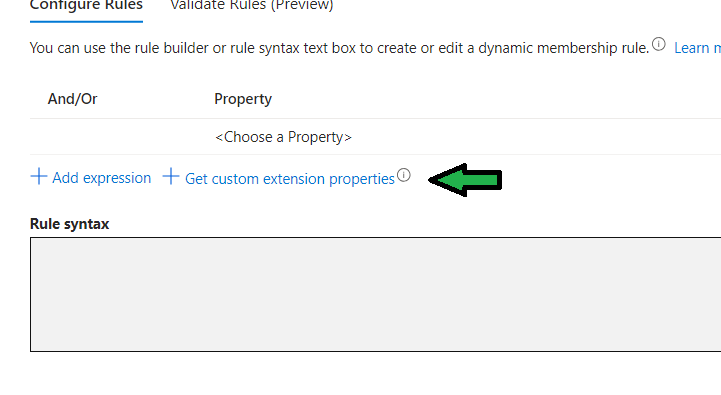
- Click Add dynamic query and click on Get custom extension properties
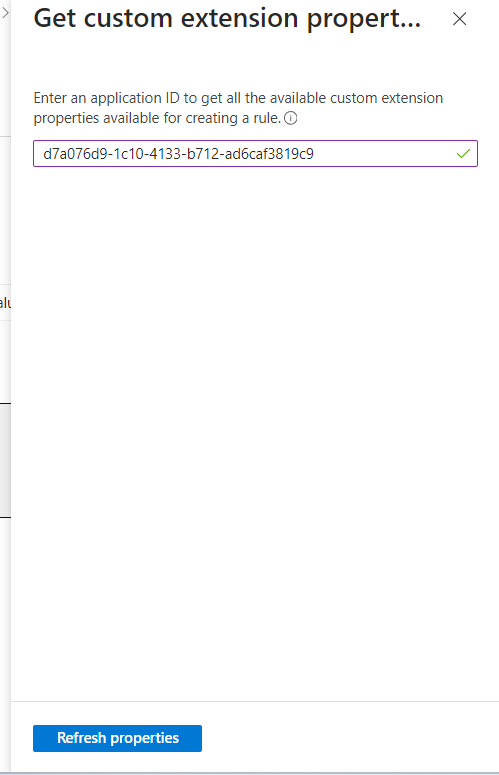
- Enter the application ID of the parent application that owns the extension attribute and click on Refresh Properties.
- Select the extension attribute from the list and click Add. Add the condition and click Add Expression.
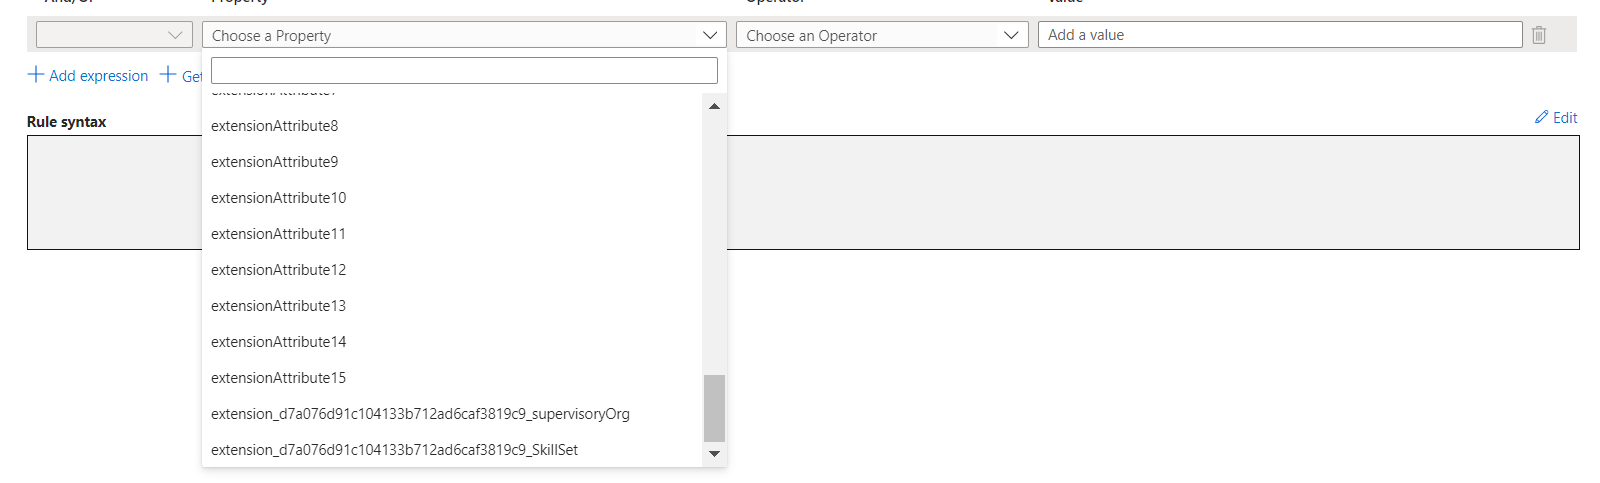
- Click Save to create the dynamic group. Wait for a few minutes for the dynamic membership to be calculated.
Conclusion
Directory extension attributes offer a powerful way to enhance the functionality and customization of Entra ID. By leveraging these attributes, organizations can map and use custom claims in various scenarios, such as SAML claims, dynamic group membership rules, and SCIM provisioning.
I have shown how to add extension attributes to claims mapping policies, configure SAML claims, create dynamic groups based on extension attributes, and customize attribute mappings for SCIM provisioning. It also highlights the importance of using the Token Configuration page and the Azure Portal’s special URL for modifying the Entra ID Directory.
Overall, directory extension attributes provide flexibility and extensibility to Entra ID applications, allowing organizations to tailor their identity and access management solutions to meet specific business requirements. By using directory extension attributes, you can leverage the power and flexibility of Entra ID to meet your specific business requirements