Cross Tenant Sync
Cross-tenant synchronization is a new feature in Azure Active Directory for connecting individuals across multiple tenants in a Multi-tenant organization.
Usecase
To collaborate between businesses, to give access to applications, share point, and teams sites, individuals from one tenant can be invited to another as external identities and access packages can be created through entitlement management. This includes creating access packages and pre-approving certain domains, giving control over the approval process.
Now consider these scenarios
-
Two organizations merged, for example, Contoso acquired Fabrikam. Contoso is currently trusted as the IDP of required SAAS applications of the organization.
-
If your organization is restructured into two legally independent business units, for example, organization Contoso is restructured into two separate entities Contoso and Fabrikam.
In this scenario, the aim is to automatically add a large number of individuals from the Fabrikam tenant as guests in the Contoso tenant for smooth collaboration within the same organization, taking into account privacy concerns.
Existing Solutions and Drawbacks
-
Microsoft Identity Manager (MIM): We can use the MIM graph connector to provision users between two Azure AD Tenants as guest users, to automate lifecycle management , update attribute of guest Azure AD Users. However, MIM is a legacy solution, and managing MIM Infrastructure is nightmarish. To implement the scenario described above you need to be highly skilled individuals with extensive knowledge of various MIM components.
-
Azure AD B2B Collaboration : Organizations can continue to use B2B Collaboration, however, guest user lifecycle management is not automated. If a user is removed from the source tenant, it will continue to exist in the target tenant.
With new Azure AD Cross Tenant synchronization you can achieve following:
- Create B2B users in your target tenant
- Remove B2B users in your target tenant
- Keep user attributes synchronized between your source and target tenants
- Minimise user friction by allow admins to consent to sharing data across tenants.
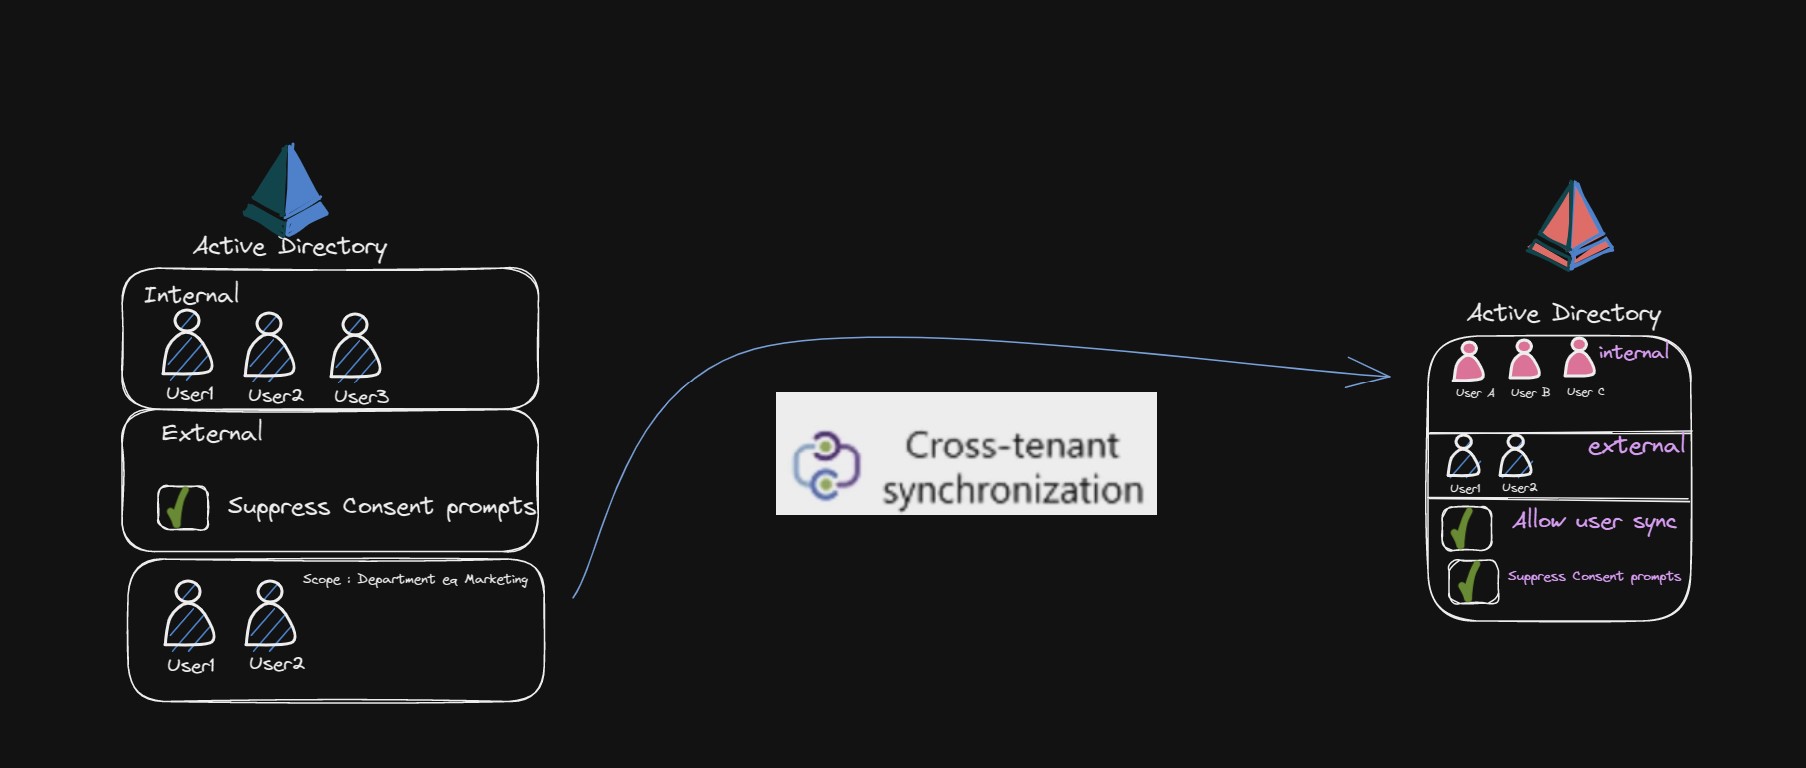
Follow the following steps to configure Cross Tenant Synchronization:
1.Enable cross-tenant synchronization and auto-redemption in the target tenant
-
Sign in to the Azure portal as an administrator in the target tenant.
-
Select Azure Active Directory > External Identities.
-
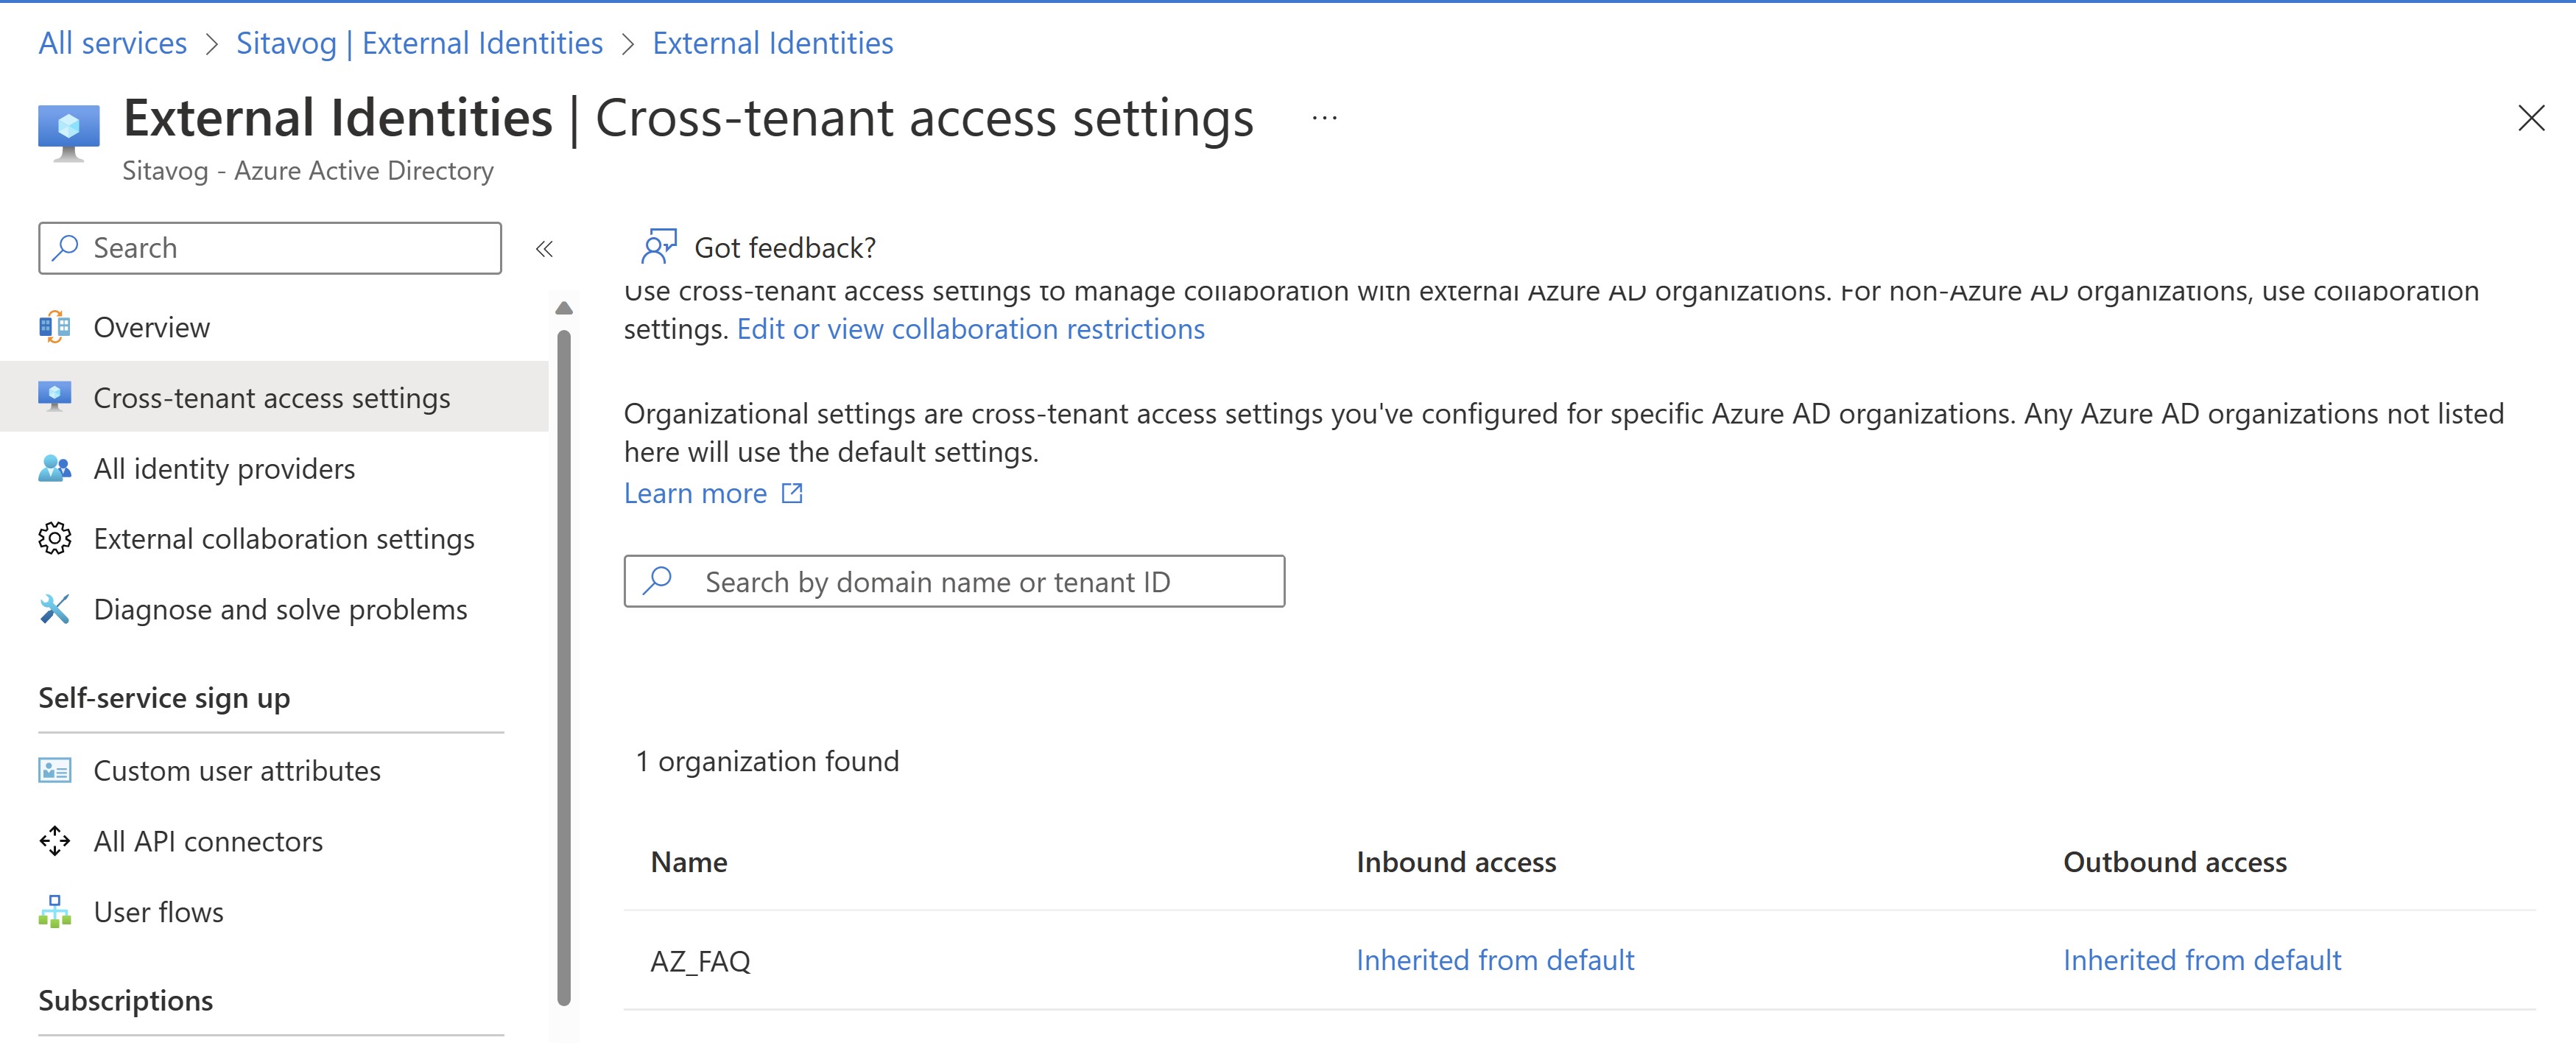
Select Cross-tenant access settings.
-
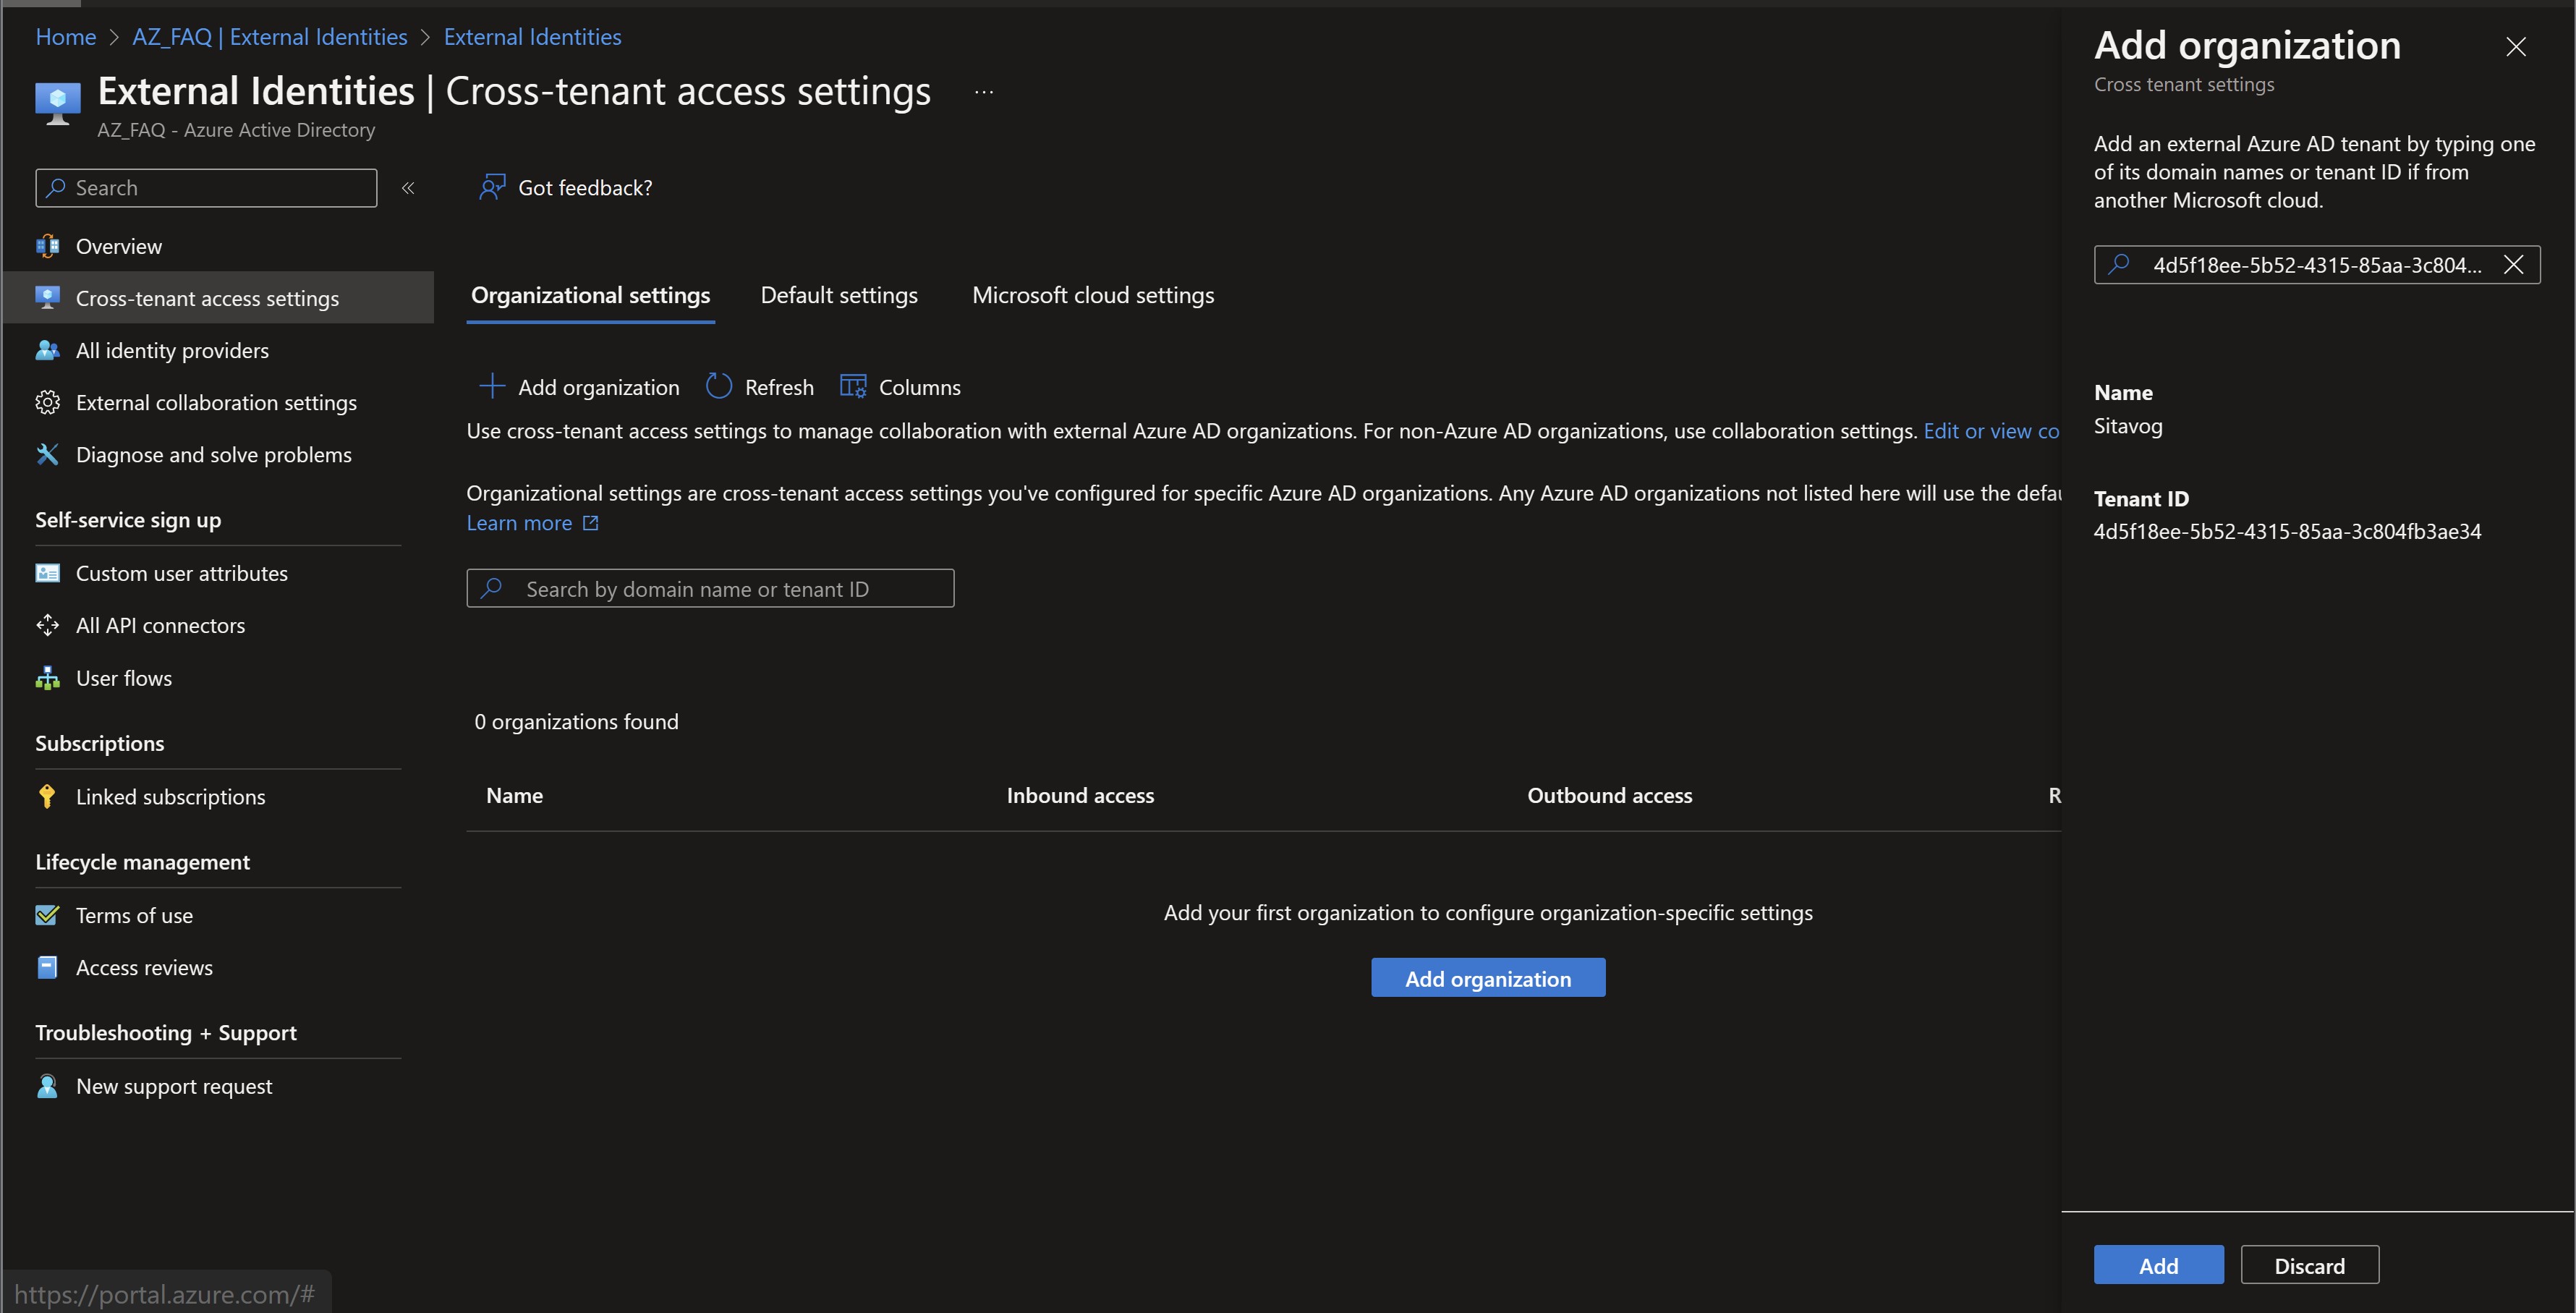
On the Organization settings tab, select Add organization.
-
Add the source tenant by typing the tenant ID or domain name and selecting Add.
- Under Inbound access of the added organization, select Inherited from default.
-
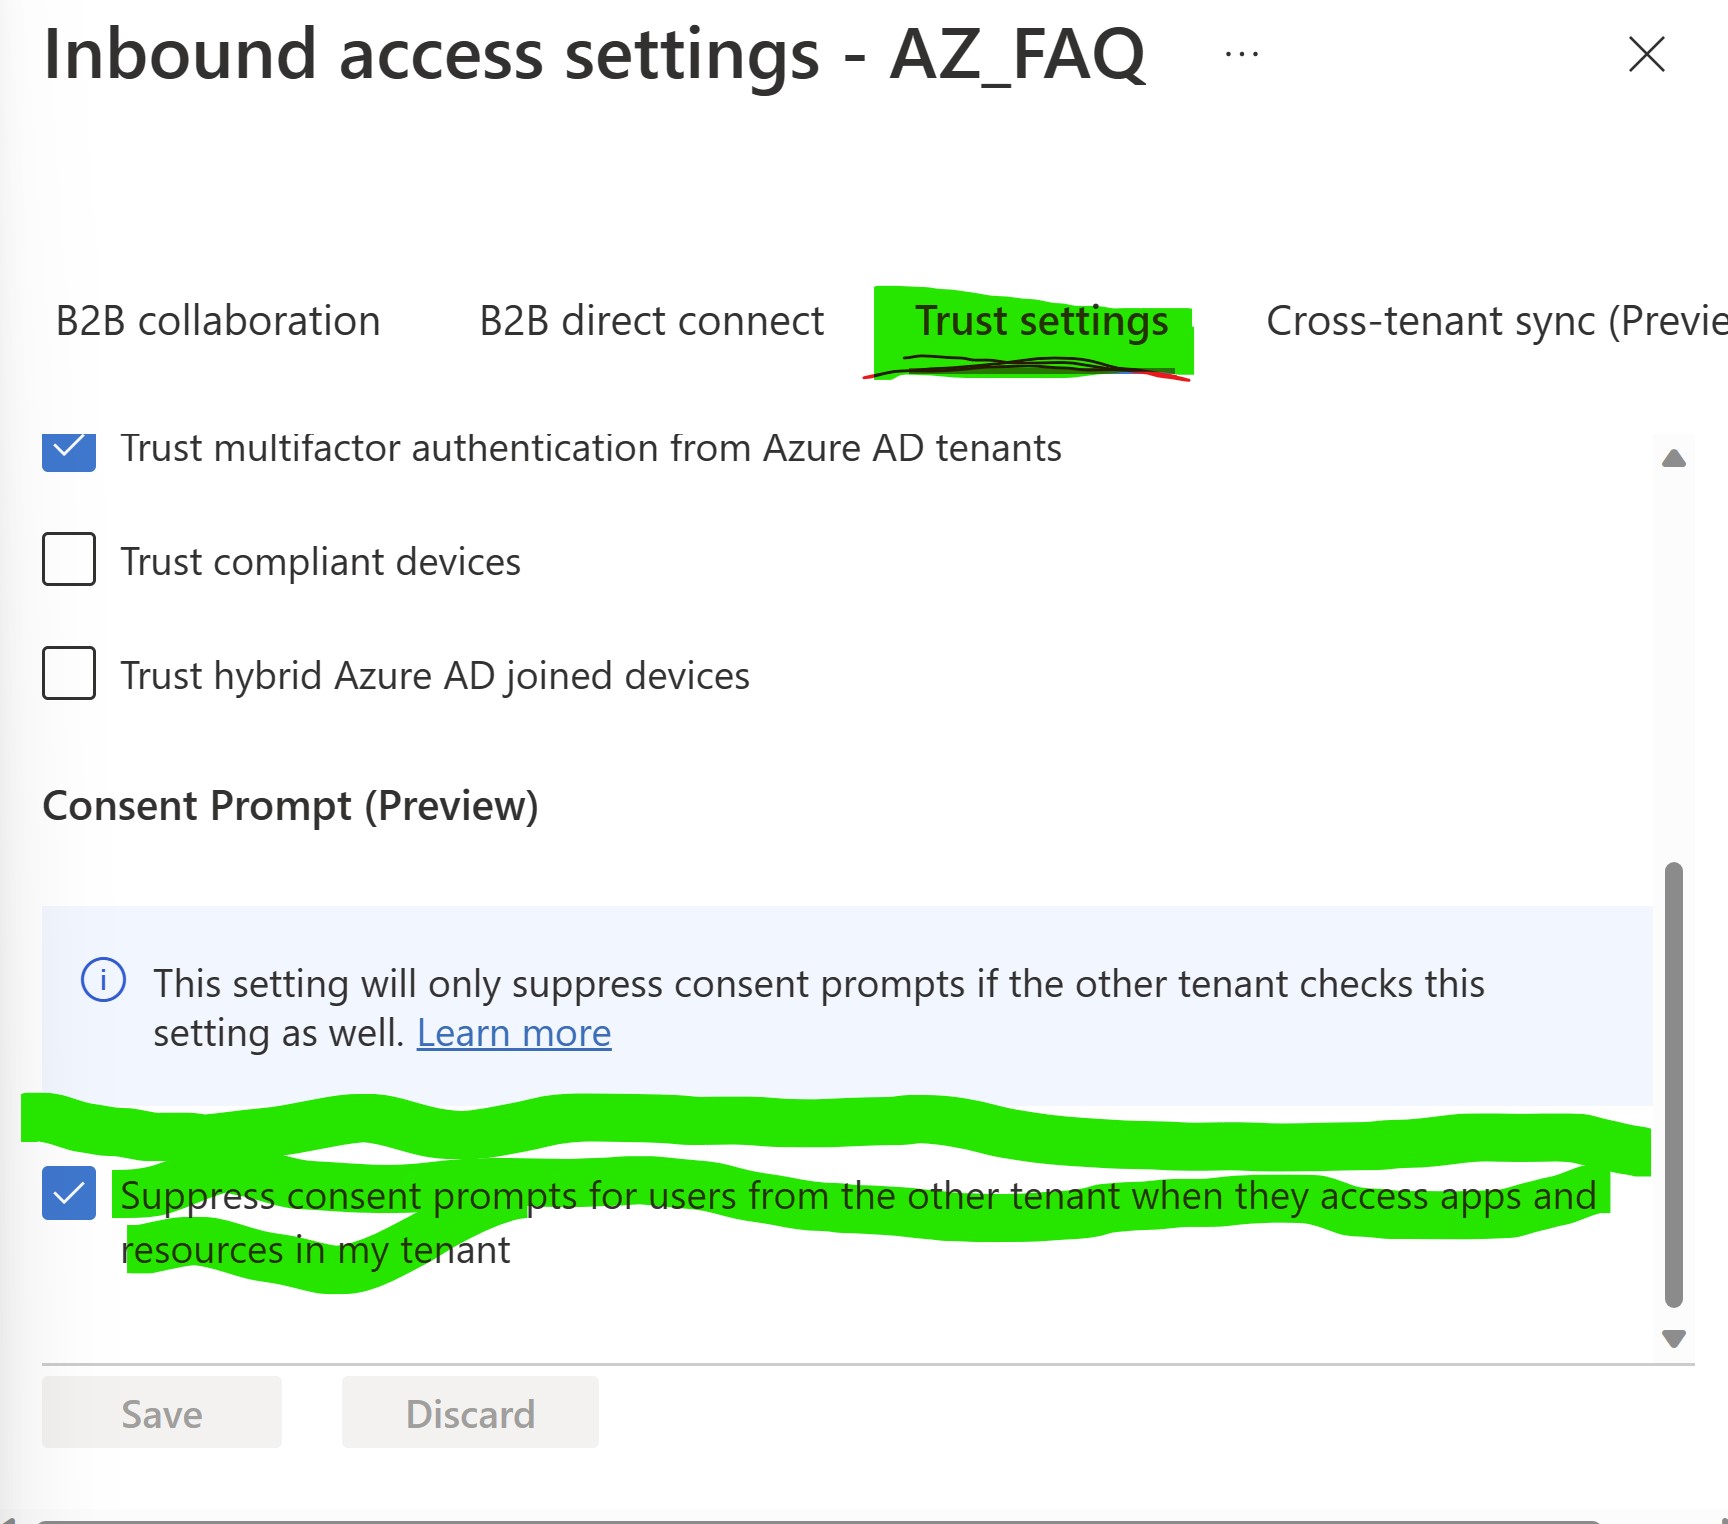
Select the Trust Settings tab, select Customized settings , notice the Consent Prompt option, here is where you will want to enable this feature as it will suppress consent prompts from apps in your target tenant for synced users from synced tenant.
-
Select the Cross-tenant sync (Preview) tab.
-
Check the Allow users sync into this tenant check box.
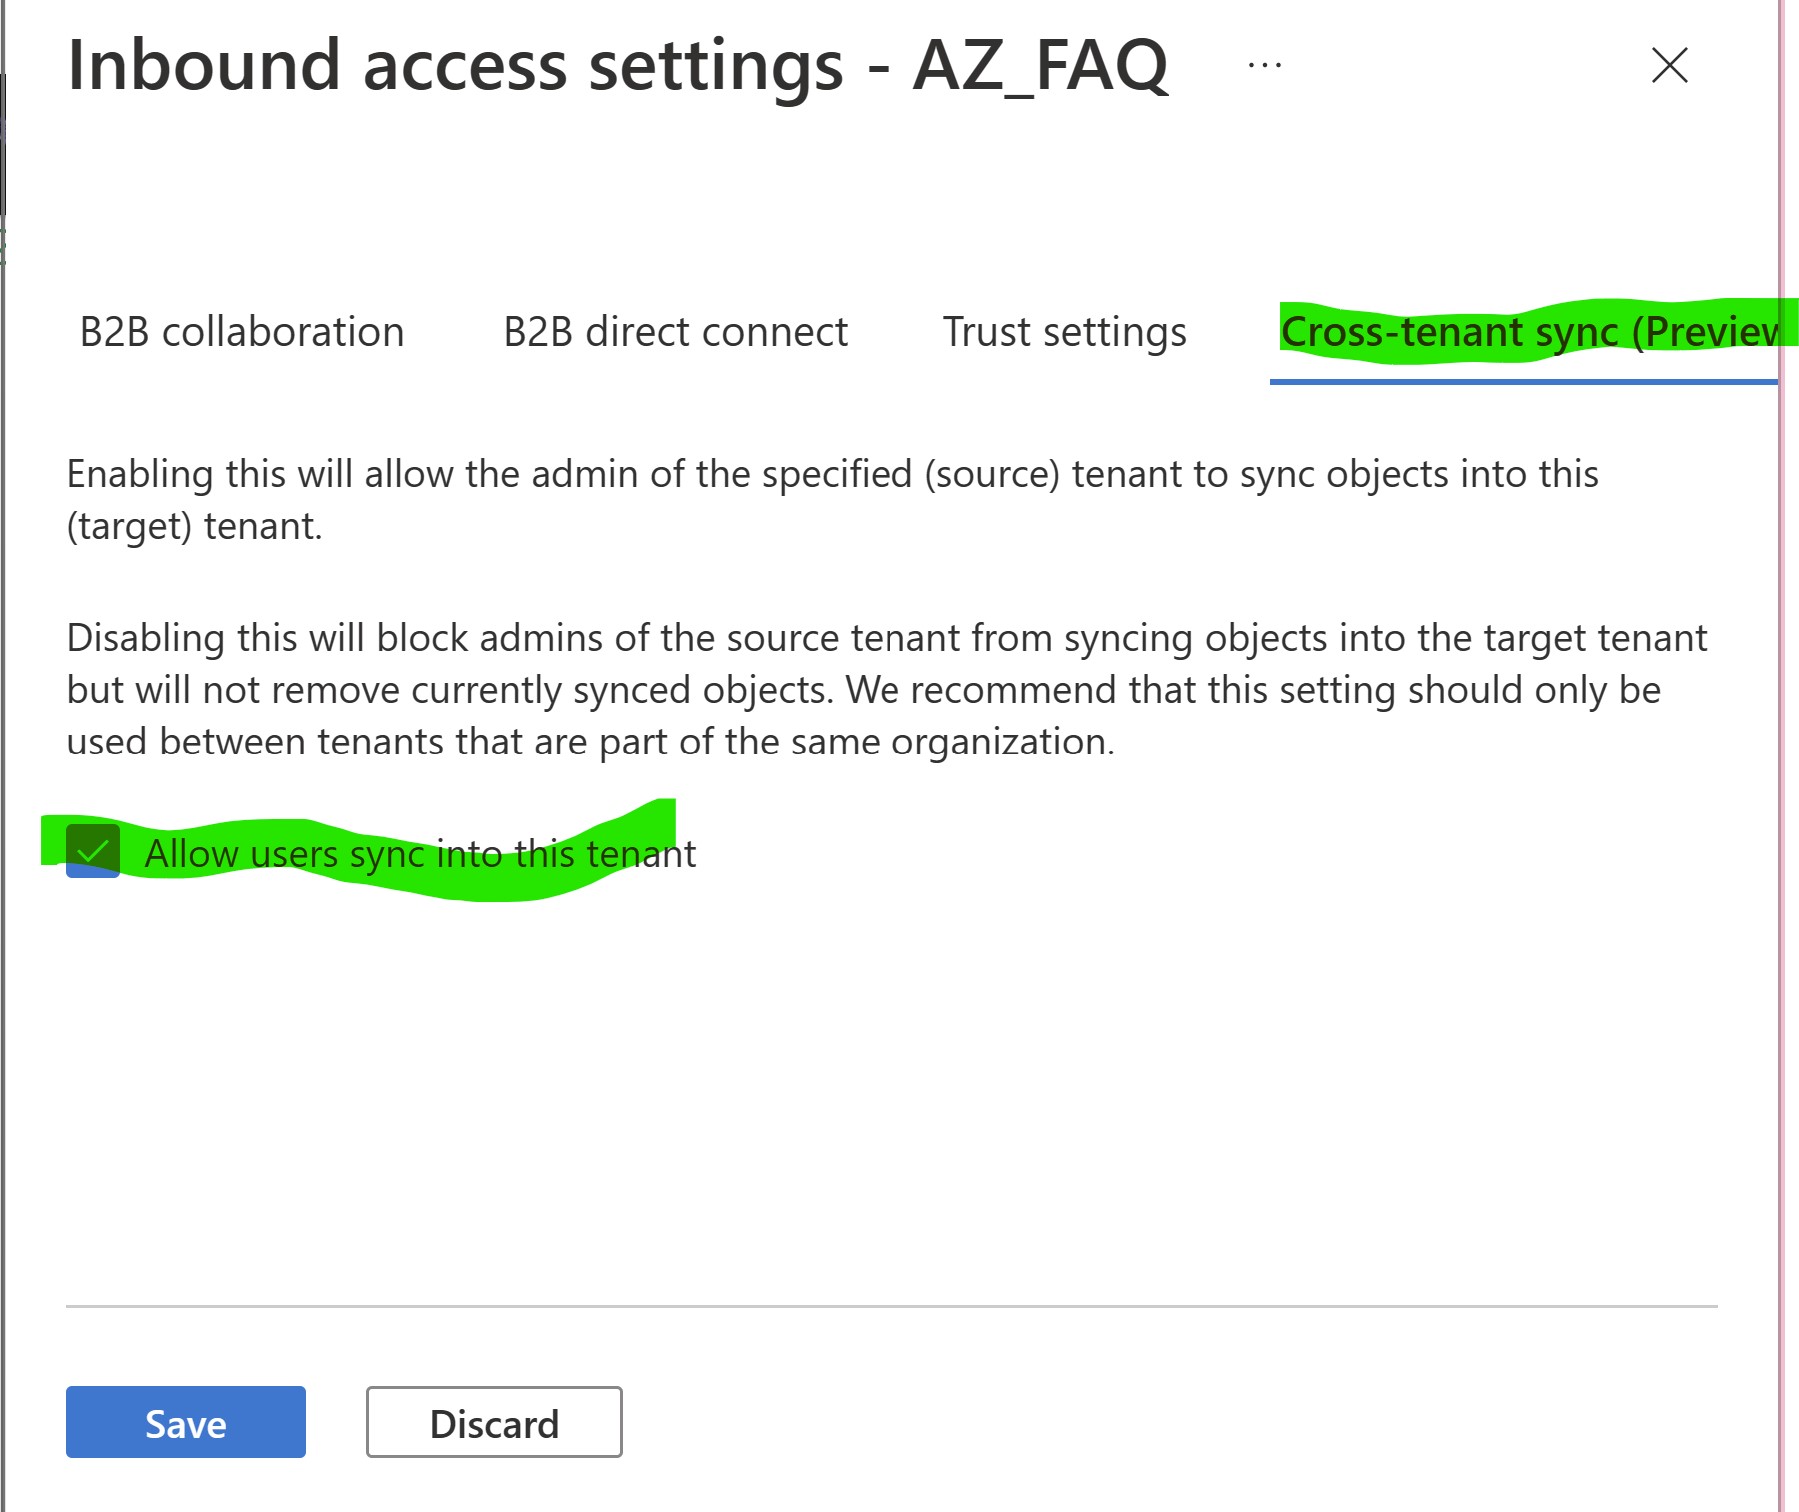
- Select Save.
2. Automatically redeem invitations in the source tenant
-
Sign in to the Azure portal as an administrator of the source tenant.
-
Select Azure Active Directory > External Identities.
-
Select Cross-tenant access settings.
-
On the Organization settings tab, select Add organization.
-
Add the target tenant by typing the tenant ID or domain name and selecting Add.
-
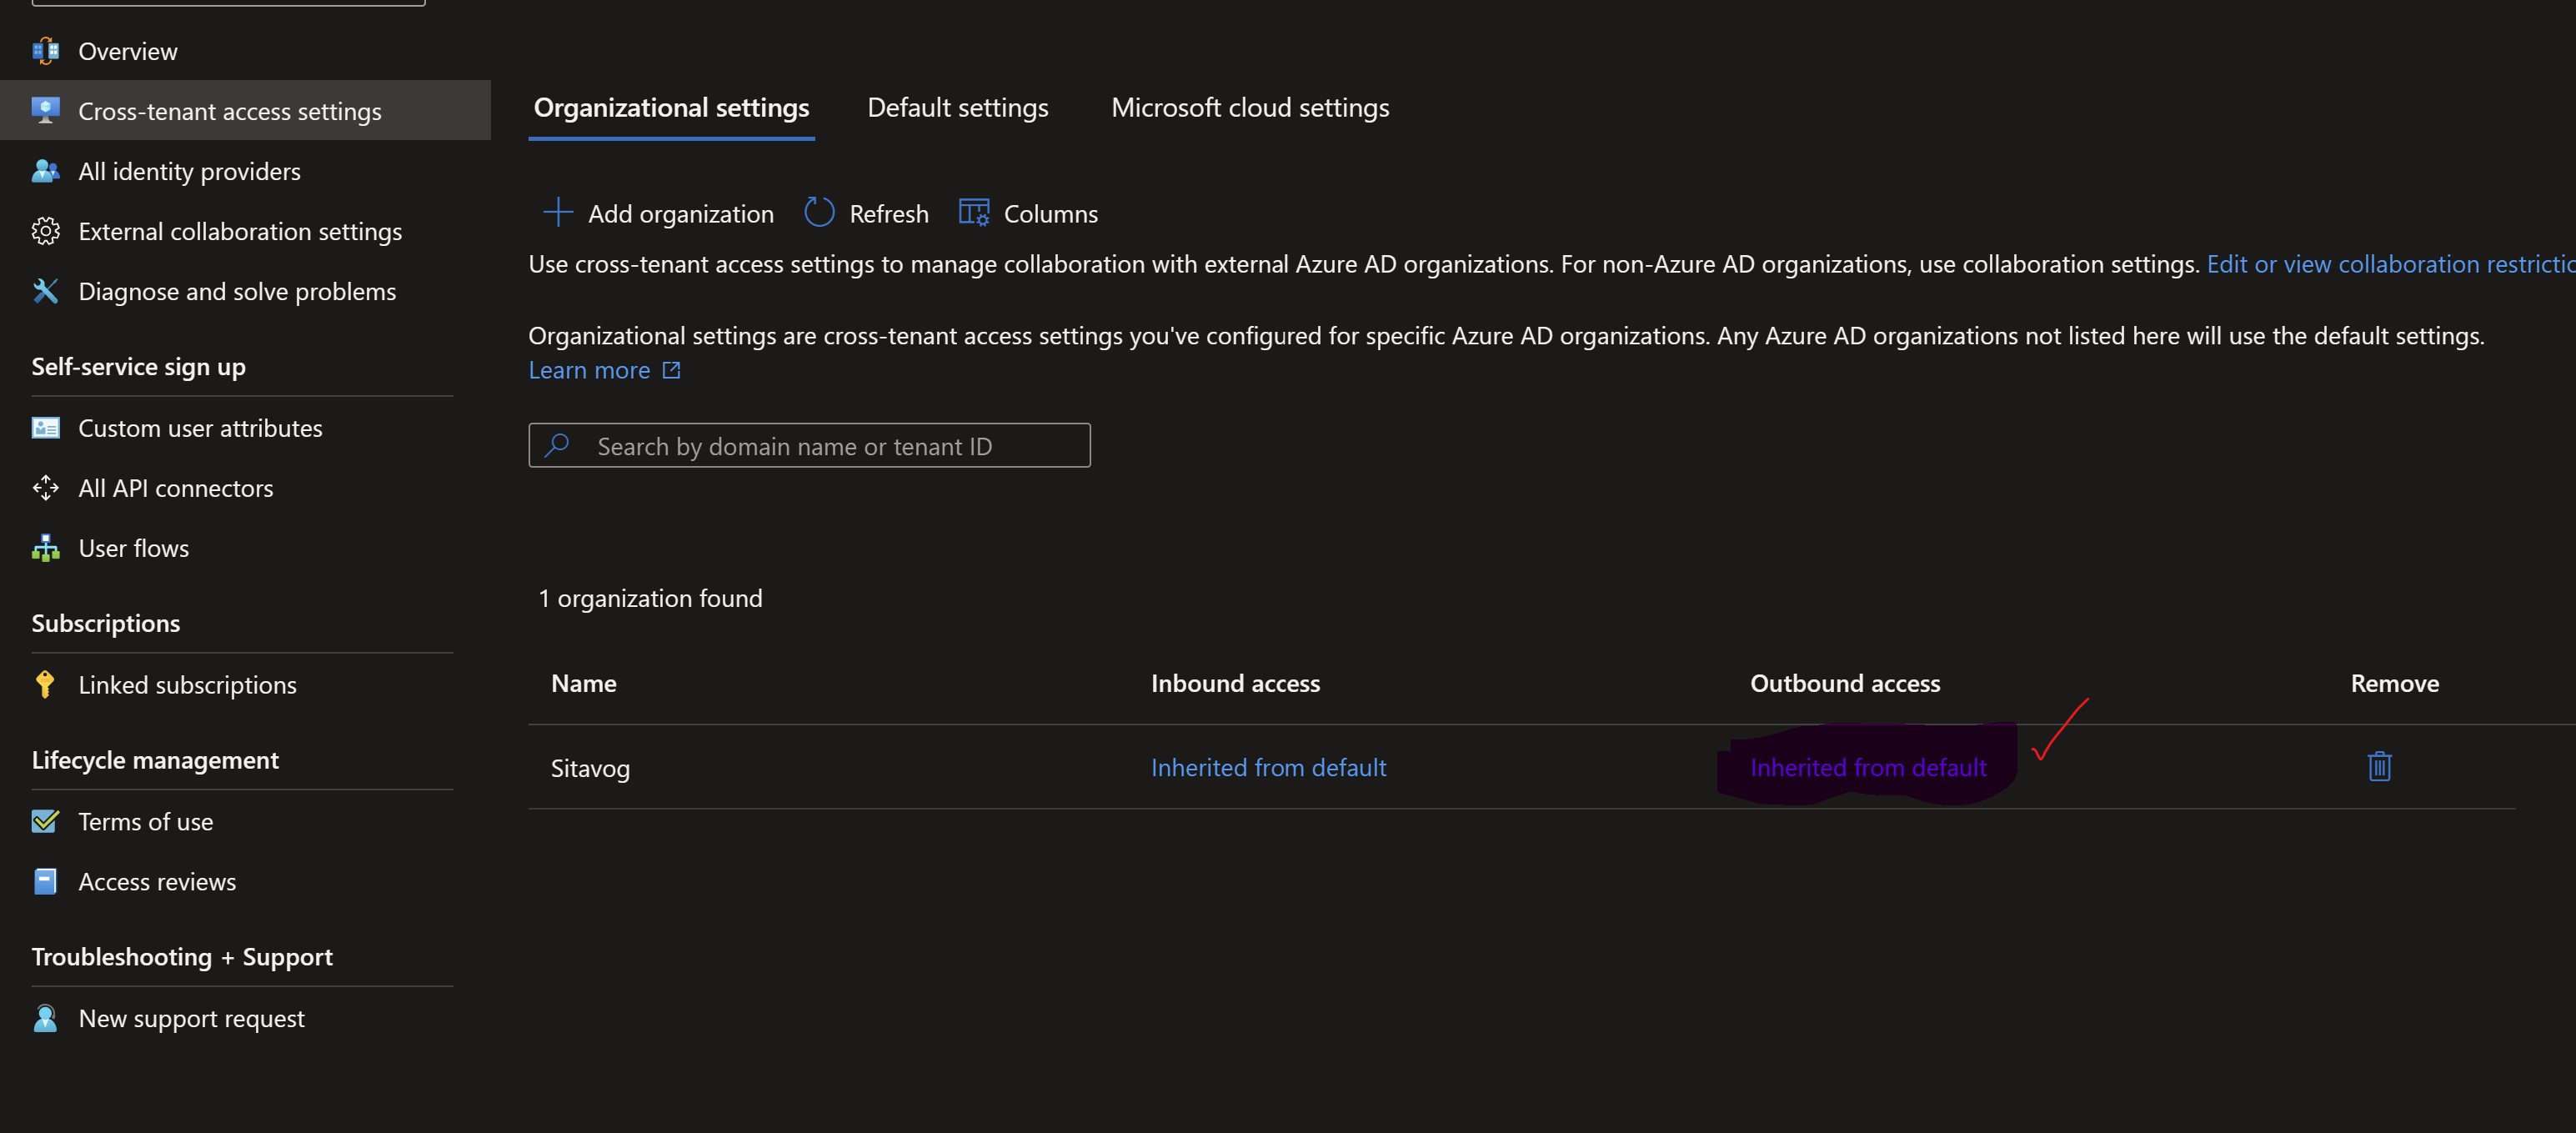
Under Outbound access for the target organization, select Inherited from default.
-
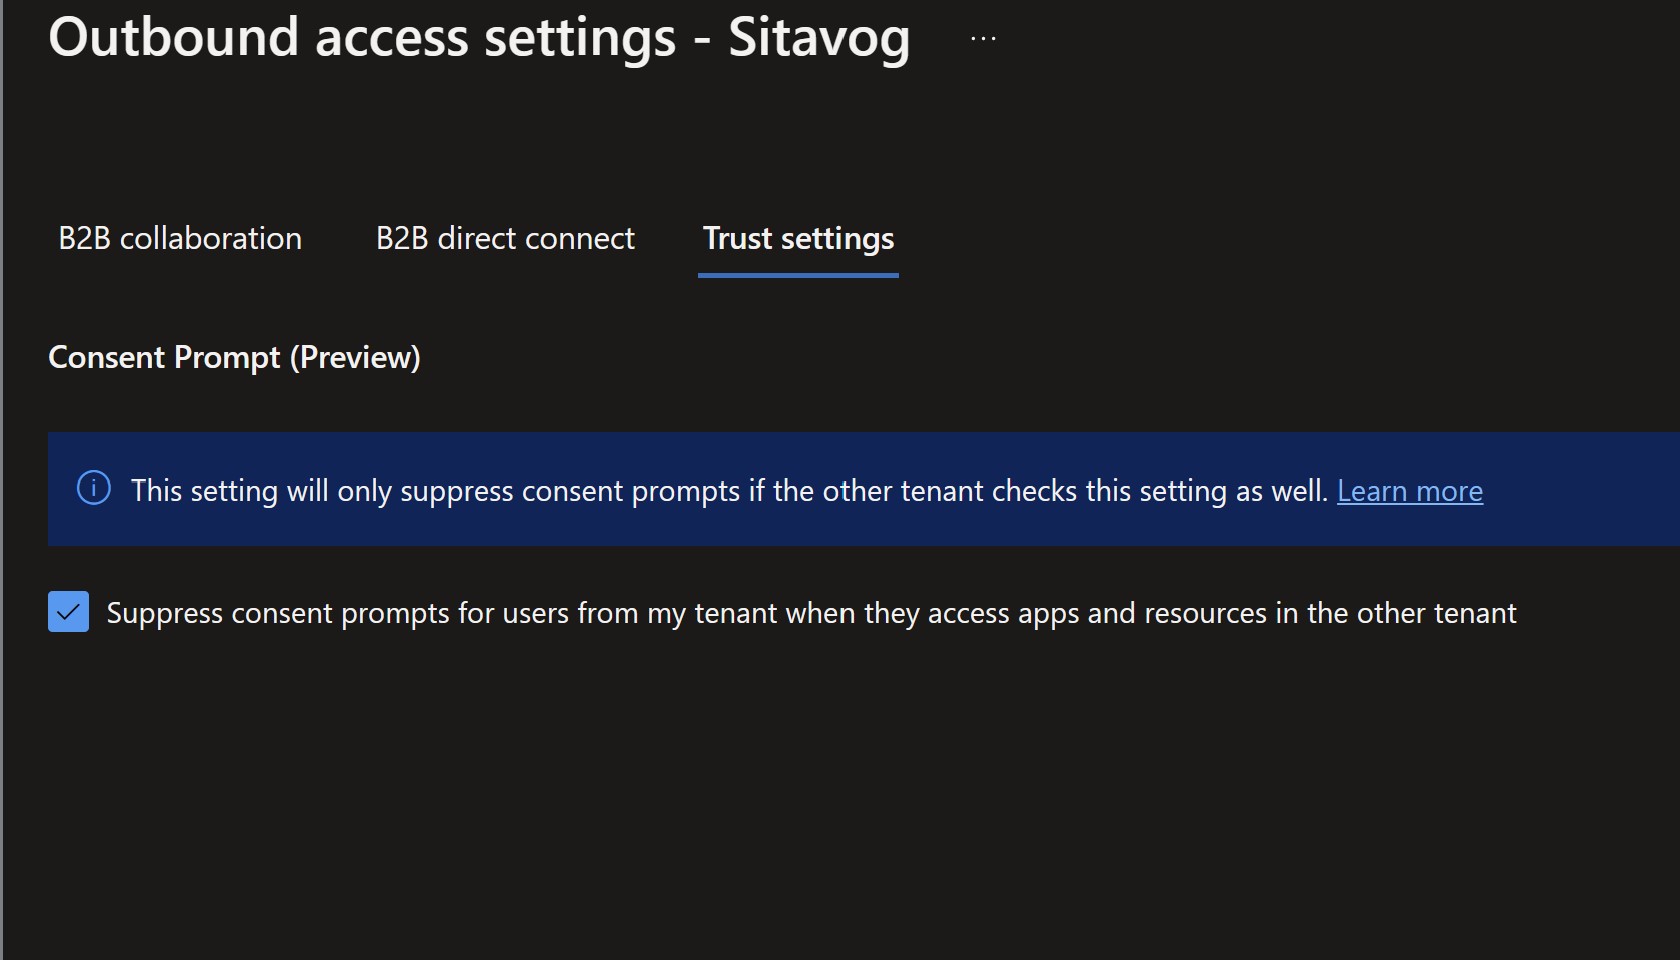
Select the Trust settings tab.
-
Check the Suppress consent prompts for users from my tenant when they access apps and resources in the other tenant check box.
-
Select Save.
3. Create a configuration in the source tenant
-
In the source tenant, select Azure Active Directory > Cross-tenant synchronization (Preview).
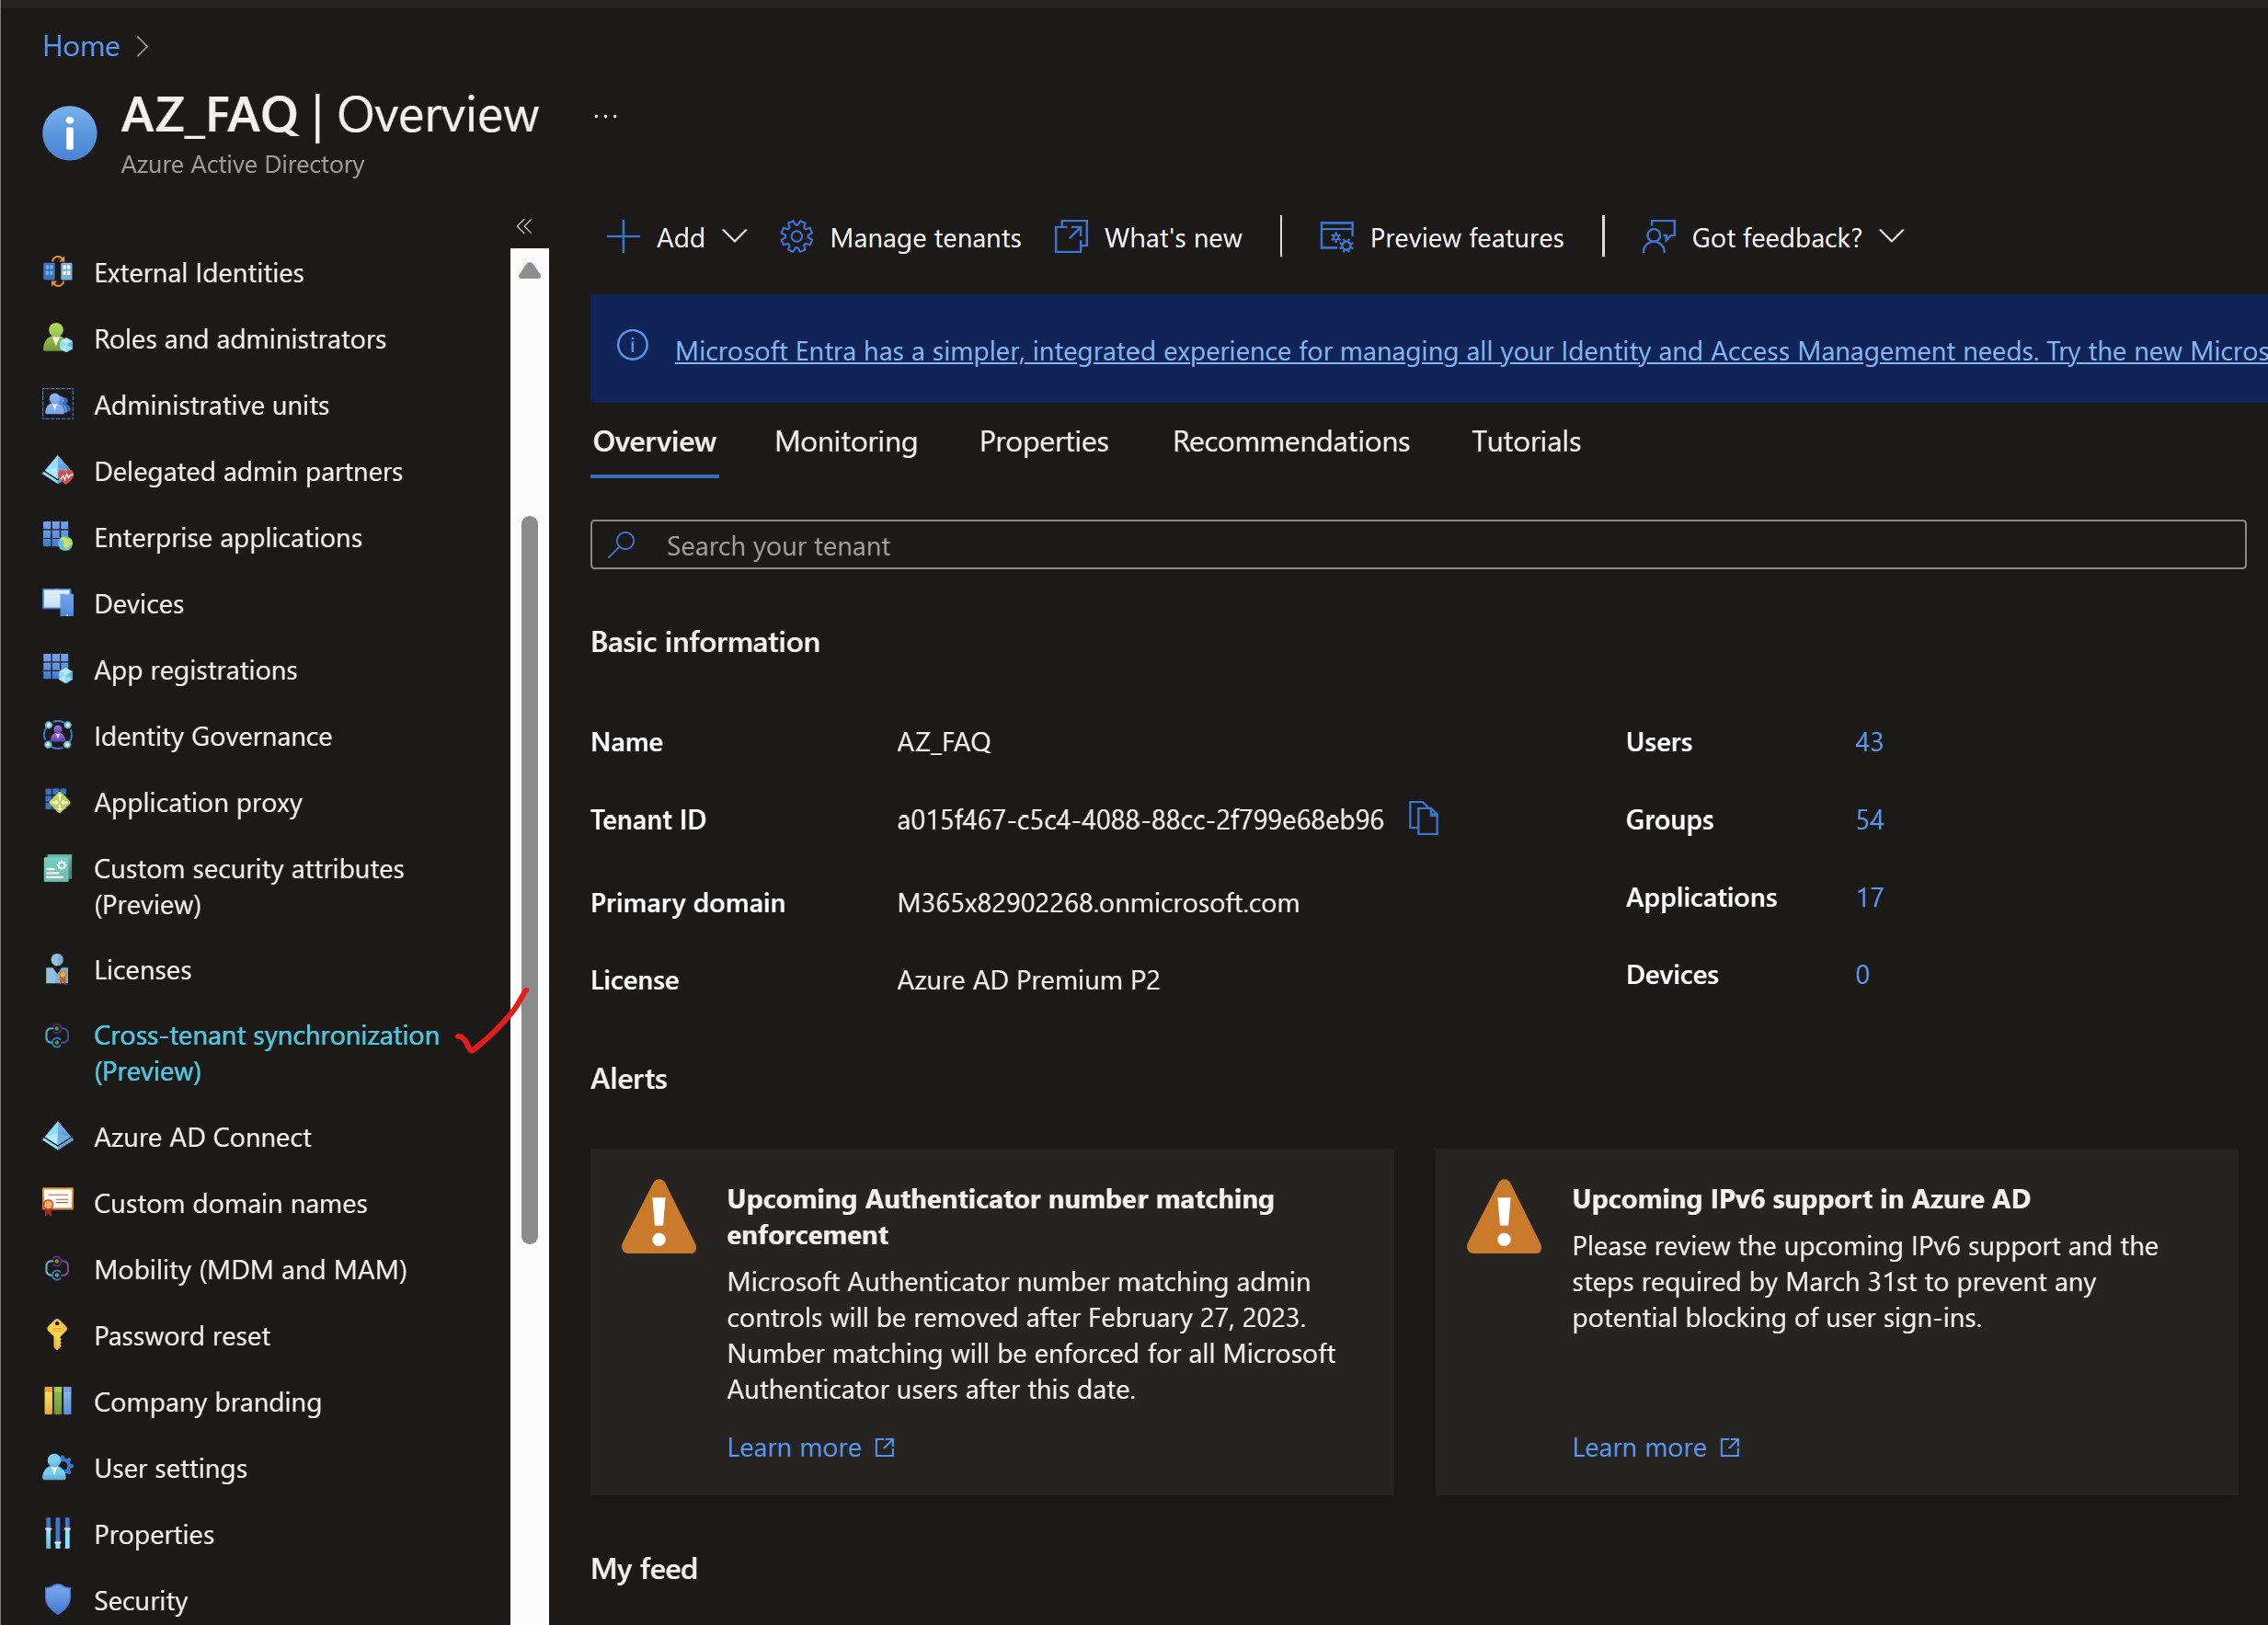 Select Configurations.
 -
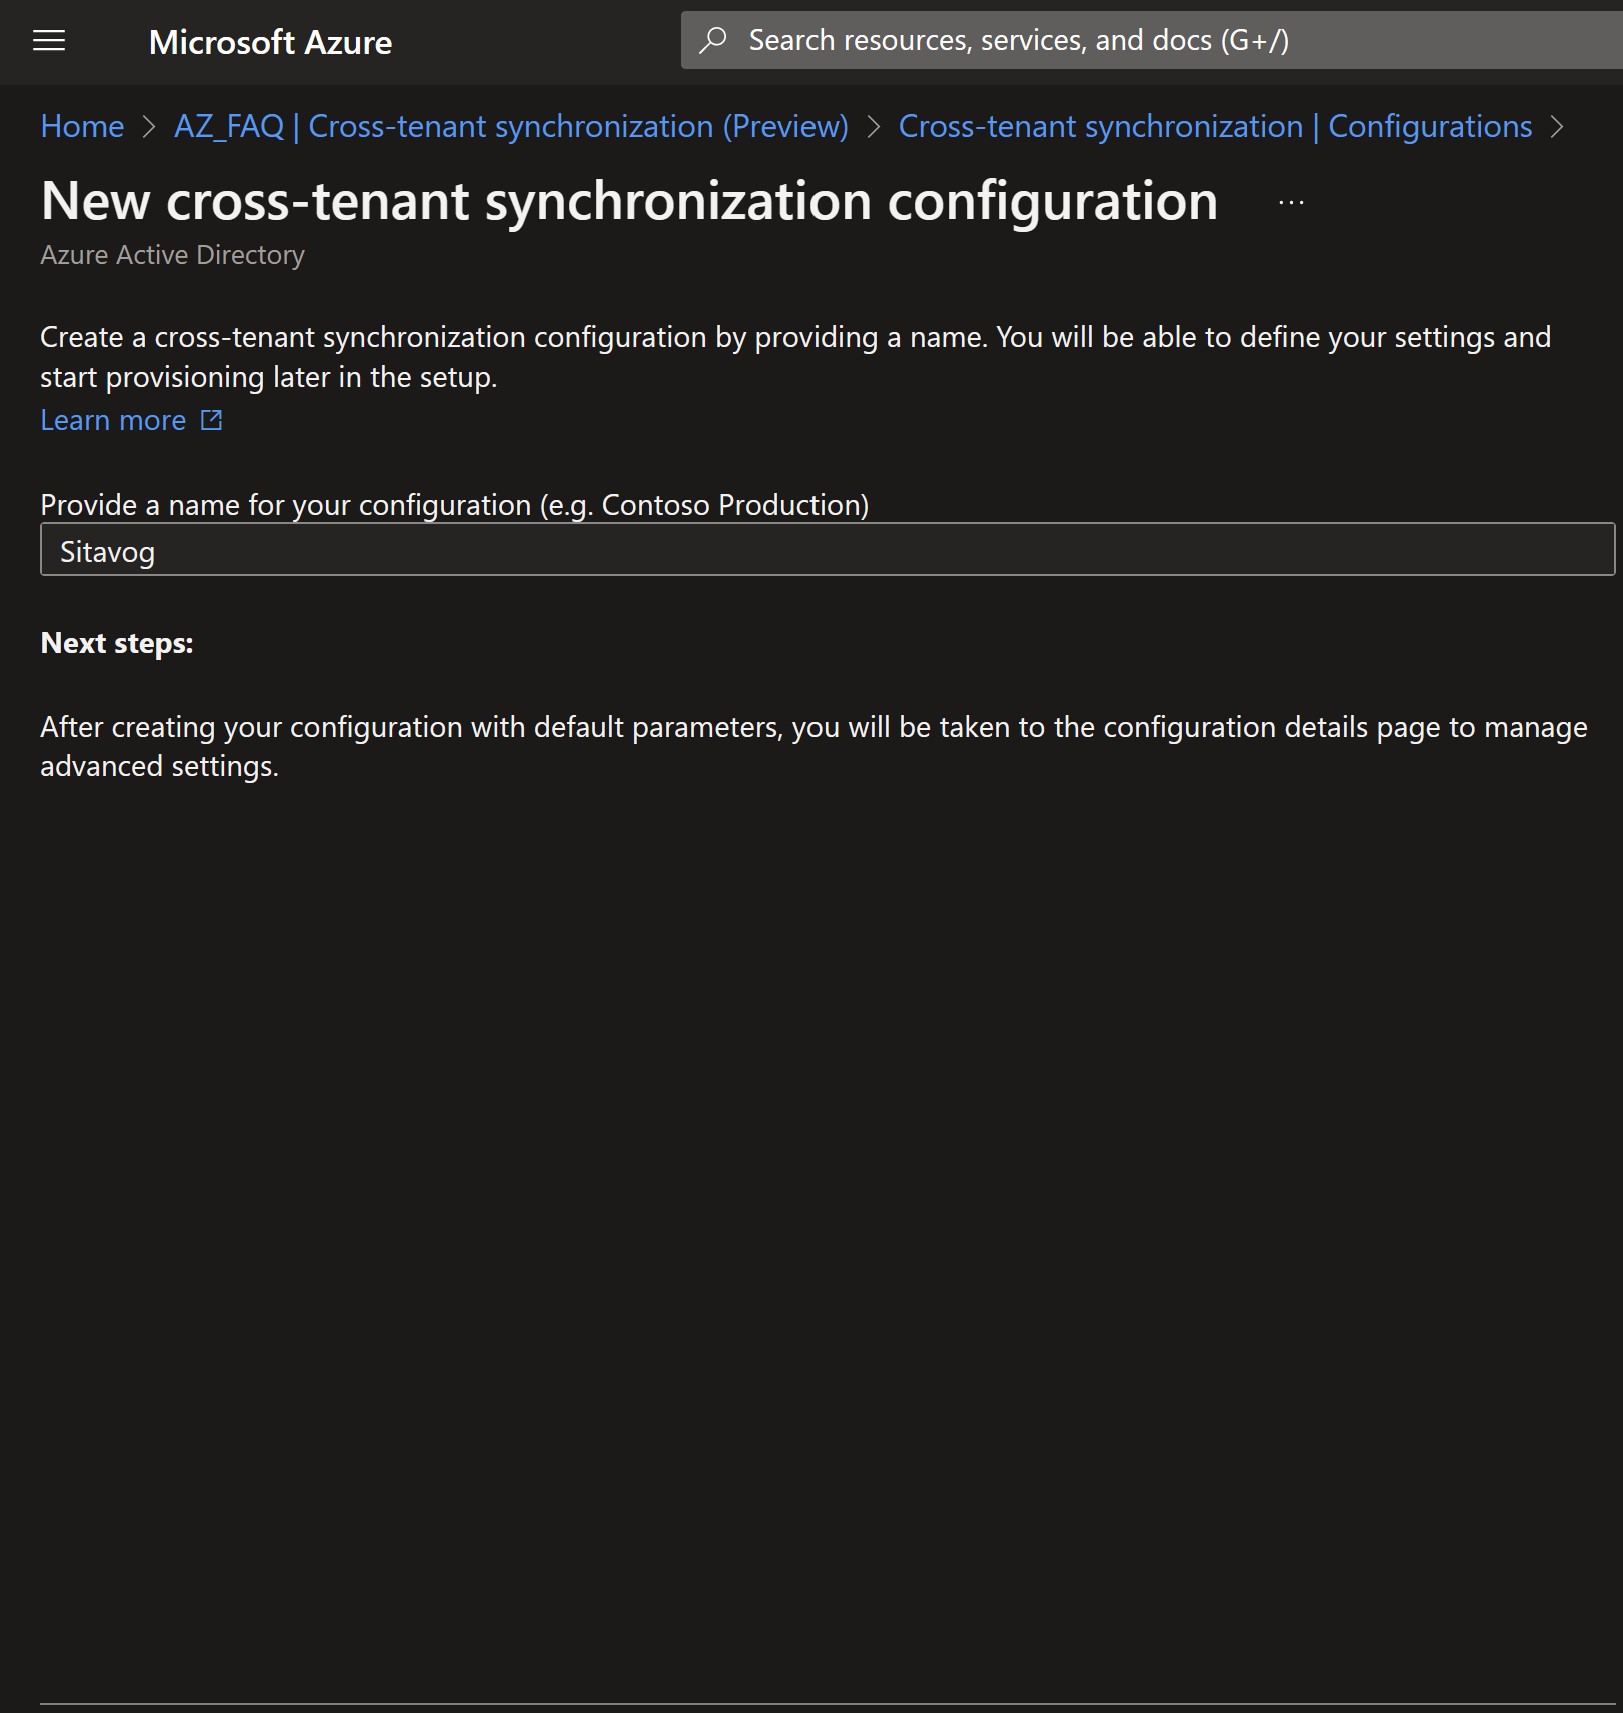
At the top of the page, select New configuration.
- Provide a name for the configuration and select Create.
-
It can take up to 15 seconds for the configuration that you just created to appear in the list.
-
Select Refresh to retrieve the latest list of configurations.
-
In the source tenant, in the configuration list, select your configuration.
-
Select Get started.
-
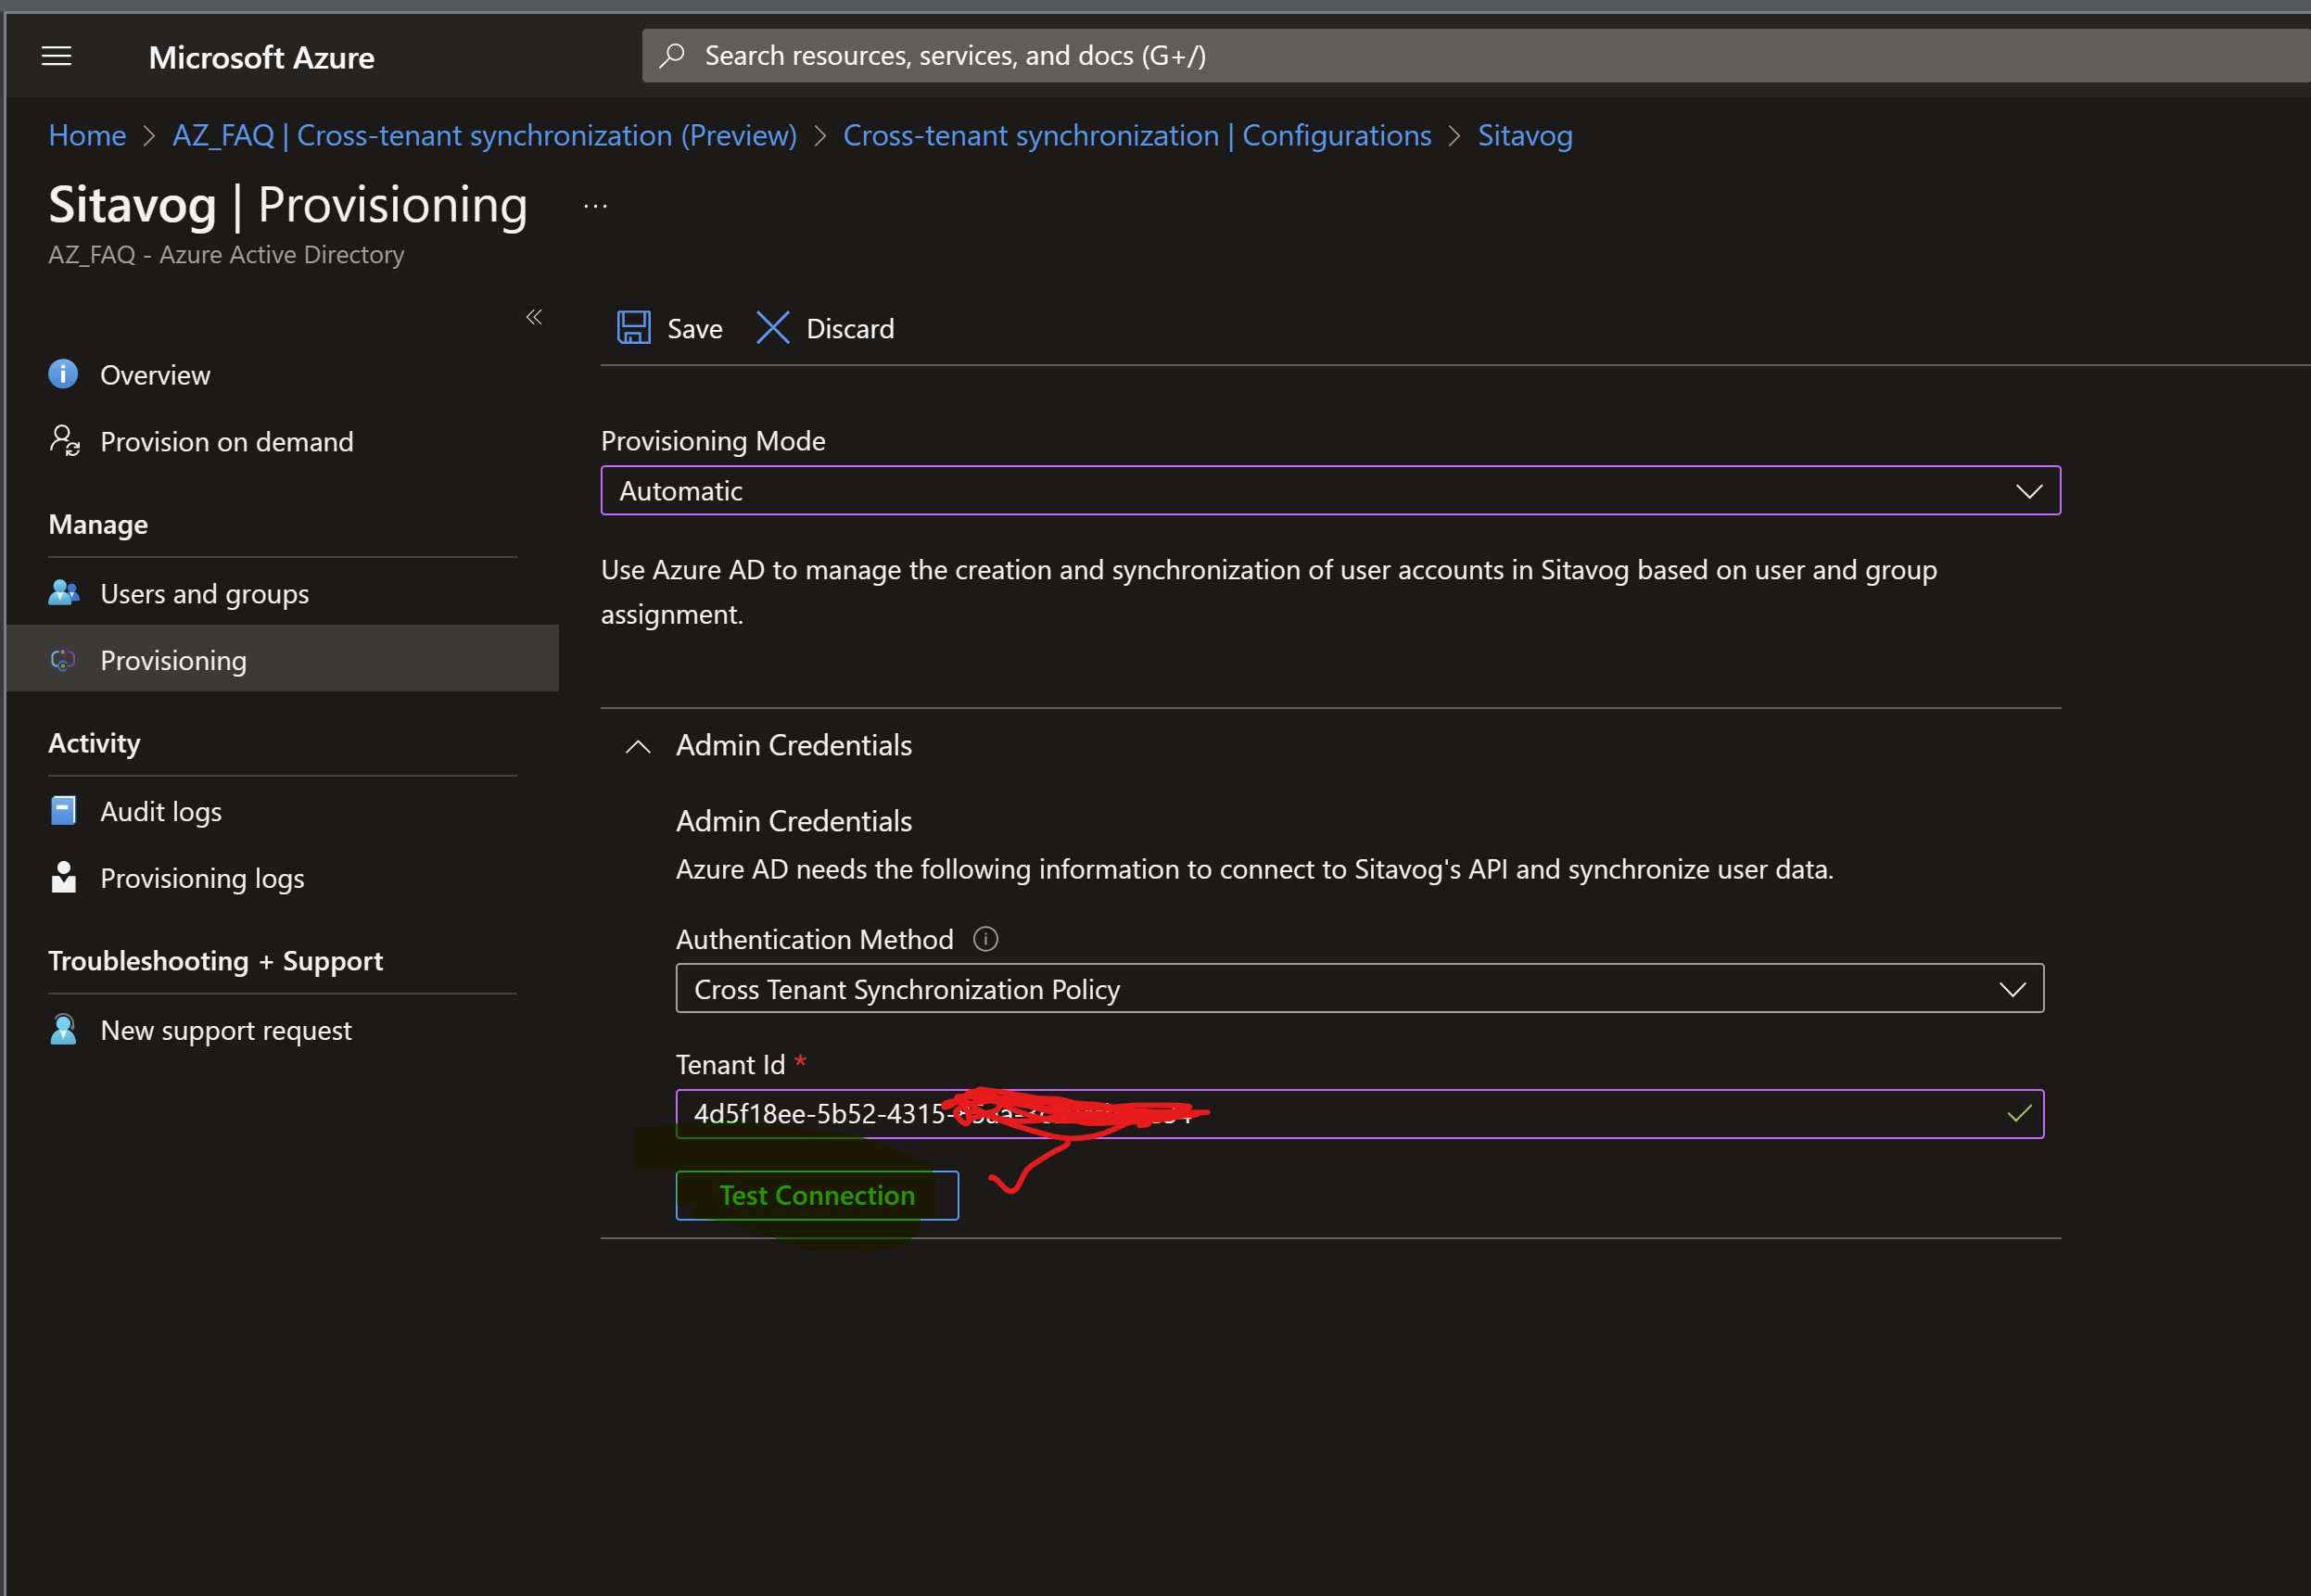
Set the Provisioning Mode to Automatic.
-
Under the Admin Credentials section, change the Authentication Method to Cross Tenant Synchronization Policy.
-
In the Tenant Id box, enter the tenant ID of the target tenant.
-
Select Test Connection to test the connection.

-
Select Save.
-
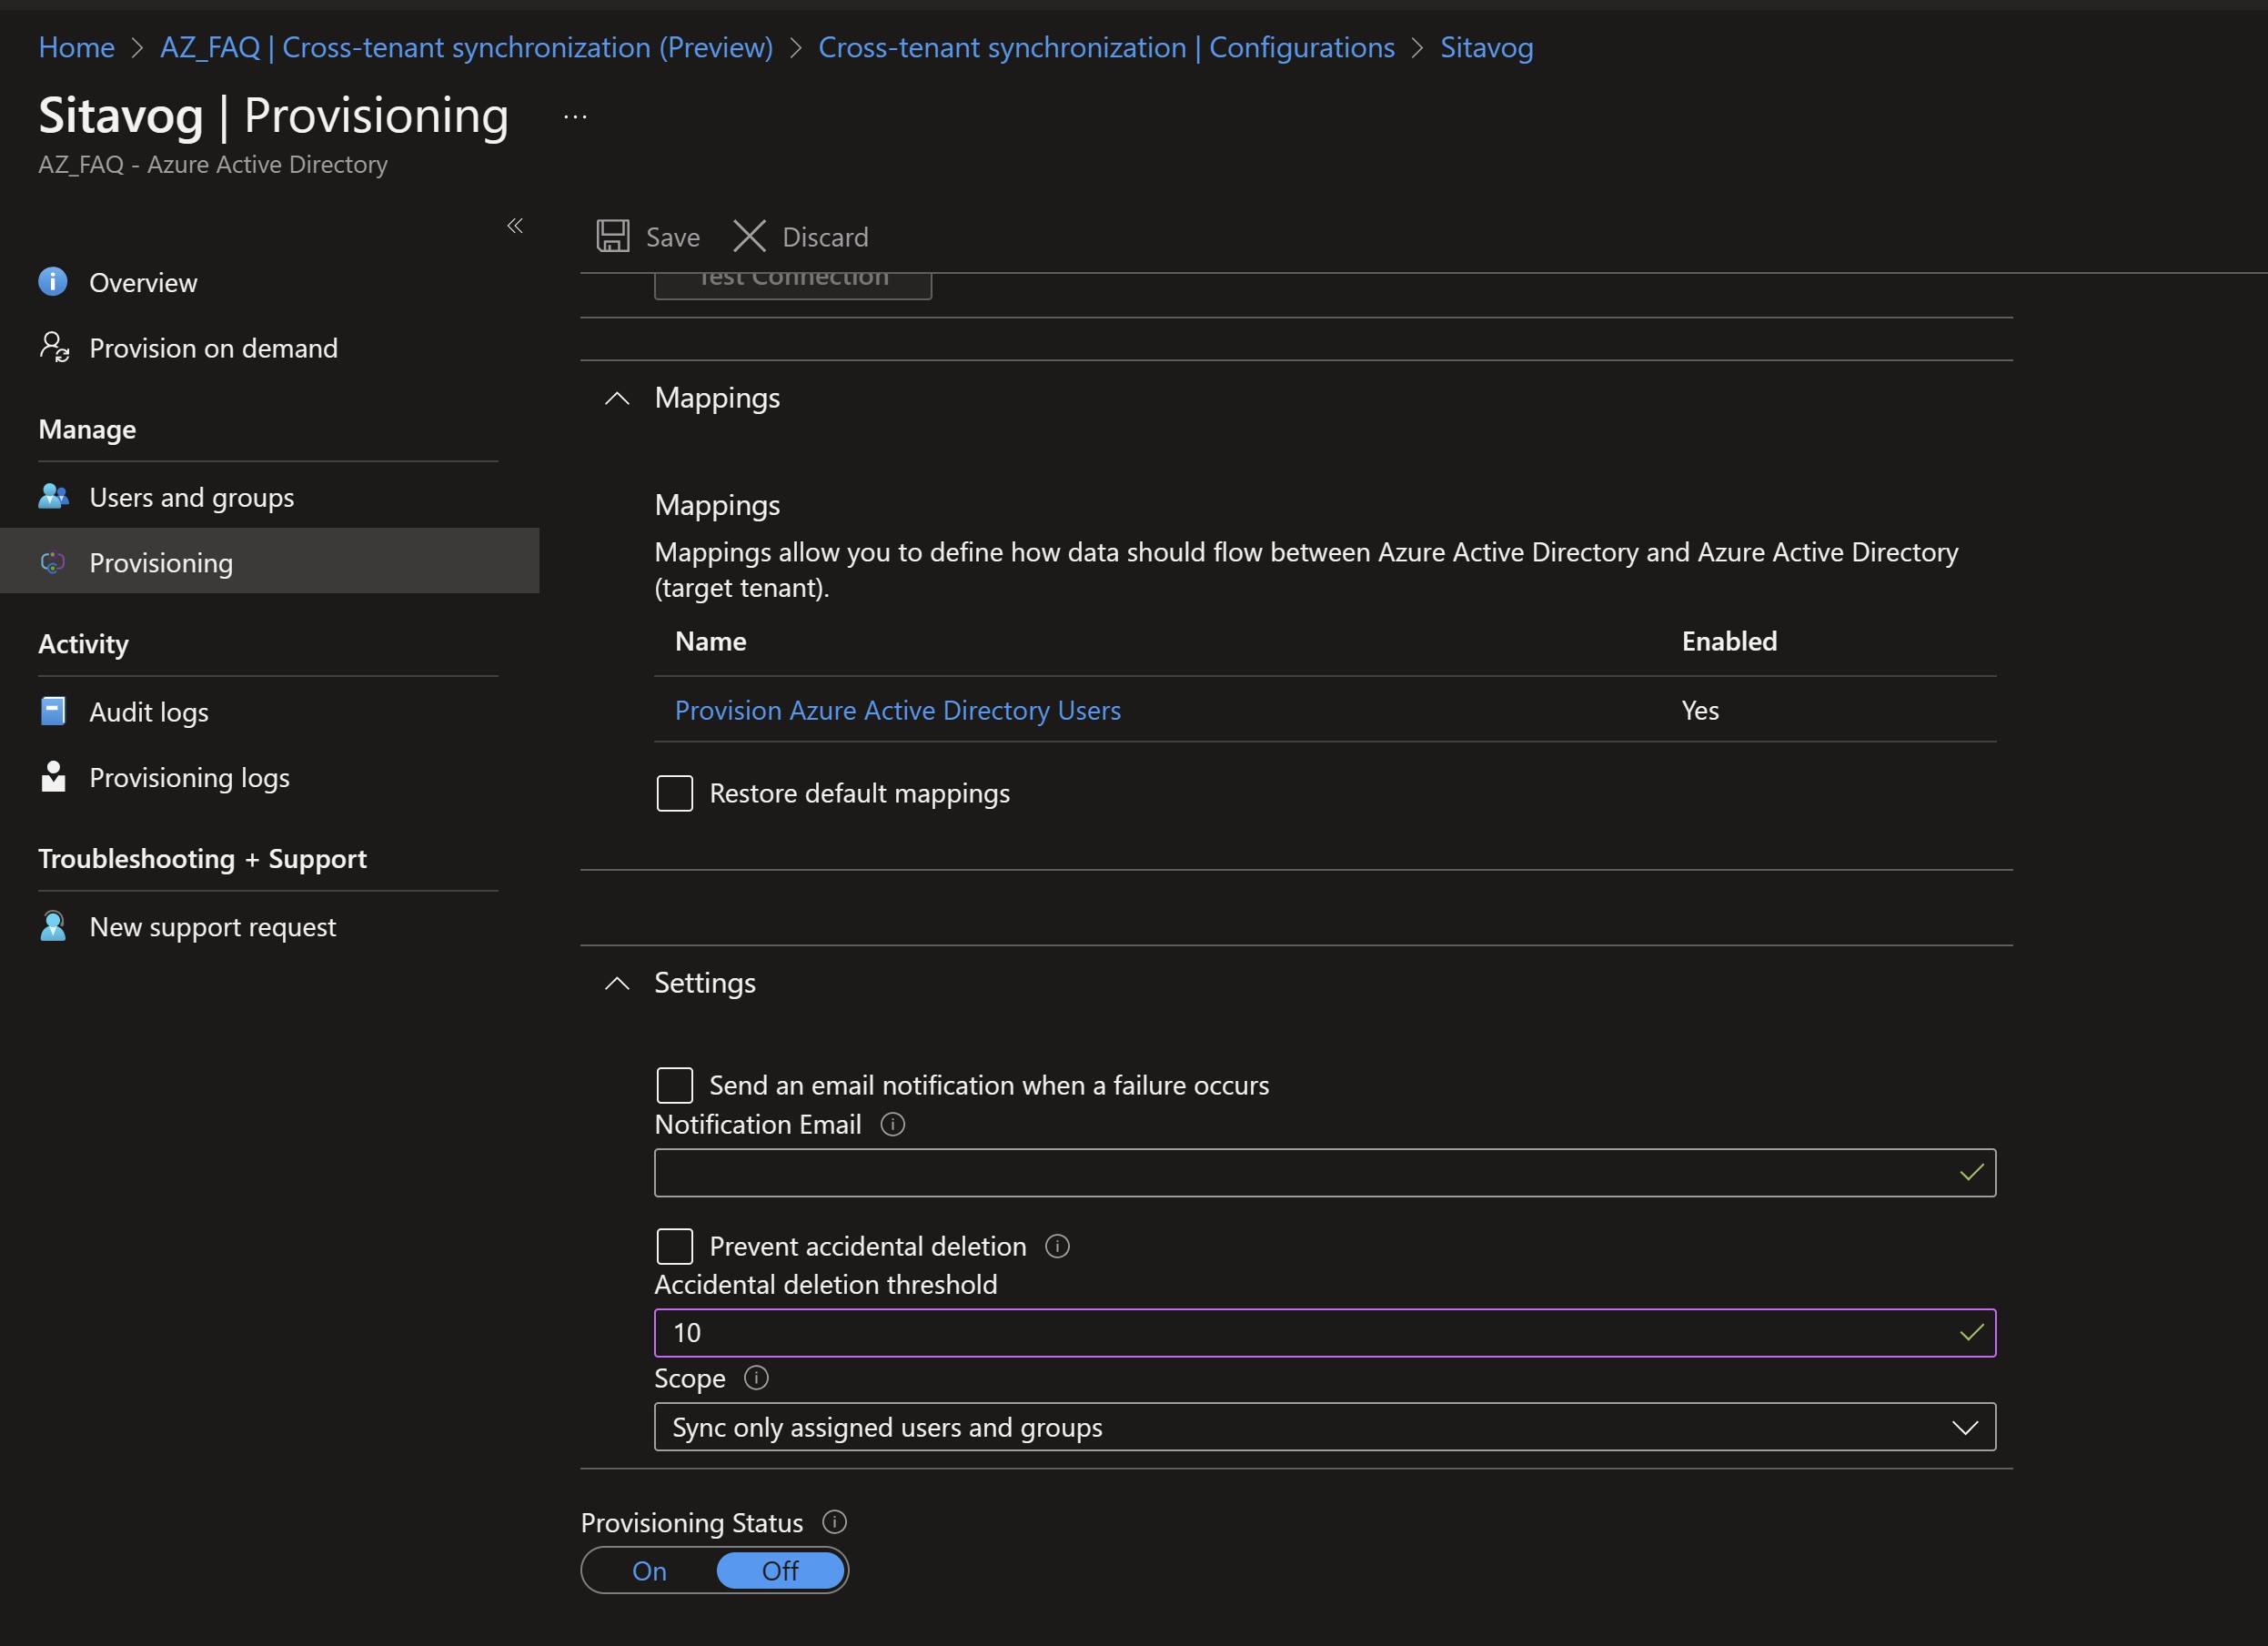
Mappings and Settings sections appear.
-
In this section, you can specify an email address for receiving sync error notifications, activate the feature to prevent accidental deletion, and select either to synchronize all users and groups (not recommended) or to limit it to the designated users and groups (recommended). Go ahead and choose your preferred option. During testing, it’s best to leave this on the default setting first.
- Close the Provisioning page.
4.Define users to synchronize (Based on group membership and attribute value).
-
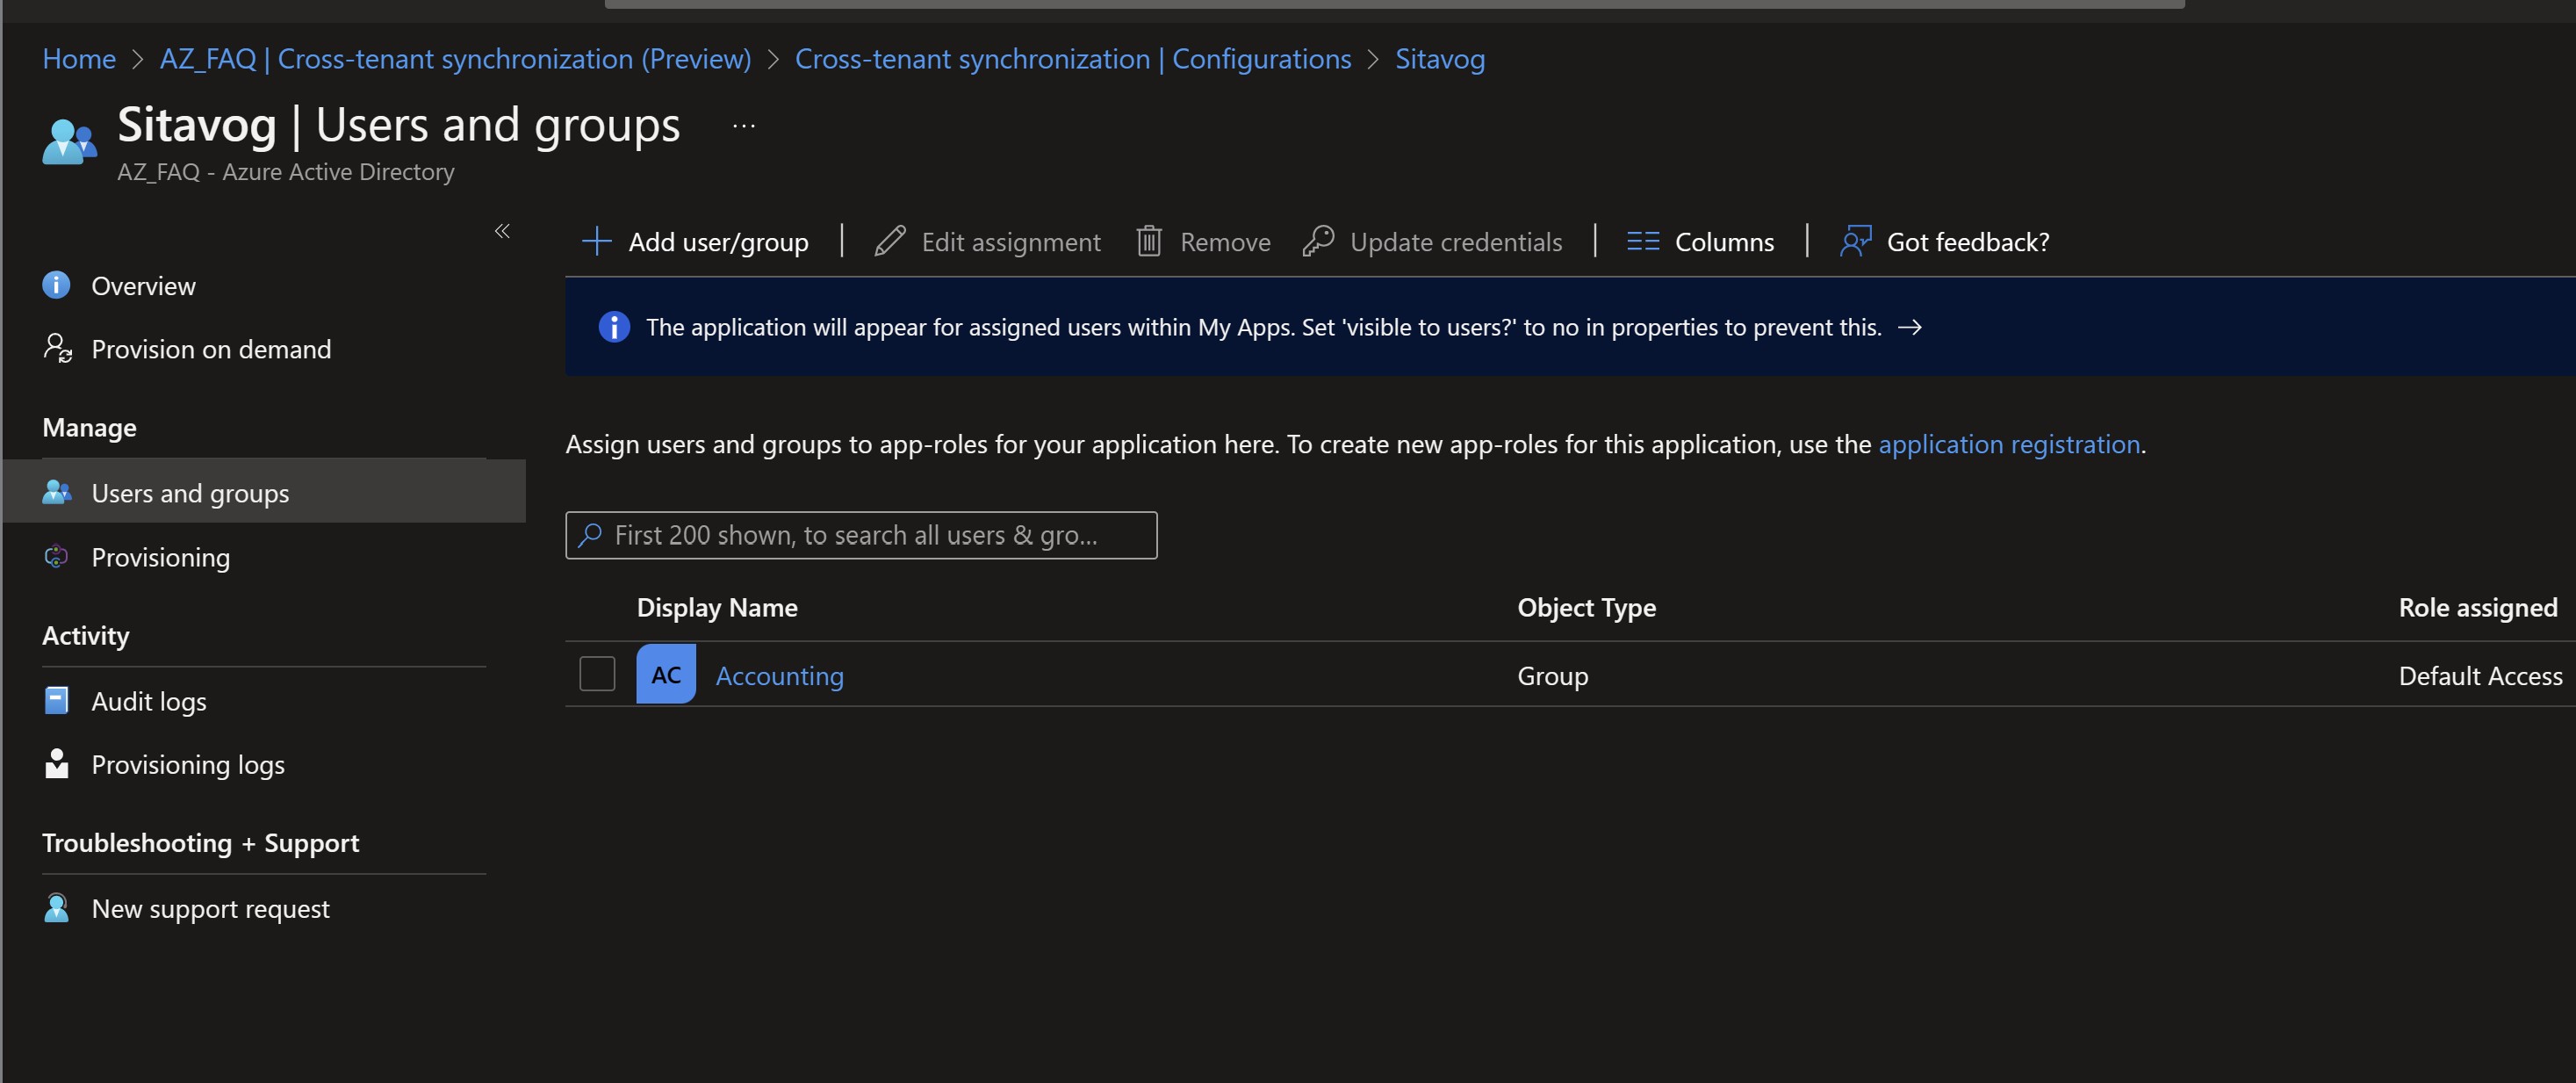
Navigate to the Users and Groups section on the left side. From this location, you can select the users or groups to be included in the synchronization.
-
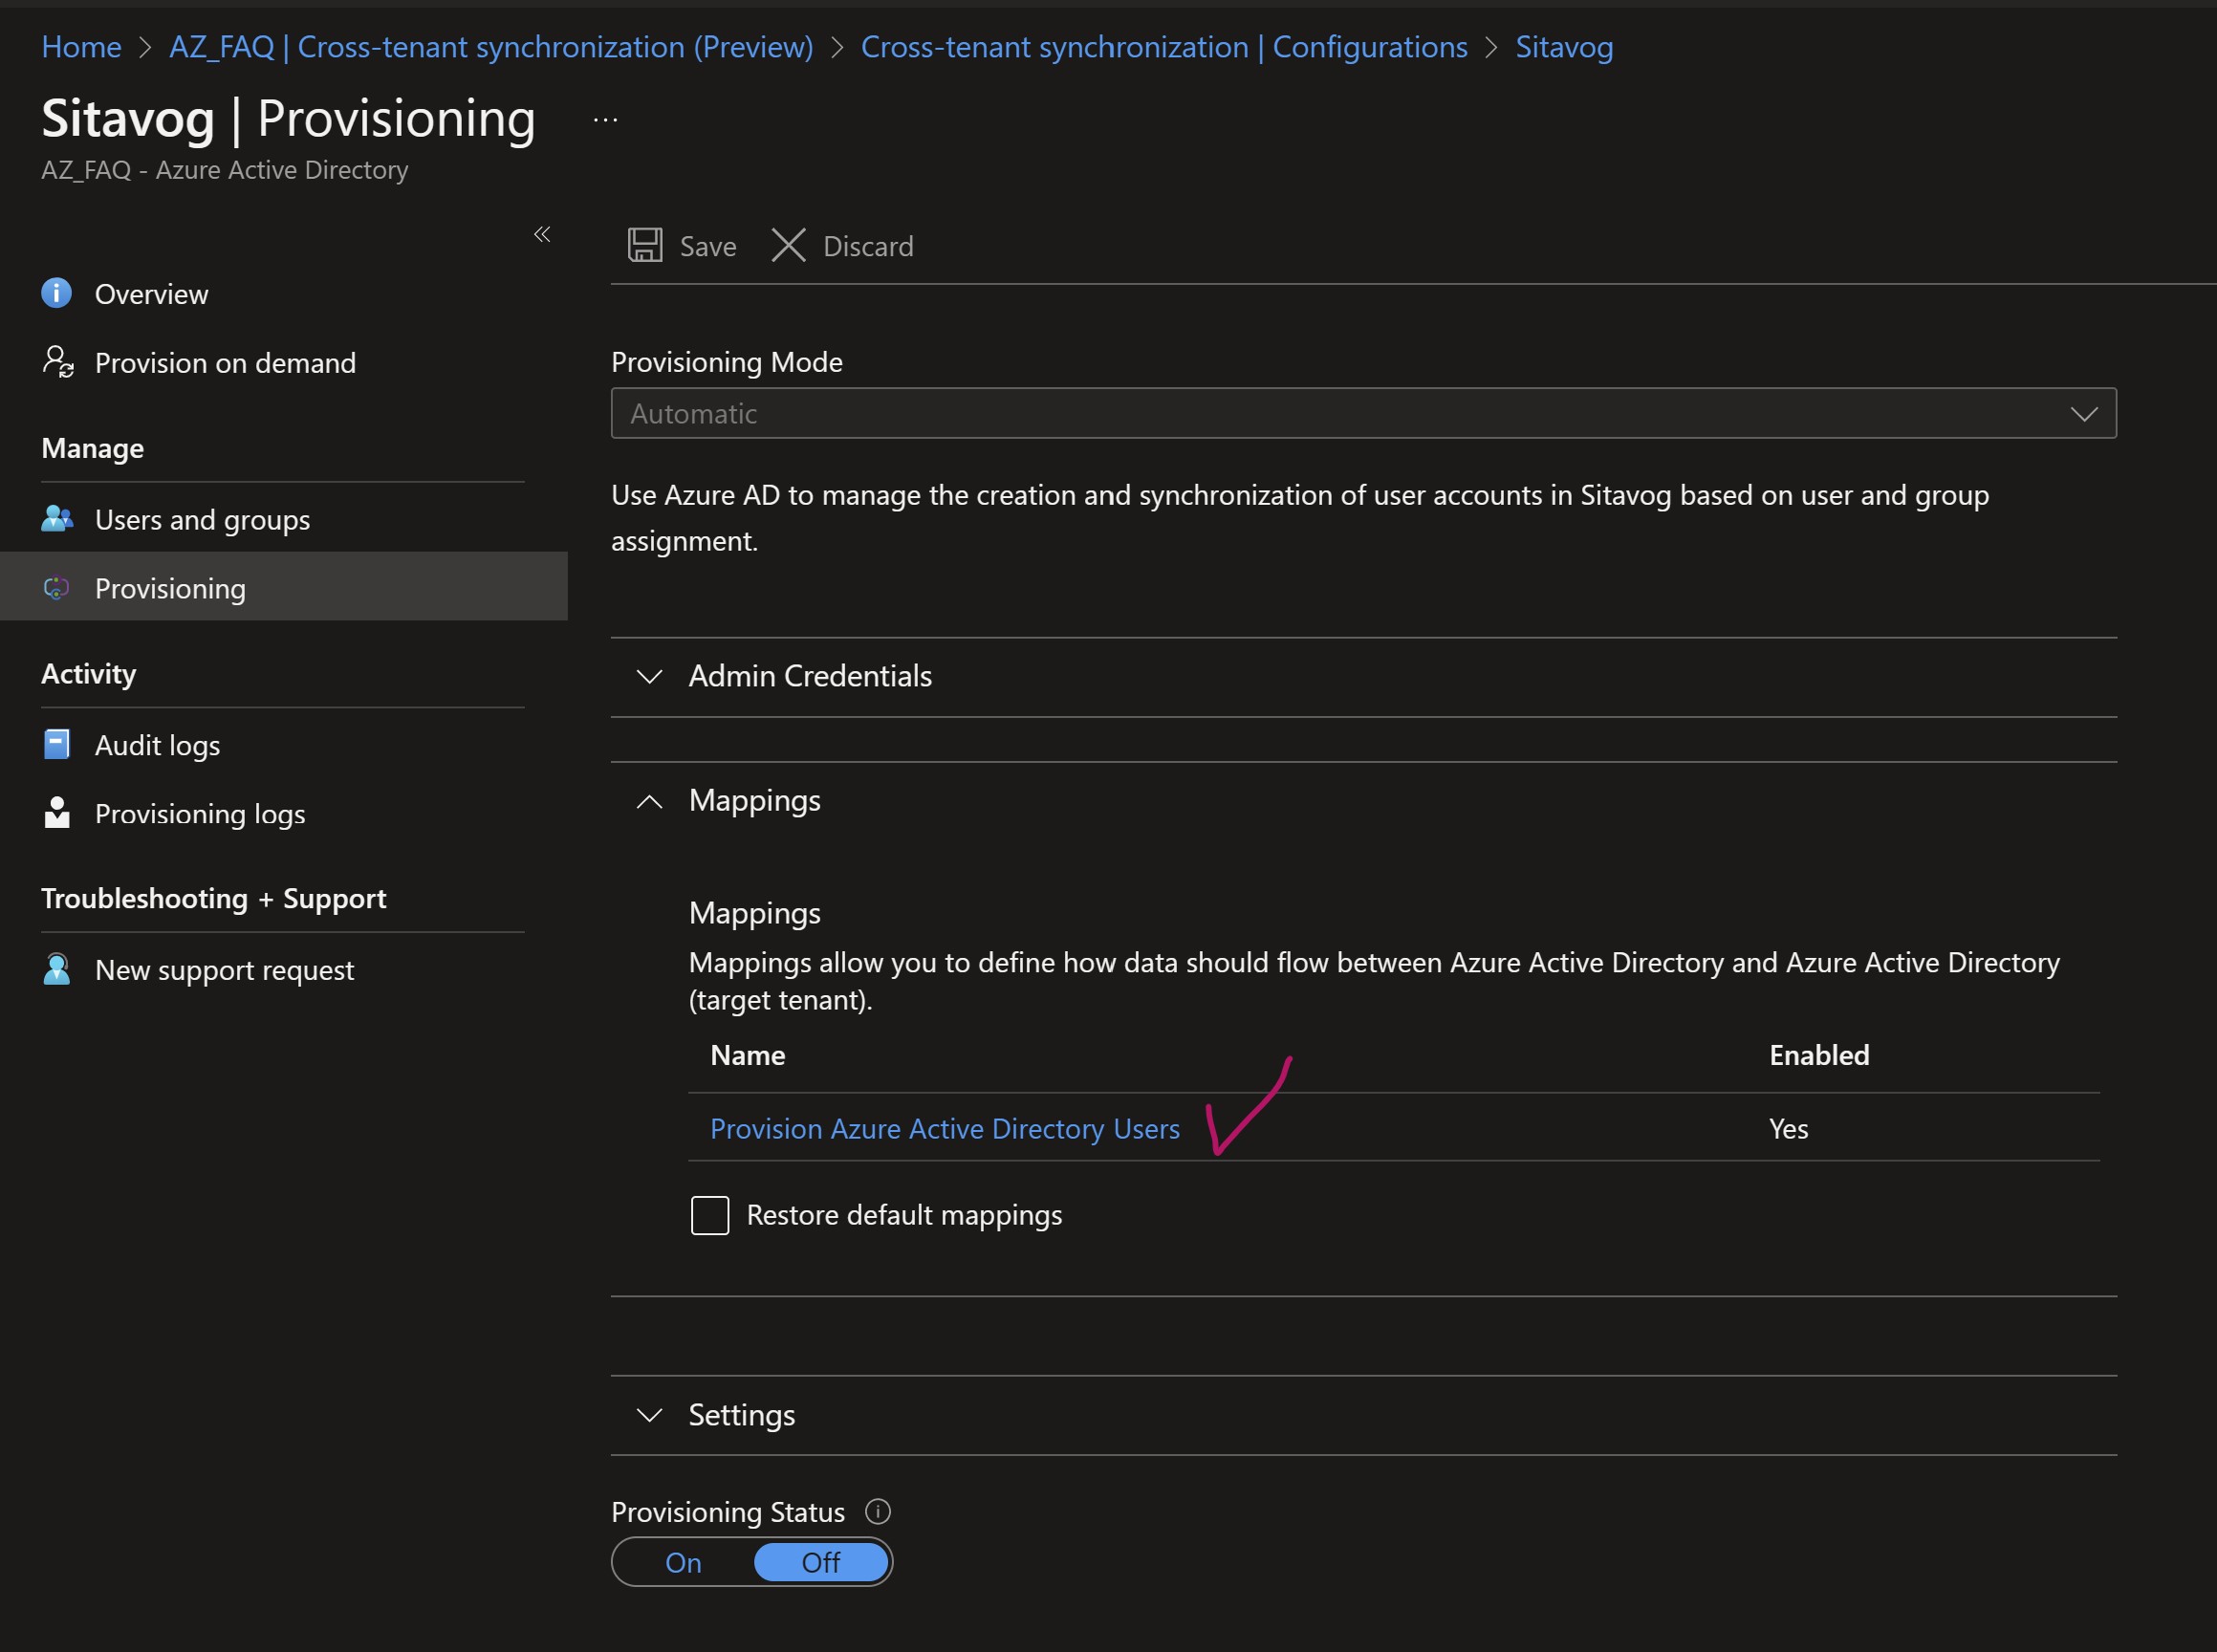
If you need to further limit the scope of the synchronization, you can use scoping filters. To do this, go back to the Provisioning blade and select “Provision Azure Active Directory Users” under the Mappings subsection.
-
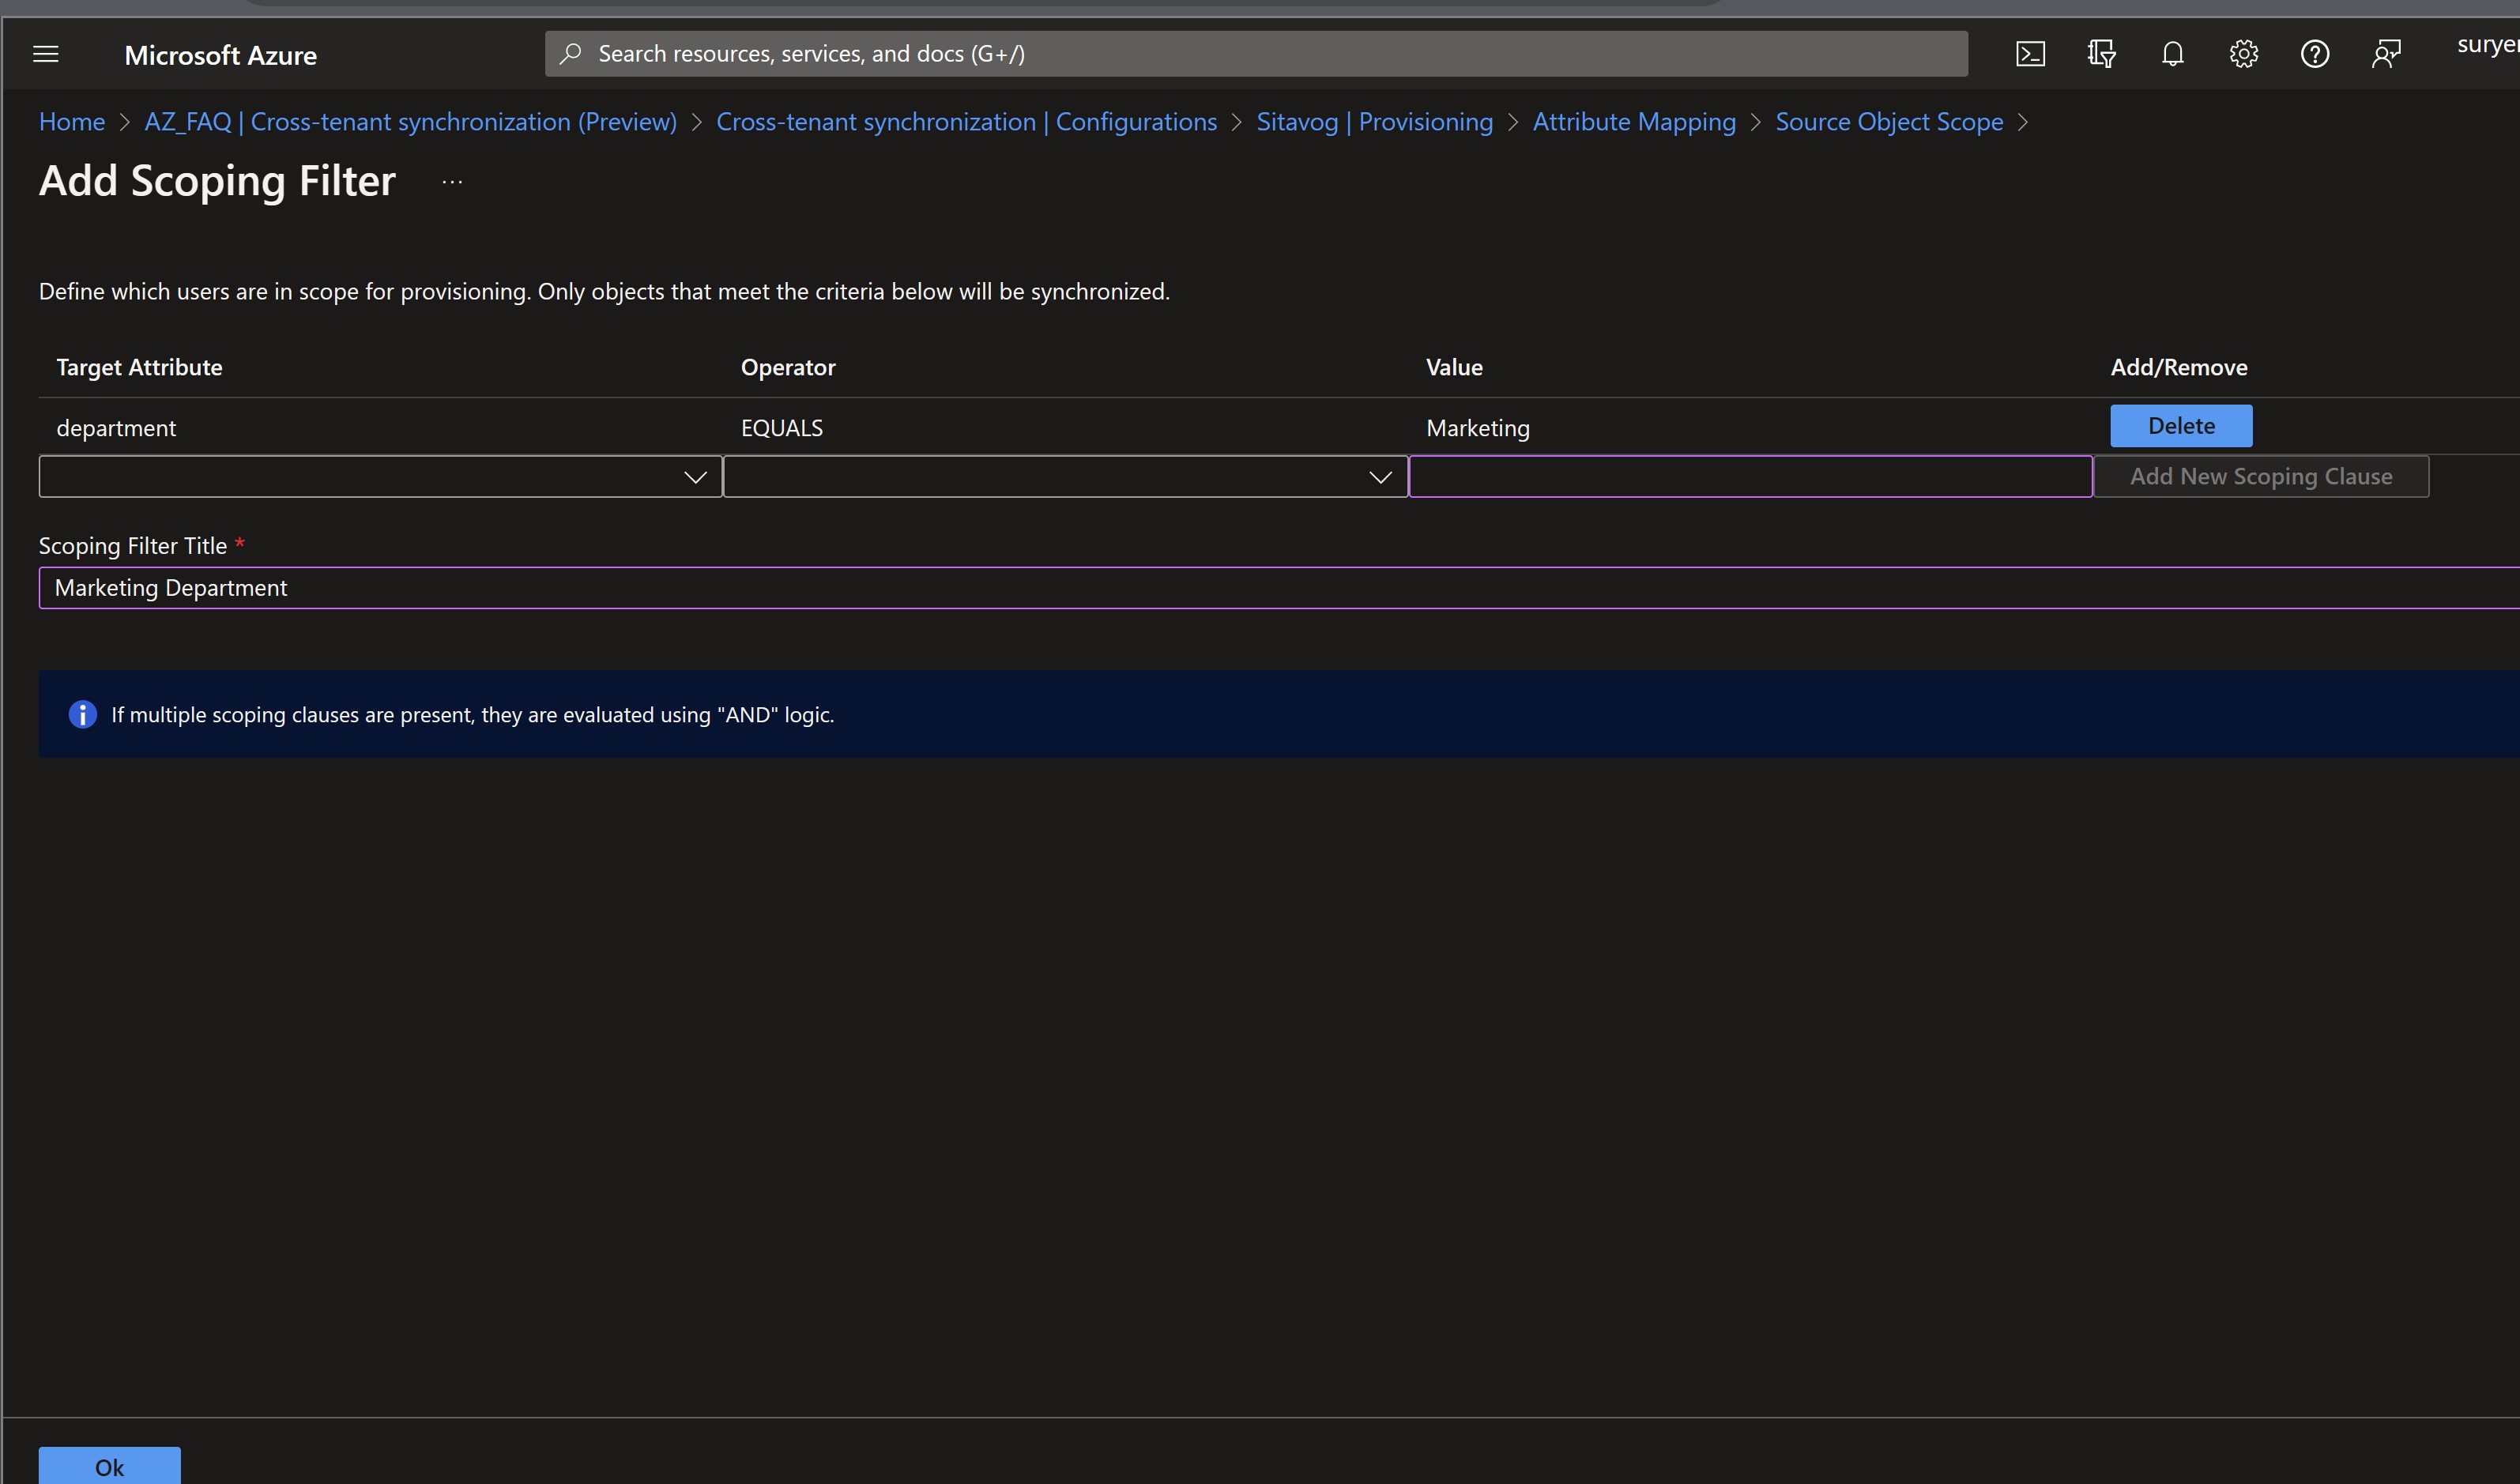
From this location, select “All records” under the Source Object Scope. This enables you to determine the scope of user provisioning based on user attributes. For instance, you could limit it to only target users within the Marketing department.
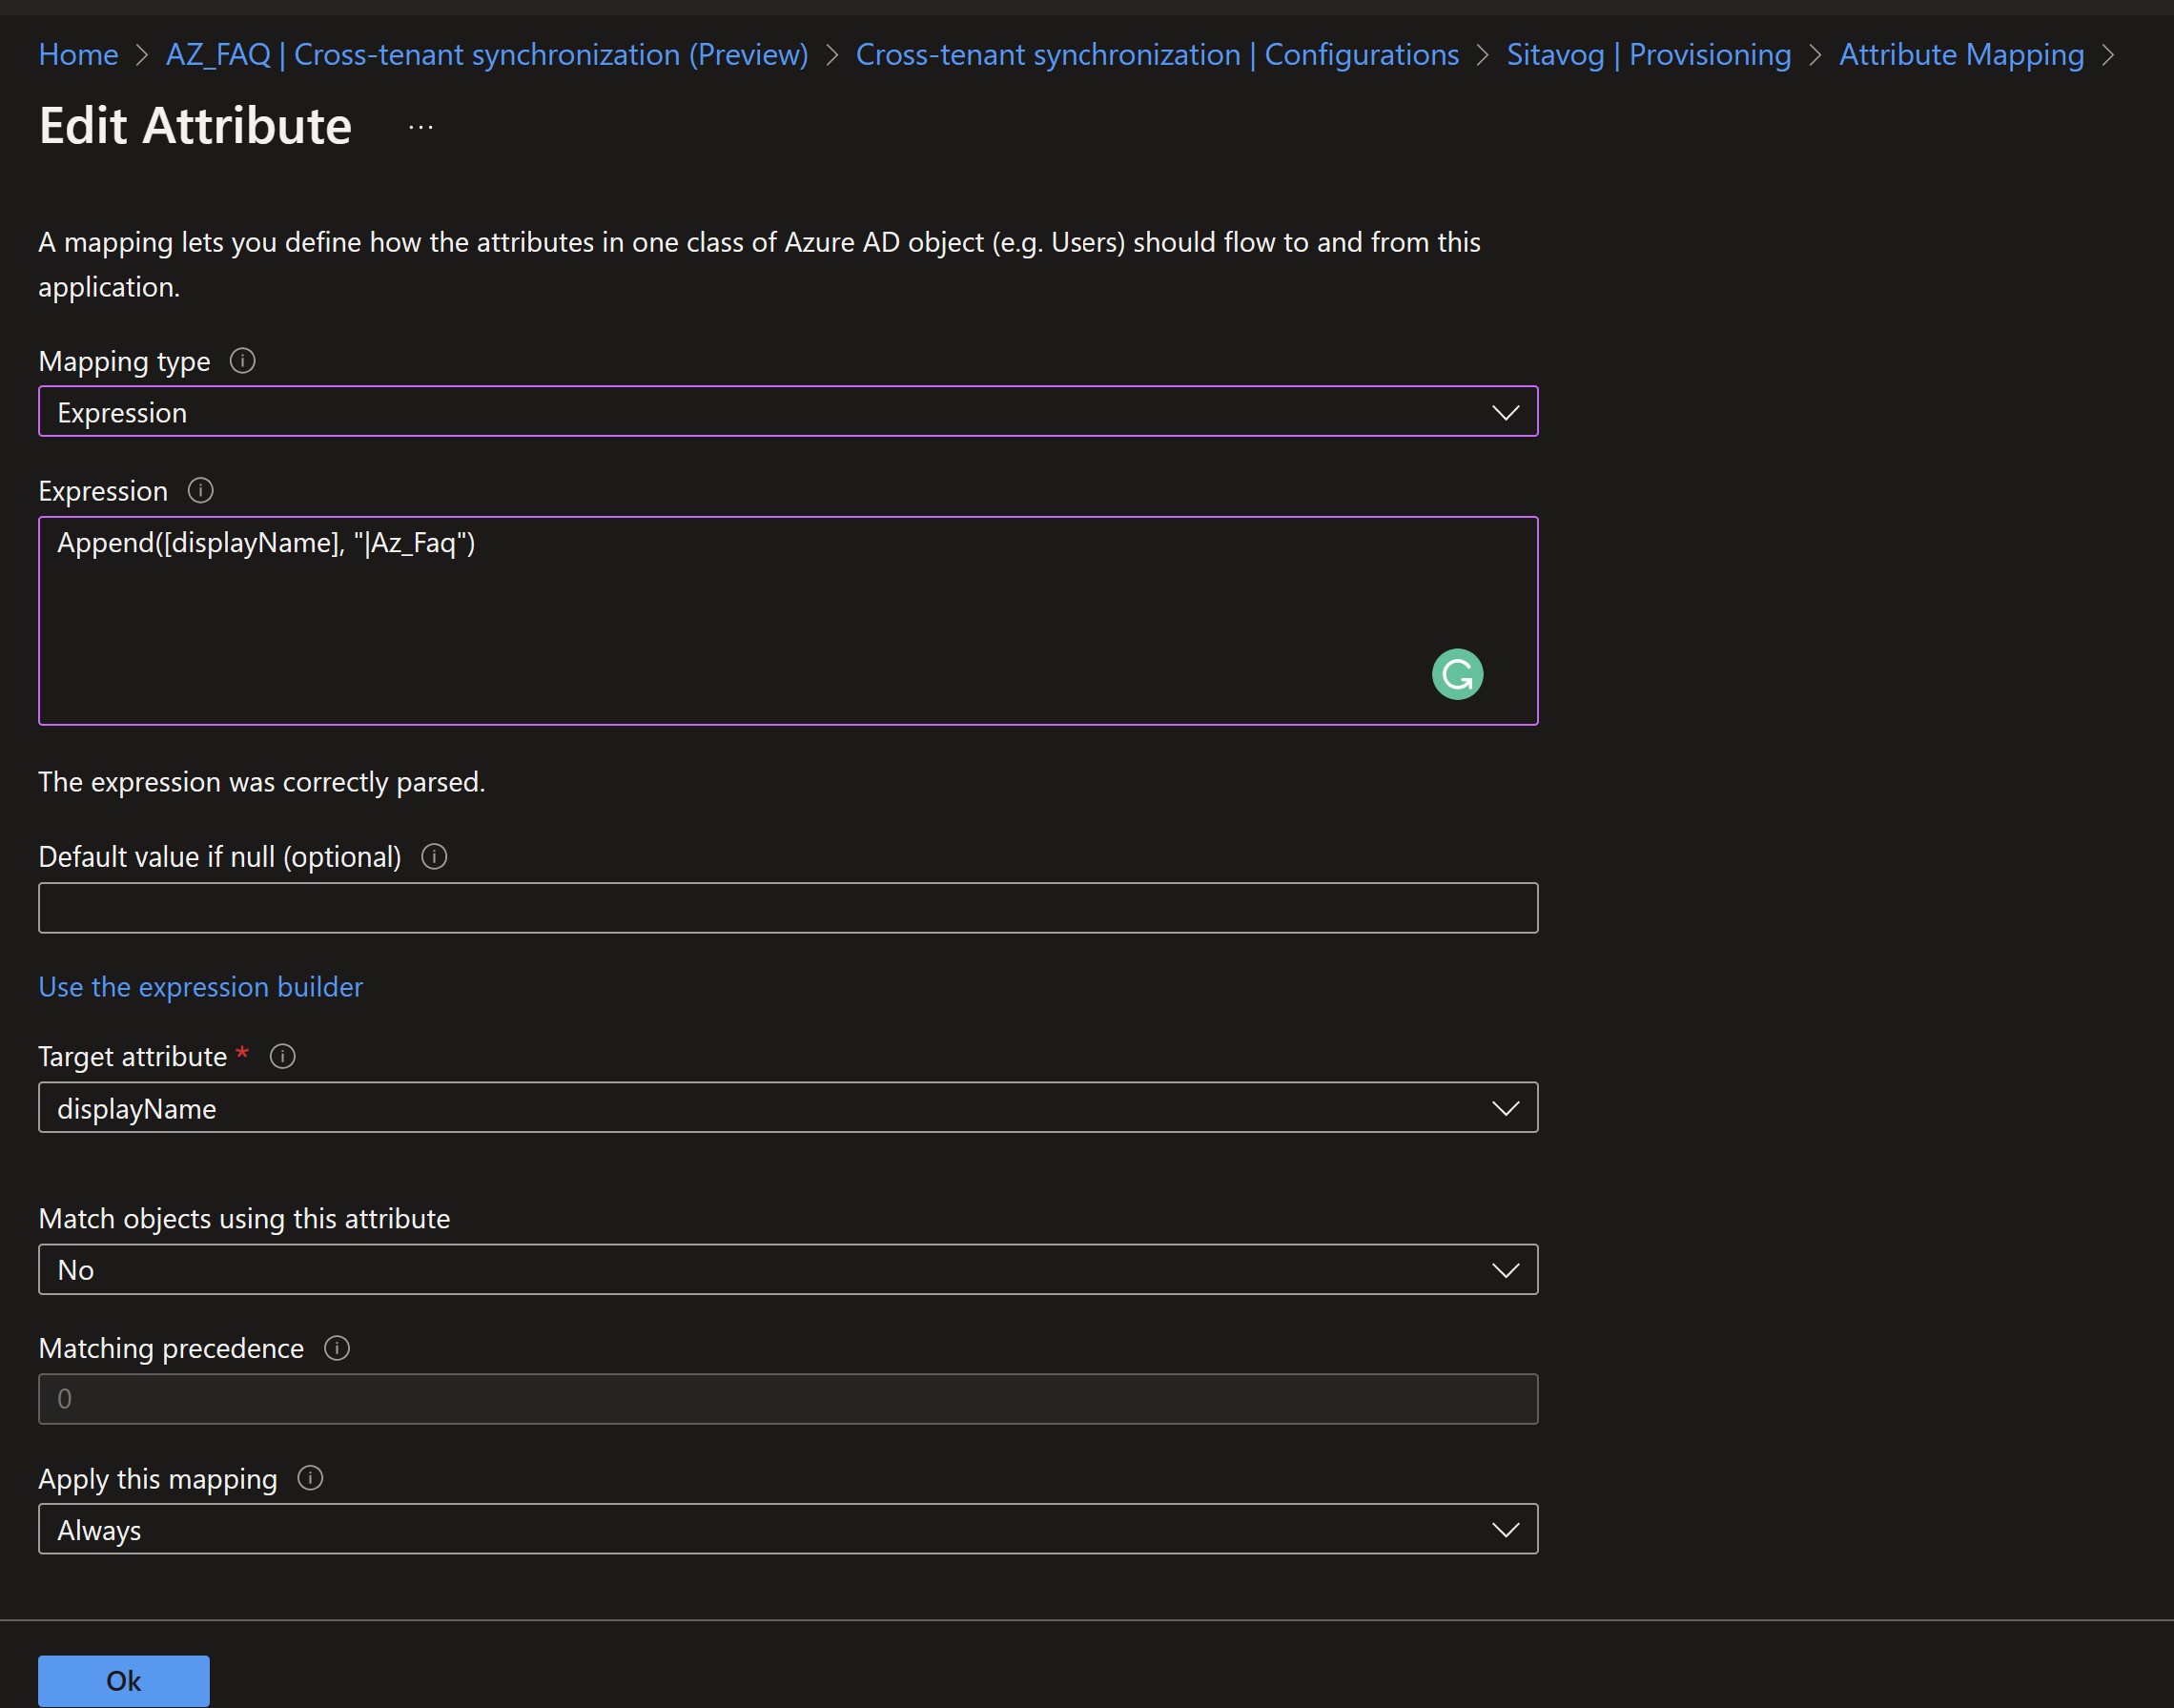
5. What attributes to synchronize (name, department, directory extensions, etc.)
-
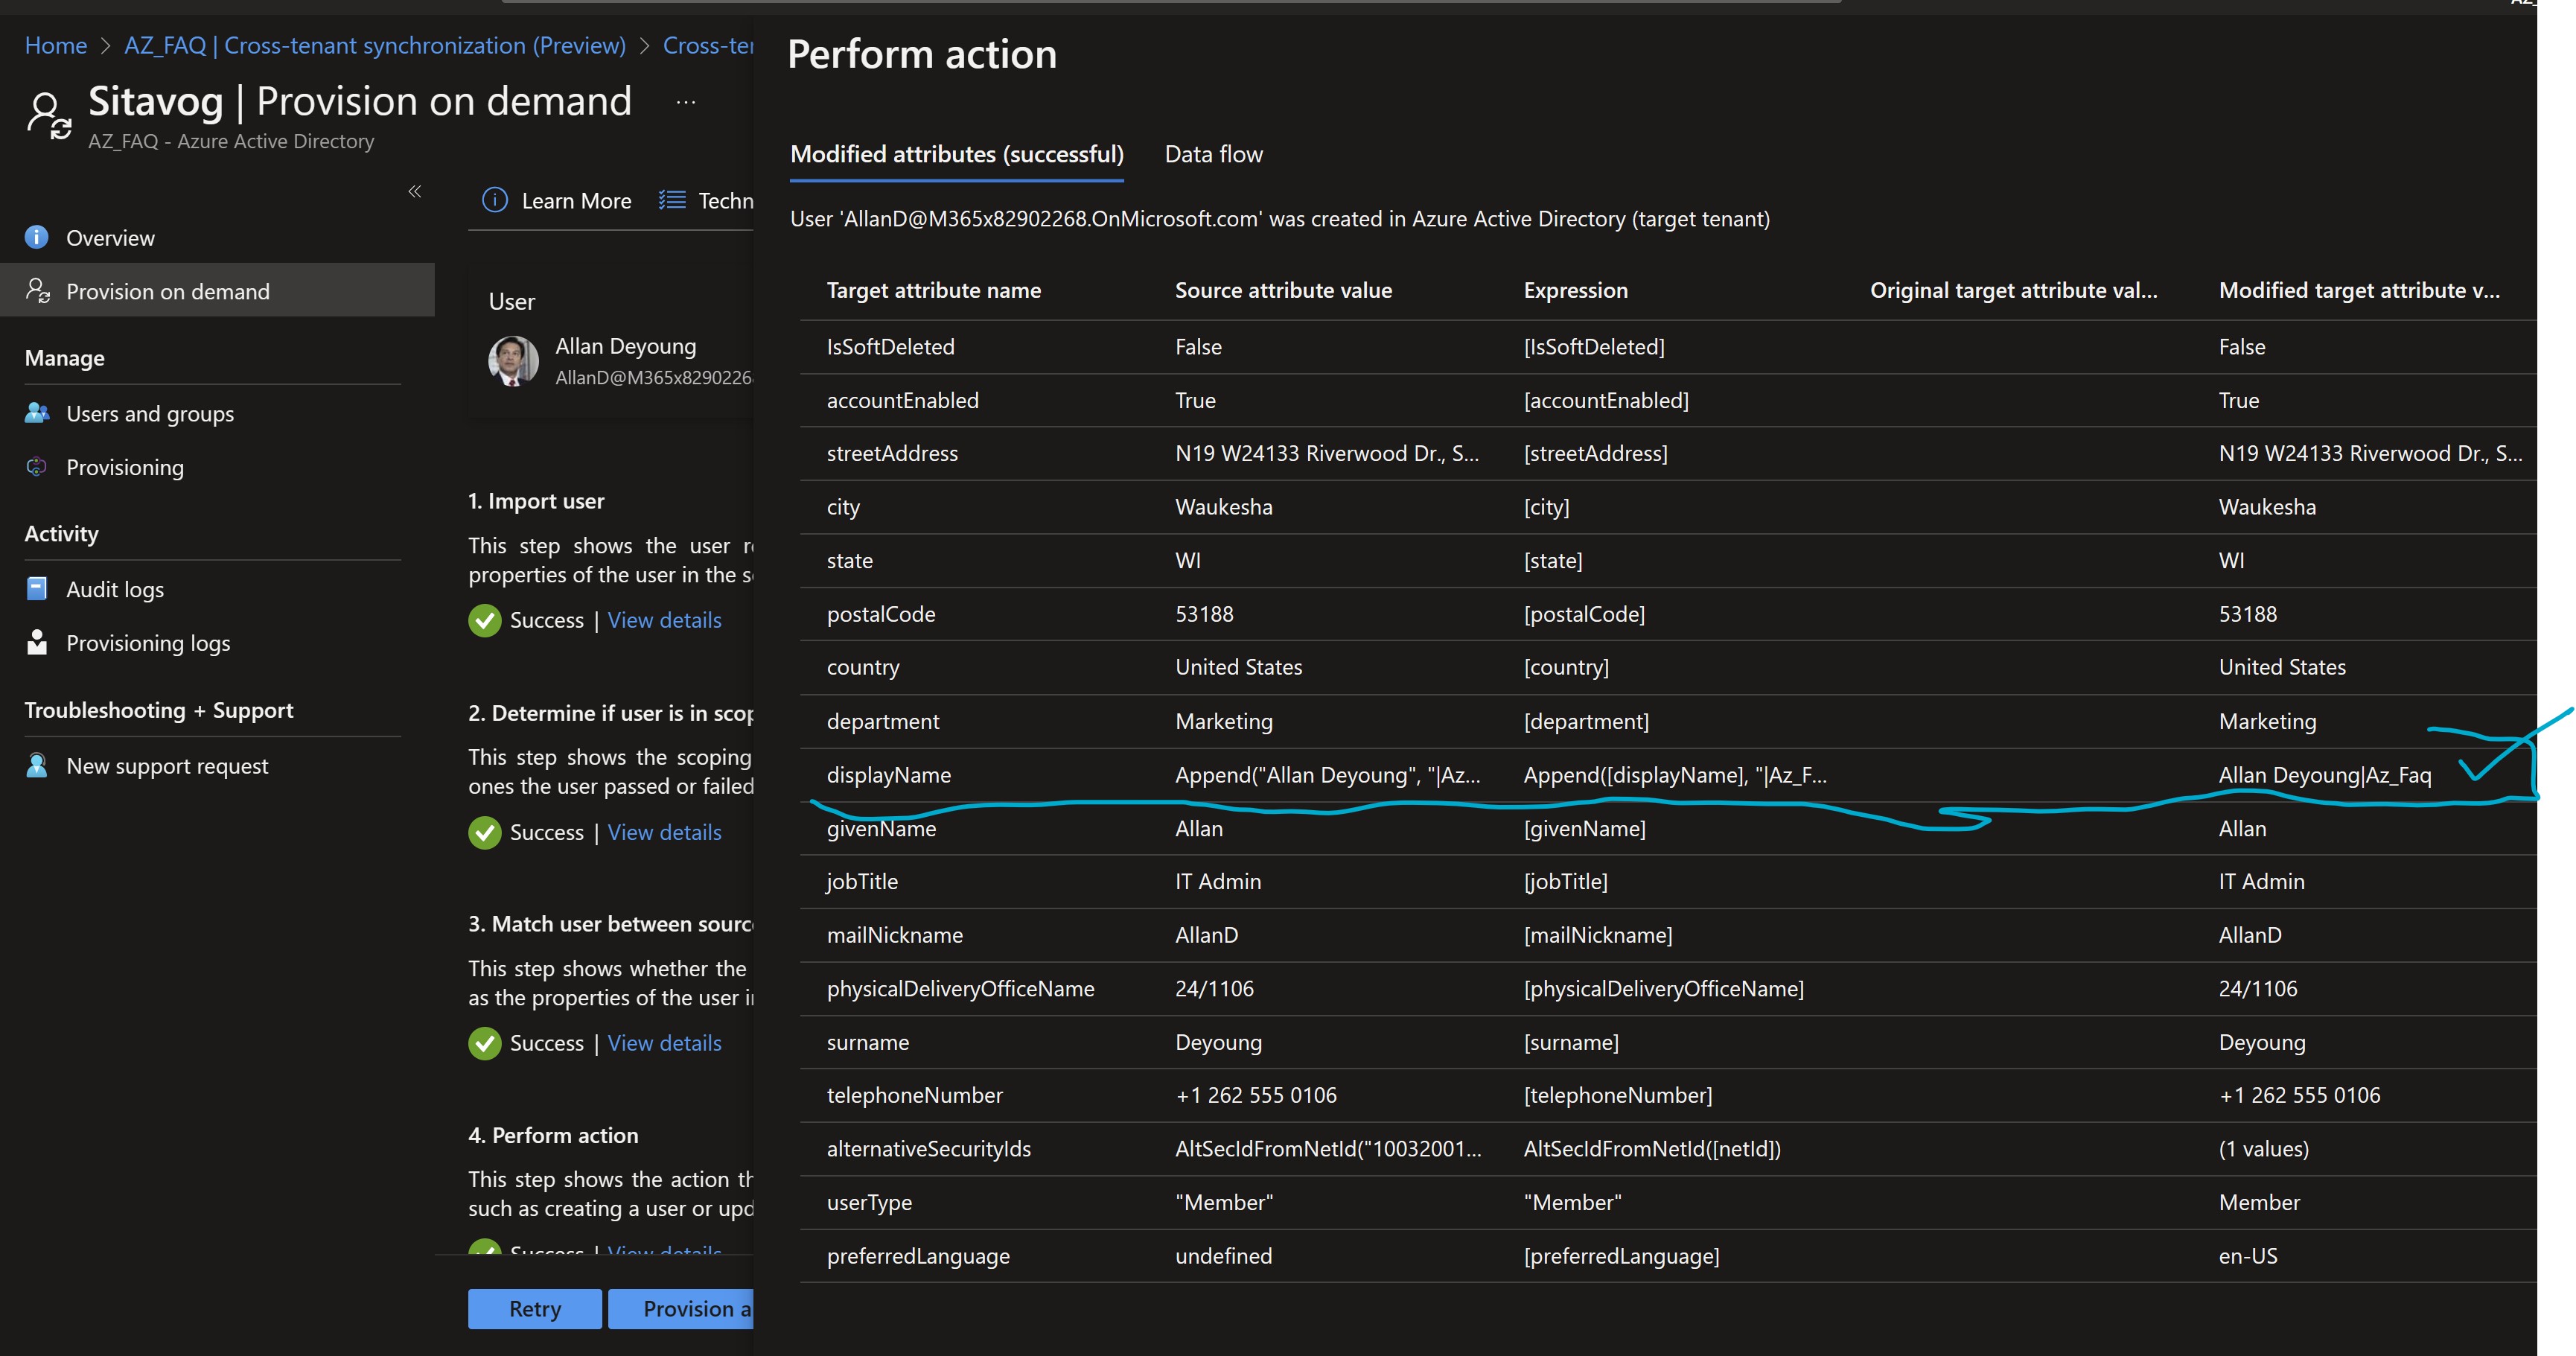
Any desired transformations, such as adding the domain to the end of the display name.
6. Test provision on demand
- Navigate to the Provision on demand section on the left side. From this location, you can select the user.
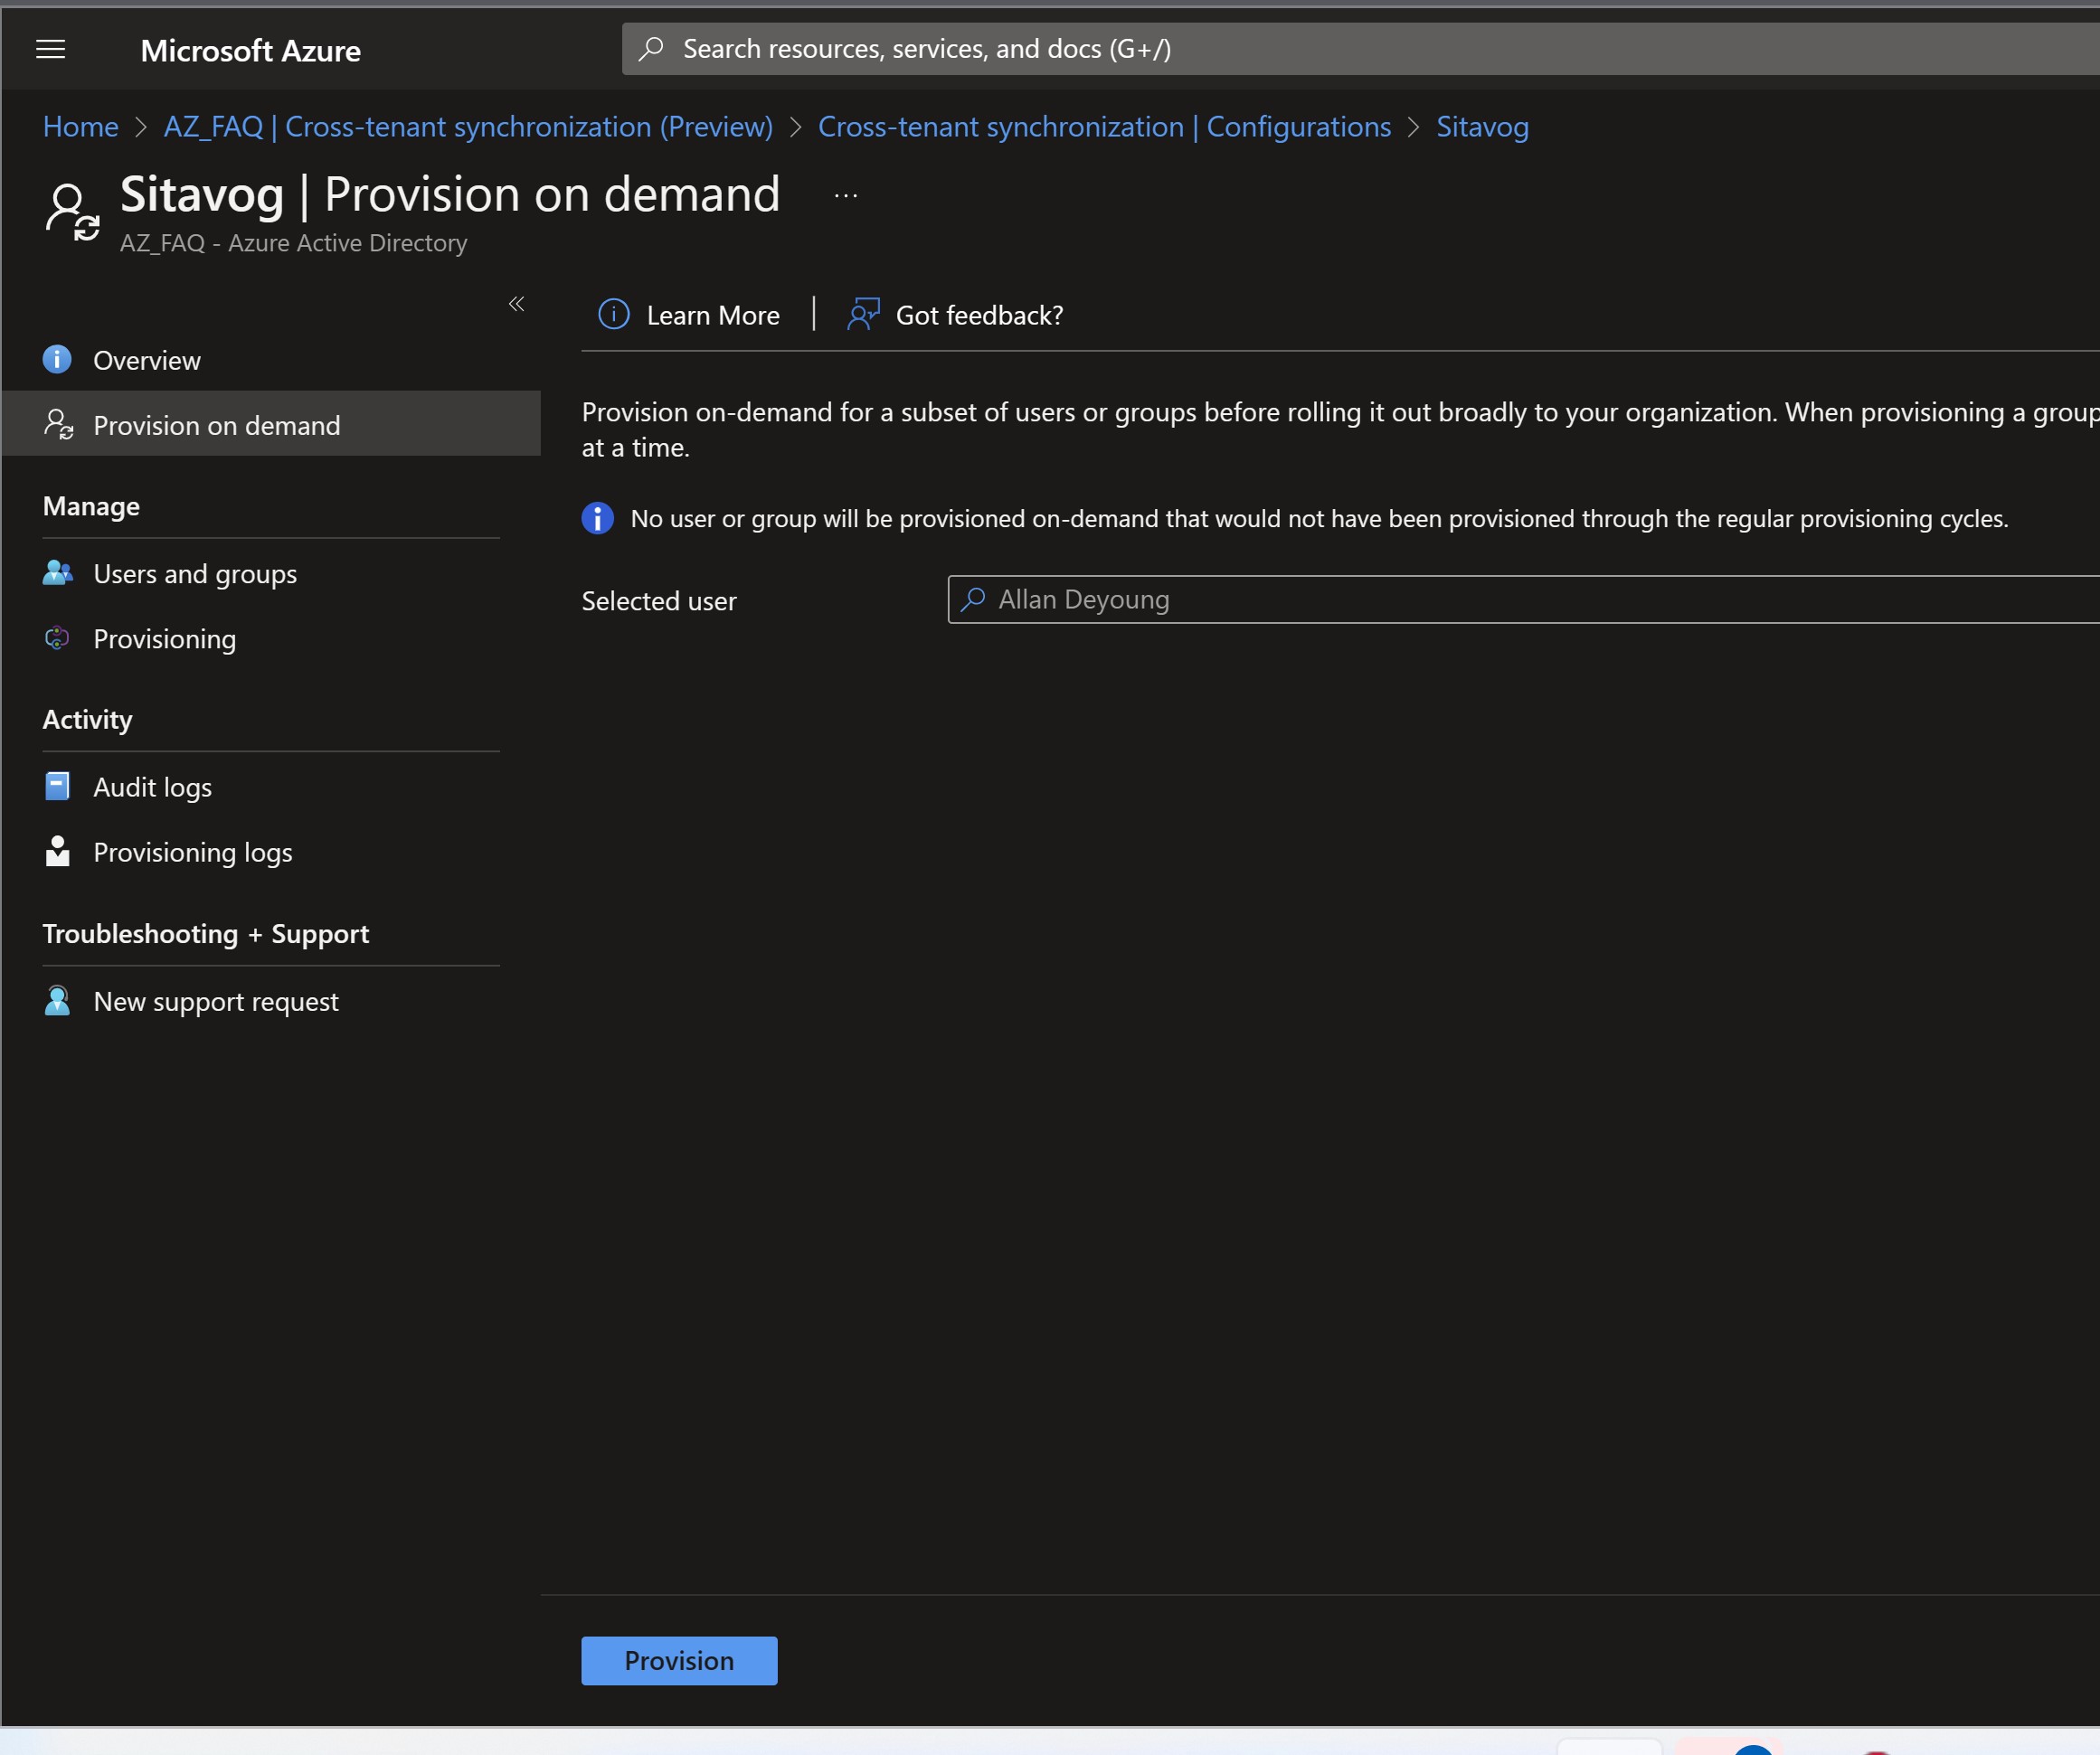
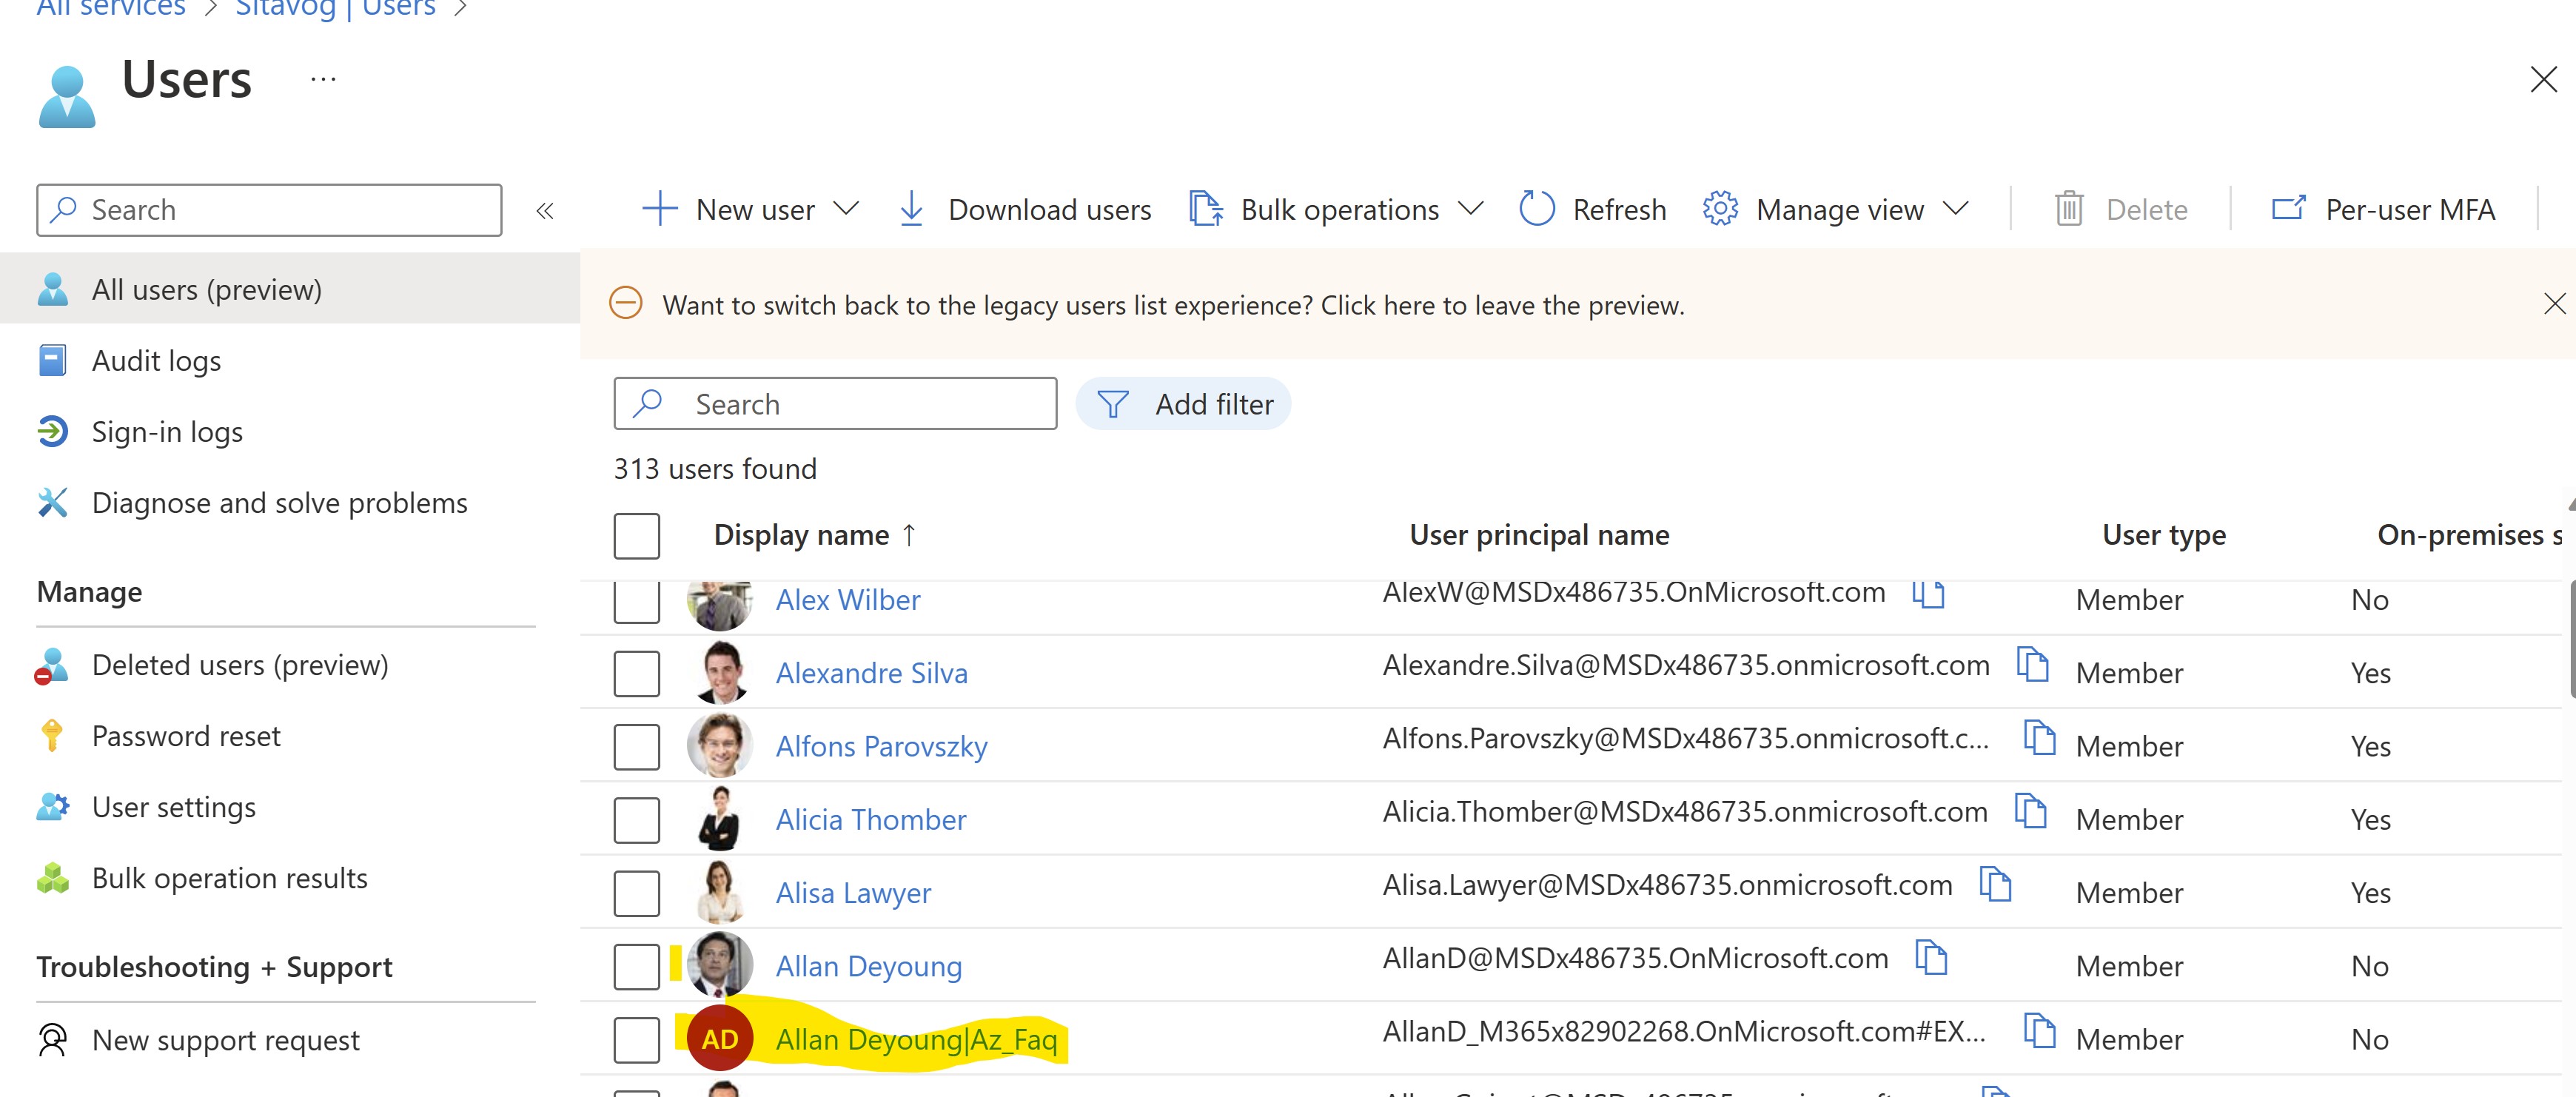
- Click on provision, on successful provision you will see something similar to the screenshot below.
- Verify the same in the target tenant.
In conclusion, the Azure Active Directory’s new Cross-Tenant Synchronization feature is a game-changer for organizations looking to collaborate and share resources across multiple tenants. It provides a streamlined solution to address the challenges posed by existing solutions such as Microsoft Identity Manager, which requires extensive technical knowledge and resources, and Azure AD B2B Collaboration, which lacks automated guest user lifecycle management. With Cross-Tenant Synchronization, organizations can easily add, remove and keep user attributes synchronized between source and target tenants, while ensuring that privacy concerns are addressed through the consent prompt feature. The three-step configuration process is straightforward and can be accomplished by administrators within the organization. This new feature aligns with the philosophy of engineers to make things simple, efficient and effective, providing a solution that reduces the barriers to collaboration, making it easier for businesses to work together.