- Deploying Serverless Architecture in AWS Cloud: AWS Cloud Resume Challenge
- Step 1 -3: Creating the Frontend with HTML and CSS
- Step 4: Static Website: Create S3 Bucket to host the Static Website
- Step 5: Setting Up a CloudFront Distribution for Your S3 Bucket
- Step 6: Add Javascript to fetch the visitor’s count.
- Step 7: Create the DynamoDB Table Using Terraform
- Step 8: Build the API to return the visitors count with AWS Lambda.
- Step 9: Create the API Gateway to integrate with AWS Lambda.
- Step 10: Create the GitHub Actions workflow.
1. Deploying Serverless Architecture in AWS Cloud: AWS Cloud Resume Challenge
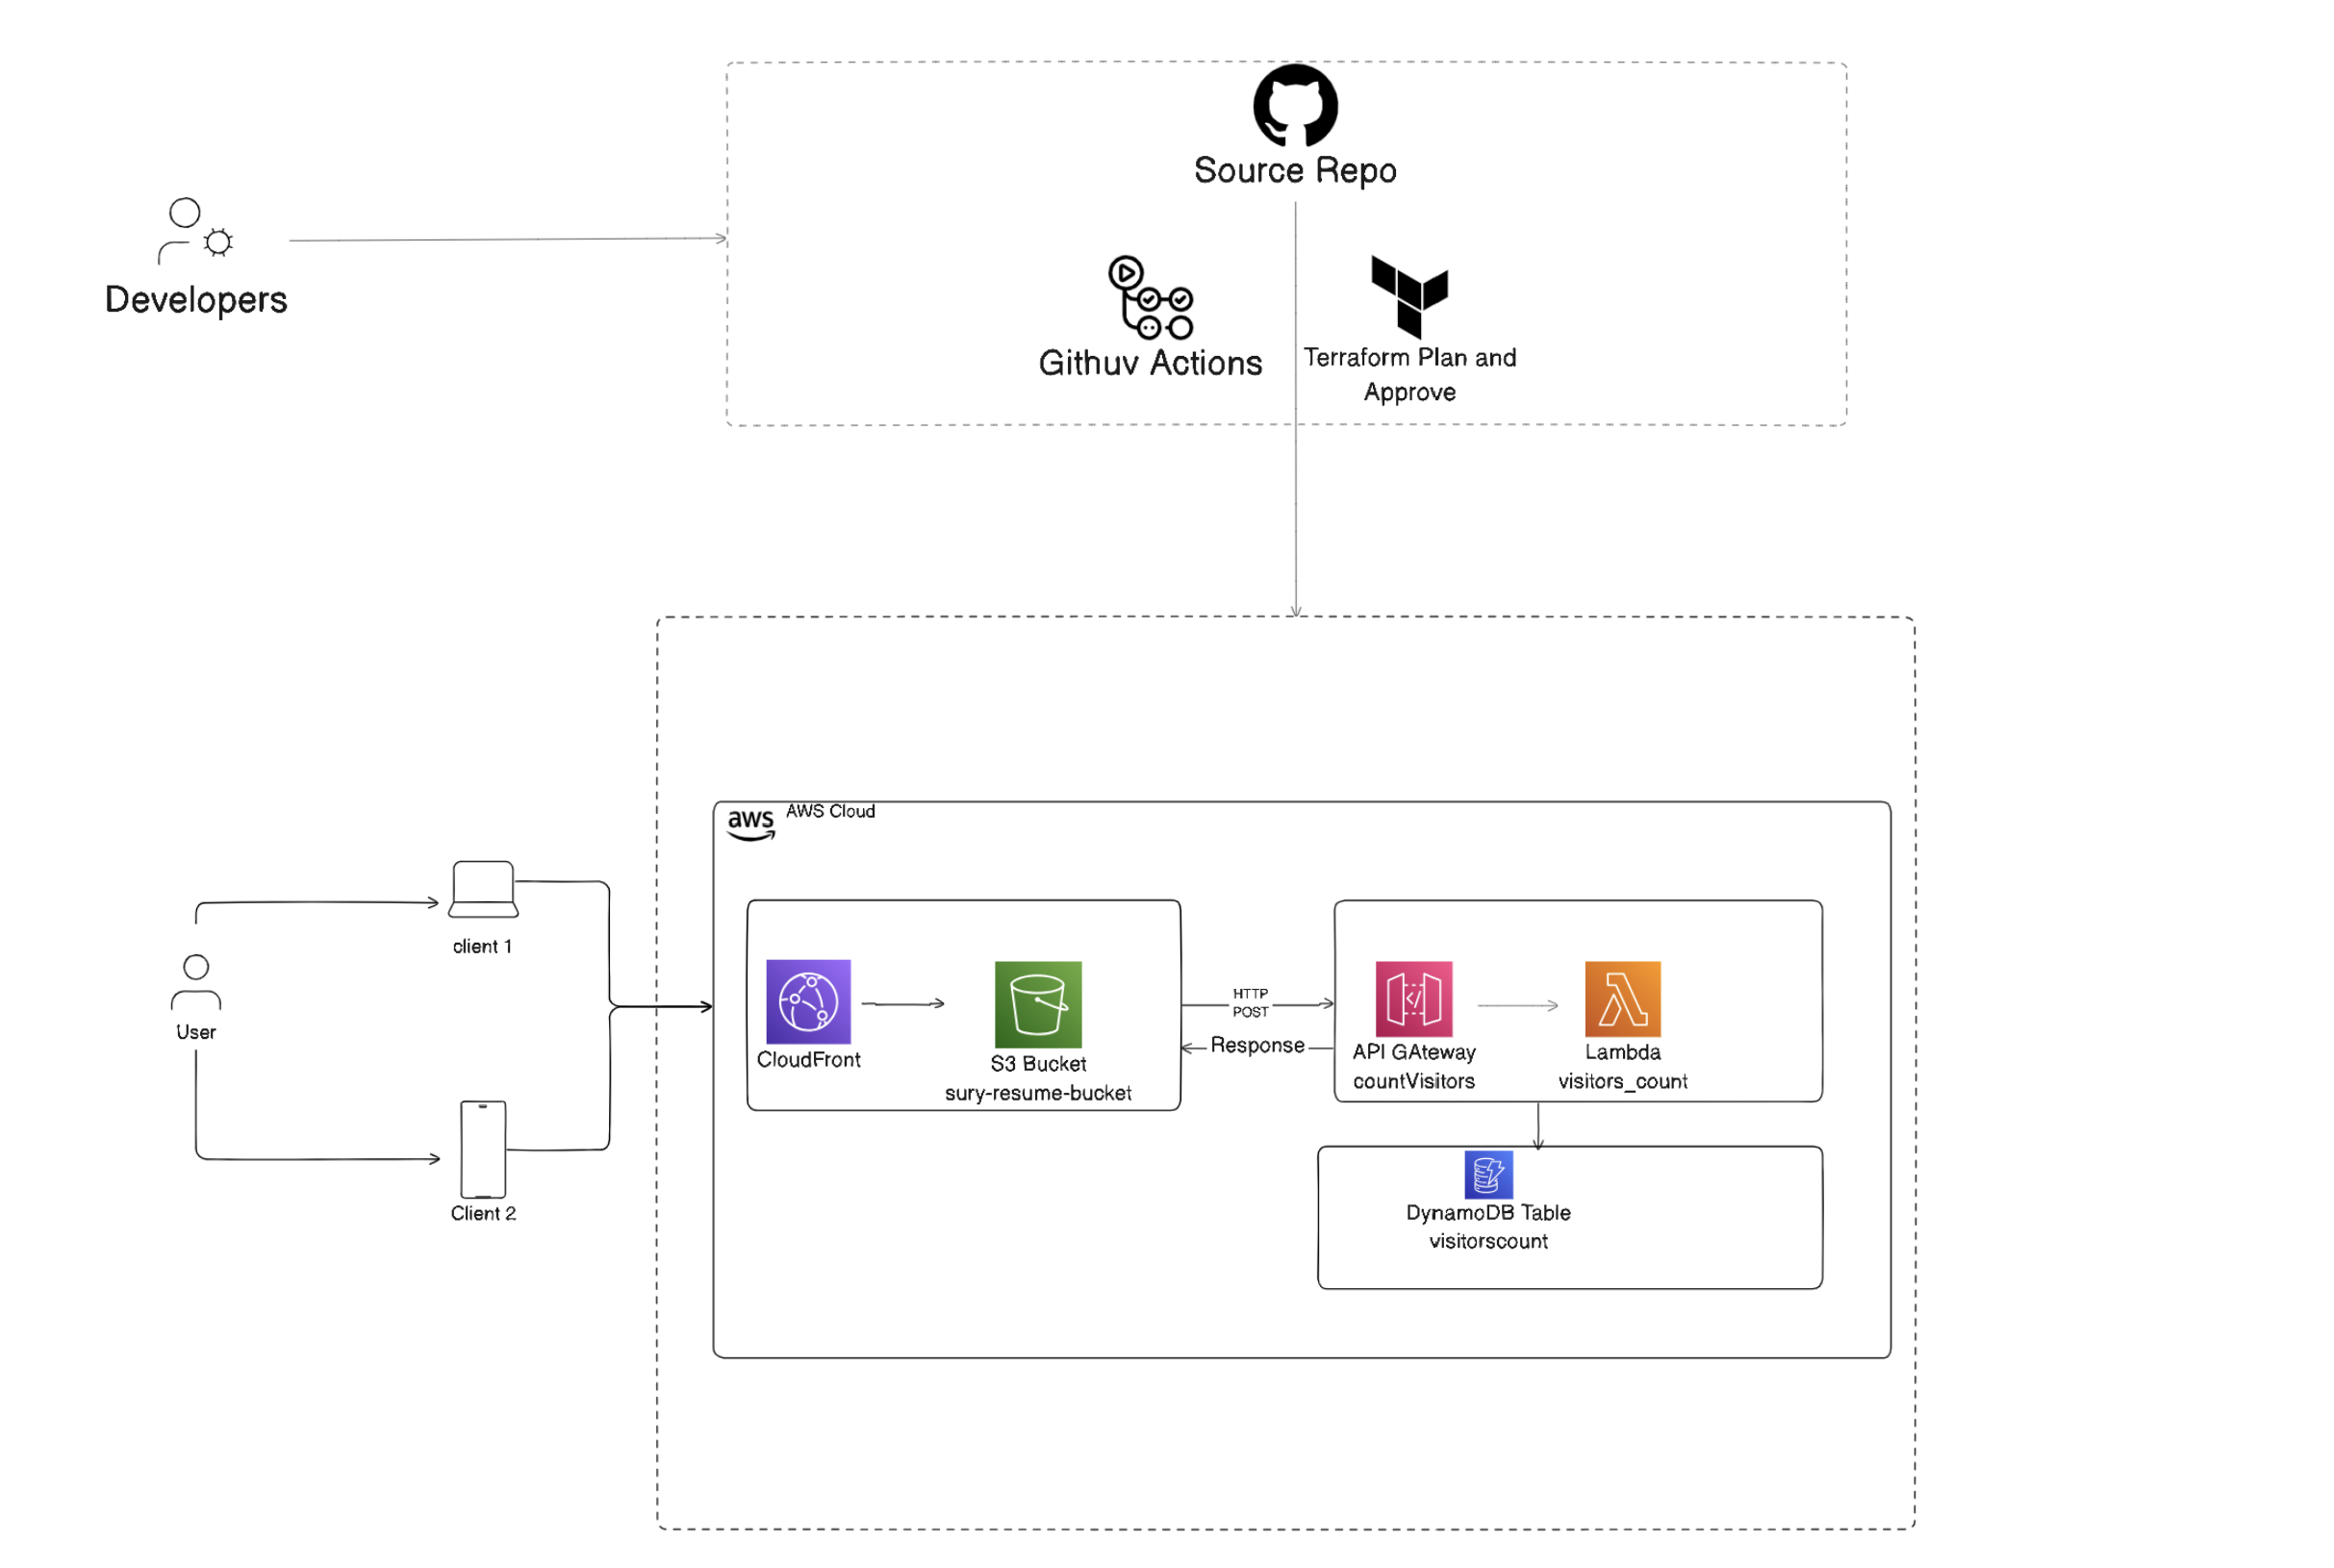
I’m excited to embark on a journey through the Cloud Resume Challenge, using AWS as my launchpad. This challenge is a fantastic way to gain practical AWS experience while building a unique and interactive resume that showcases my cloud skills to potential employers.
While my MultiCloud experience might be a work in progress, I see this as the perfect opportunity to bridge that gap. Additionally, the challenge provides a valuable platform to explore AWS security in a hands-on way before diving deeper into the specifics.
Throughout this blog, I’ll be documenting my experiences, from setting up the initial infrastructure to deploying a fully functional cloud resume website.
2. Step 1 -3: Creating the Frontend with HTML and CSS
I will keep these steps to the bare minimum. I have a rudimentary knowledge of HTML and CSS and mostly used online resources to build the front-end static page to create my resume.
3. Step 4: Static Website: Create S3 Bucket to host the Static Website
In this stage, we will establish a publicly accessible S3 bucket to host our website’s static content. We will then configure the bucket for static website hosting and designate the appropriate index file. Finally, we will upload all necessary website files and folders. This streamlined deployment process ensures the CI/CD pipeline can seamlessly deploy updates by replacing the website content within the S3 bucket.
The following Terraform configuration sets up an Amazon S3 bucket with various configurations and permissions. Here is a brief documentation of each section:
3.1. Create S3 Bucket:
Create an S3 bucket using the name specified in the var.s3_name variable.
resource "aws_s3_bucket" "sury-resume-bucket" {
  bucket = var.s3_name
}

3.2. Public Access Block: Configures the public access block settings for the bucket.
Here, it allows public ACLs and public policies, meaning the bucket can be accessed publicly.
resource "aws_s3_bucket_public_access_block" "example" {
  bucket = aws_s3_bucket.sury-resume-bucket.id

  block_public_acls       = false
  block_public_policy     = false
  ignore_public_acls      = false
  restrict_public_buckets = false
}

3.3. IAM Policy Document:
Creates an IAM policy document allowing read access to all objects in the bucket for any principal.
data "aws_iam_policy_document" "allow_read_access_from_all_account" {
  statement {
    sid    = "PublicReadGetObject"
    effect = "Allow"
    principals {
      type        = ""
      identifiers = [""]
    }

    actions = [
      "s3:GetObject"
    ]

    resources = [
      aws_s3_bucket.sury-resume-bucket.arn,
      "${aws_s3_bucket.sury-resume-bucket.arn}/",
    ]
  }
}
3.4. Bucket Policy:
Attaches the previously defined IAM policy document to the bucket, allowing public read access to all objects.
resource "aws_s3_bucket_policy" "allow_read_access_from_all_account" {
  bucket     = aws_s3_bucket.sury-resume-bucket.id
  policy     = data.aws_iam_policy_document.allow_read_access_from_all_account.json
  depends_on = [aws_s3_bucket_public_access_block.example]
}

3.5. Website Configuration:
Configures the S3 bucket as a website with index.html as the index document.
resource "aws_s3_bucket_website_configuration" "example" {
  bucket     = aws_s3_bucket.sury-resume-bucket.id
  depends_on = [aws_s3_object.object]

  index_document {
    suffix = "index.html"
  }
}

3.6. Upload Index.html Object:
Uploads the index.html file to the bucket.
resource "aws_s3_object" "object" {
  bucket       = "sury-resume-bucket"
  key          = "index.html"
  source       = "../index.html"
  content_type = "text/html"

  depends_on = [
    aws_s3_bucket.sury-resume-bucket,
    aws_s3_bucket_public_access_block.example
  ]
  etag = filemd5("../index.html")
}
3.7. Upload Image Files:
Uploads all files from the ../images directory to the images/ folder in the bucket.
resource "aws_s3_object" "test" {
  for_each = fileset("../images", ".")

  bucket = aws_s3_bucket.sury-resume-bucket.id
  key    = "images/${each.value}"
  source = "../images/${each.value}"
}
3.8. CORS Configuration:
Configures CORS settings for the bucket, allowing all headers, POST and GET methods, and access from any origin.
resource "aws_s3_bucket_cors_configuration" "allow_core" {
  bucket = aws_s3_bucket.sury-resume-bucket.id

  cors_rule {
    allowed_headers = [""]
    allowed_methods = ["POST", "GET"]
    allowed_origins = [""]
  }
  depends_on = [aws_s3_bucket.sury-resume-bucket]
}
This setup effectively creates an S3 bucket configured as a public website, uploads the necessary website files, and configures CORS and public access policies.

4. Step 5: Setting Up a CloudFront Distribution for Your S3 Bucket
I will describe how to set up an AWS CloudFront distribution using Terraform with an S3 bucket as the origin. This setup ensures that your static website hosted on S3 can benefit from CloudFront’s performance and security features.
In this blog post, we’ll walk through the process of setting up a CloudFront distribution for an S3 bucket. This setup allows you to serve your website content stored in the S3 bucket through the CloudFront content delivery network (CDN), providing faster delivery and better availability to your users.
4.1. Define Local Variables
First, we define local variables to simplify our configuration:
locals {
  s3_origin_id   = "${var.s3_name}-origin"
  s3_domain_name = "${var.s3_name}.s3-website.${var.region}.amazonaws.com"
}
s3_origin_id: A unique identifier for the S3 origin.s3_domain_name: The domain name of the S3 website endpoint. We will use the same s3 bucket we have created in the previous step.4.2. Configure the CloudFront Distribution
Next, we define the CloudFront distribution resource:
resource "aws_cloudfront_distribution" "this" {

enabled             = true
default_root_object = "index.html"
enabled: Enables the CloudFront distribution.default_root_object: Sets the default root object toindex.html.4.3. Define the Origin
We specify the S3 bucket as the origin for the CloudFront distribution:
origin {
  origin_id   = local.s3_origin_id
  domain_name = aws_s3_bucket.sury-resume-bucket.bucket_regional_domain_name
  custom_origin_config {
    http_port              = 80
    https_port             = 443
    origin_protocol_policy = "http-only"
    origin_ssl_protocols   = ["TLSv1"]
  }
}
origin_id: Uses the locals3_origin_id.domain_name: Uses the S3 bucket’s (created in Step #4) regional domain name.custom_origin_config: Configures the origin to use HTTP only.
4.4. Configure the Default Cache Behavior to redirect HTTP to HTTPS.
We configure the default cache behavior:
default_cache_behavior {

  target_origin_id = local.s3_origin_id
  allowed_methods  = ["GET", "HEAD"]
  cached_methods   = ["GET", "HEAD"]

  forwarded_values {
    query_string = true

    cookies {
      forward = "all"
    }
  }

  viewer_protocol_policy = "redirect-to-https"
  min_ttl                = 0
  default_ttl            = 0
  max_ttl                = 0
}
4.5. Set Restrictions
We define the restrictions for the distribution:
restrictions {
  geo_restriction {
    restriction_type = "none"
  }
}
restriction_type: No geographical restrictions.
4.6. Configure the Viewer Certificate
We’ll leverage CloudFront’s default certificate for viewers. As I am not creating a Route53 domain (mostly due to Amazon not verifying my account), I will skip the part of creating a custom SSL certificate and creating the necessary CName records.
viewer_certificate {
  cloudfront_default_certificate = true
}
4.7. Set the Price Class
We set the price class for the distribution:
price_class = "PriceClass_200"
}
price_class: Sets the price class to “PriceClass_200” to balance cost and performance.
The URL for the distribution can be found under the Domain name column. For example_ _d1iw3f2bekq5bl.cloudfront.net. Hopefully, you will see your static website by accessing this URL on your web browser.
5. Step 6: Add Javascript to fetch the visitor’s count.
In subsequent steps, we will create an API that returns the visitor’s count. We will create the javascript to update the resume static website with the value.
This JavaScript code fetches data from the specified visitor’s count API endpoint using a POST request and updates an HTML element with the retrieved value. When the page loads, the updateValue the function is called, which makes a fetch request to the apiUrl and expects a JSON response. If the response is successful, it parses the JSON, extracts the body content, and updates the HTML element identified by elementId with this content. If the request fails, it logs the error to the console and displays an error message in the HTML element. This setup allows dynamic updating of the webpage with data from the API. Add the script element just under <body> tag. Essentially for each page load, we will increase the counter by 1.
<script>
    const apiUrl = 'https://cp1m61sqid.execute-api.eu-central-1.amazonaws.com/prod/count'; // Visitors count API endpoint
    const elementId = 'api-value'; // HTML element to display API value

    async function updateValue() {
        try {
            const response = await fetch(apiUrl, {
                method: 'POST', // Use POST method
                mode: "cors"    // Allow cross-origin requests
            });
            if (!response.ok) {
                throw new Error(`API request failed with status ${response.status}`);
            }
            const data = await response.text(); // Parse response as text
            const jsonData = JSON.parse(data);  // Convert text to JSON
            const bodyElement = jsonData.body;  // Extract body content

            document.getElementById(elementId).textContent = bodyElement; // Update HTML element
        } catch (error) {
            console.error('Error fetching data:', error);
            document.getElementById(elementId).textContent = 'Error: API call failed.'; // Handle errors
        }
    }

    window.onload = function() {
        updateValue(); // Call function on page load
    };
</script>
6. Step 7: Create the DynamoDB Table Using Terraform
First, we’ll set up DynamoDB as our NoSQL database using Terraform. DynamoDB is a fully managed NoSQL database service that provides fast and predictable performance with seamless scalability. This database will serve the purpose of hosting the visitor’s count data.
resource "aws_dynamodb_table" "visitors_count" {
name         = "visitorscount"
billing_mode = "PAY_PER_REQUEST"
hash_key     = "id"

attribute {
  name = "id"
  type = "S"
}


}

7. Step 8: Build the API to return the visitors count with AWS Lambda.
7.1. Python Script to read the data from the AWS the dynamodb table
Before discussing the infrastructure and permission elements we need to build element, let’s discuss the Python script in the AWS Lambda function.
It increments a visitor count stored in a DynamoDB table. It first initializes the DynamoDB client and specifies the table name visitorscount, which we created in the previous step. The updated count is then converted to a string and printed. Next, the function updates the item in the DynamoDB table with the new count. Finally, the function returns a JSON response with a status code 200 and the updated count, including CORS headers to allow cross-origin requests.
import boto3
import json

def lambda_handler(event, context):
    dynamodb = boto3.client('dynamodb')
    table_name = 'visitorscount'  # Replace with your actual table name
    number_to_update_s = '0'


    # Scan the table to retrieve all items
    response = dynamodb.scan(TableName=table_name)

    # Fetch the item with partition key 'count' equal to '9'
    try:
        get_response = dynamodb.get_item(
            TableName=table_name,
            Key={
                'id': {'S': '1'}  # Assuming 'count' is a numeric attribute
            }
        )
        item = get_response.get('Item')
        if item:
            itemcount = int(item['count']['S'])
            number_to_update = itemcount + 1
            number_to_update_s = str(number_to_update)
            print(f"Item retrieved: {number_to_update}")
        else:
            print("Item not found.")
    except Exception as e:
        print(f"Error fetching item: {e}")

    #return "GetItem operation completed."


    # Update the item in DynamoDB
    item = {
    'id': {'S': '1'},  # Replace 'your_id_value' with the actual ID value
    'count': {'S': number_to_update_s}  # Replace 'other_value' with the actual attribute value
}
    response = dynamodb.put_item(
    TableName=table_name,
    Item=item
)


    return {
        'statusCode': 200,
        'headers': {

            'Access-Control-Allow-Origin': '',

        },
        'body': json.dumps(f"{number_to_update_s}")

    }
This Terraform configuration sets up an AWS IAM policy document (aws_iam_policy_document.assume_role) that allows the AWS Lambda service (lambda.amazonaws.com) to assume a role (sts:AssumeRole). This policy is then attached to an IAM role (aws_iam_role.iam_for_lambda) named “iam_for_lambda”, specifying that Lambda functions can assume this role.
data "aws_iam_policy_document" "assume_role" {
  statement {
    effect = "Allow"

    principals {
      type        = "Service"
      identifiers = ["lambda.amazonaws.com"]
    }

    actions = ["sts:AssumeRole"]
  }
}

resource "aws_iam_role" "iam_for_lambda" {
  name               = "iam_for_lambda"
  assume_role_policy = data.aws_iam_policy_document.assume_role.json
}
Now it is time for creating the Lambda Function. This policy is then attached to an IAM role (aws_iam_role.iam_for_lambda) named “iam_for_lambda”, specifying that Lambda functions can assume this role. The configuration also defines an AWS Lambda function (aws_lambda_function.test_lambda) named “test_lambda” with its deployment package specified as “index.zip”.
AWS Lambda function (aws_lambda_function.test_lambda) named “test_lambda” with its deployment package specified as “index.zip”.We use the source code described previously to create the zip.
data "archive_file" "lambda_package" {
  type        = "zip"
  source_file = "index.py"
  output_path = "index.zip"
}
It assigns the IAM role iam_for_lambda to this Lambda function, sets its runtime environment to Python 3.12, specifies the entry point handler as index.lambda_handler, and includes a source code hash for validation.
resource "aws_lambda_function" "test_lambda" {
filename         = "index.zip"
function_name    = var.lambda_function_name
role             = aws_iam_role.iam_for_lambda.arn
runtime          = "python3.12"
handler          = "index.lambda_handler"
source_code_hash = data.archive_file.lambda_package.output_base64sha256


}
Now it is time to add permission for the DynamoDB table we have created in the previous step to the lambda function to read and update data.
data "aws_iam_policy_document" "lambda_dynamodb" {
  statement {
    effect = "Allow"

    actions = [

      "dynamodb:PutItem",

      "dynamodb:GetItem",
      "dynamodb:Scan"
    ]

    resources = [aws_dynamodb_table.visitors_count.arn]
  }
}

resource "aws_iam_policy" "lambda_dynamodb" {
  name        = "lambda_dynamodb"
  path        = "/"
  description = "IAM policy for managing dynamodb items"
  policy      = data.aws_iam_policy_document.lambda_dynamodb.json
}

resource "aws_iam_role_policy_attachment" "lambda_dynamodb" {
  role       = aws_iam_role.iam_for_lambda.name
  policy_arn = aws_iam_policy.lambda_dynamodb.arn
}
Now it is time to build the API Gateway to invoke the lambda function.
8. Step 9: Create the API Gateway to integrate with AWS Lambda.
Here, we’re setting up an API Gateway endpoint and establishing a root resource within it. Once deployed, this setup enables access to the endpoint at “
Each API Gateway resource incorporates four key elements: Method request, Integration Request, Integration Response, and Method Response. These elements play crucial roles in handling incoming requests and managing outgoing responses with diverse processing capabilities.
resource "aws_api_gateway_rest_api" "countVisitors" {
  name        = "countVisitors"
  description = "My API Gateway to CountVisitors"

  endpoint_configuration {
    types = ["EDGE"]
  }
}

resource "aws_api_gateway_resource" "root" {
  rest_api_id = aws_api_gateway_rest_api.countVisitors.id
  parent_id   = aws_api_gateway_rest_api.countVisitors.root_resource_id
  path_part   = "count"
}
We write the Terraform configuration below to add a POST method on our API Gateway resource.
resource "aws_api_gateway_method" "proxy" {
  rest_api_id   = aws_api_gateway_rest_api.countVisitors.id
  resource_id   = aws_api_gateway_resource.root.id
  http_method   = "POST"
  authorization = "NONE"
}
In the following step, let’s integrate the Lambda function created previously with the API Gateway so that the incoming requests on the API Gateway are passed to the Lambda function.
To specify the service responsible for triggering this Lambda function, provide its ARN in the “URI” attribute in the same resource.
resource "aws_api_gateway_integration" "lambda_integration" {
  rest_api_id             = aws_api_gateway_rest_api.countVisitors.id
  resource_id             = aws_api_gateway_resource.root.id
  http_method             = aws_api_gateway_method.proxy.http_method
  integration_http_method = "POST"
  type                    = "AWS"
  uri                     = aws_lambda_function.test_lambda.invoke_arn
}
We need to add the method_response and integration_response resource for processing incoming requests and outgoing responses in various ways. API Gateway throws a CORS error if not explicitly set. To avoid the same, in this step, we enable CORS headers in the method response and integration response of our API Gateway.
resource "aws_api_gateway_method_response" "proxy" {
  rest_api_id = aws_api_gateway_rest_api.countVisitors.id
  resource_id = aws_api_gateway_resource.root.id
  http_method = aws_api_gateway_method.proxy.http_method
  status_code = "200"
  //cors section
  response_parameters = {
    "method.response.header.Access-Control-Allow-Headers" = true,
    "method.response.header.Access-Control-Allow-Methods" = true,
    "method.response.header.Access-Control-Allow-Origin"  = true
  }
}

resource "aws_api_gateway_integration_response" "proxy" {
  rest_api_id = aws_api_gateway_rest_api.countVisitors.id
  resource_id = aws_api_gateway_resource.root.id
  http_method = aws_api_gateway_method.proxy.http_method
  status_code = aws_api_gateway_method_response.proxy.status_code


  //cors
  response_parameters = {
    "method.response.header.Access-Control-Allow-Headers" = "'Content-Type,X-Amz-Date,Authorization,X-Api-Key,X-Amz-Security-Token'",
    "method.response.header.Access-Control-Allow-Methods" = "'GET,OPTIONS,POST,PUT'",
    "method.response.header.Access-Control-Allow-Origin"  = "''"
  }

  depends_on = [
    aws_api_gateway_method.proxy,
    aws_api_gateway_integration.lambda_integration
  ]
}
Now we will need to add the OPTIONS method to allow CORS preflight requests.
esource "aws_api_gateway_method" "options" {
  rest_api_id = aws_api_gateway_rest_api.countVisitors.id
  resource_id = aws_api_gateway_resource.root.id
  http_method = "OPTIONS"
  #   authorization = "NONE"

  authorization = "NONE"
}

resource "aws_api_gateway_integration" "options_integration" {
  rest_api_id             = aws_api_gateway_rest_api.countVisitors.id
  resource_id             = aws_api_gateway_resource.root.id
  http_method             = aws_api_gateway_method.options.http_method
  integration_http_method = "OPTIONS"
  type                    = "MOCK"
  request_templates = {
    "application/json" = "{\"statusCode\": 200}"
  }
}

resource "aws_api_gateway_method_response" "options_response" {
  rest_api_id = aws_api_gateway_rest_api.countVisitors.id
  resource_id = aws_api_gateway_resource.root.id
  http_method = aws_api_gateway_method.options.http_method
  status_code = "200"

  response_parameters = {
    "method.response.header.Access-Control-Allow-Headers" = true,
    "method.response.header.Access-Control-Allow-Methods" = true,
    "method.response.header.Access-Control-Allow-Origin"  = true
  }
}

resource "aws_api_gateway_integration_response" "options_integration_response" {
  rest_api_id = aws_api_gateway_rest_api.countVisitors.id
  resource_id = aws_api_gateway_resource.root.id
  http_method = aws_api_gateway_method.options.http_method
  status_code = aws_api_gateway_method_response.options_response.status_code

  response_parameters = {
    "method.response.header.Access-Control-Allow-Headers" = "'Content-Type,X-Amz-Date,Authorization,X-Api-Key,X-Amz-Security-Token'",
    "method.response.header.Access-Control-Allow-Methods" = "'GET,OPTIONS,POST,PUT'",
    "method.response.header.Access-Control-Allow-Origin"  = "''"
  }

  depends_on = [
    aws_api_gateway_method.options,
    aws_api_gateway_integration.options_integration,
  ]
}
Every time the API Gateway configuration changes, we have to explicitly deploy the same on a stage of our choice. Thus we add the configuration block below to let Terraform perform this step.
resource "aws_api_gateway_deployment" "deployment" {
  depends_on = [
    aws_api_gateway_integration.lambda_integration,
    aws_api_gateway_integration.options_integration, # Add this line
  ]

  rest_api_id = aws_api_gateway_rest_api.countVisitors.id
  stage_name  = "prod"
}
We need to add an appropriate policy to the lambda function.
We attach the AWSLambdaBasicExecutionRole to the IAM role we created in Step 9.
Next, we allocate permissions to the Lambda function to “AllowExecutionFromAPIGateway”.
resource "aws_iam_role_policy_attachment" "lambda_basic" {
  policy_arn = "arn:aws:iam::aws:policy/service-role/AWSLambdaBasicExecutionRole"
  role       = aws_iam_role.iam_for_lambda.name
}

resource "aws_lambda_permission" "apigw_lambda" {
  statement_id  = "AllowExecutionFromAPIGateway"
  action        = "lambda:InvokeFunction"
  function_name = aws_lambda_function.test_lambda.function_name
  principal     = "apigateway.amazonaws.com"

  source_arn = "${aws_api_gateway_rest_api.countVisitors.execution_arn}///"
}
This is all the infrastructure element we need. Now we will need to build CI/CD blocks to deploy the website.
Once the deployment is completed we can see Lambda Function is successfully integrated with the API Gateway.

9. Step 10: Create the GitHub Actions workflow.
Now we take an exception from the original AWSResumeChallenge.
We build two pipelines, one to deploy the complete infrastructure element and the other to destroy the entire block so that we can build and rebuild.


We will also have to run the pipeline twice for the complete deployment.
First time we will run the pipeline to deploy all the resources retrieve the URL for our API and update the index.html code. The pipeline Terraform Infrastructure Change Management Pipeline with GitHub Actions will get triggered automatically after each deployment.


We can access the website by the URL from the CloudFront domain name column.


We can see from the network tab in developer tools, that our newly created API is invoked to get the visitors count.


Our static website is updated with the data received from the API.
